

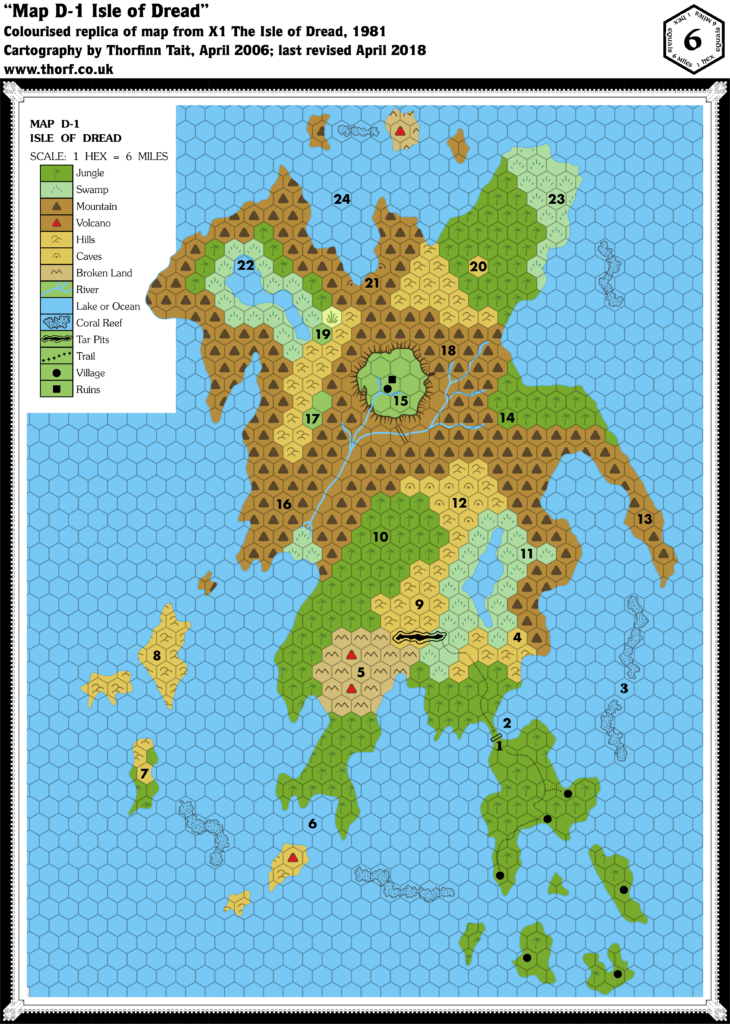
Wilderness Wandering Monster Table 1
When rolling for a wilderness wandering monster on the Isle of Dread, consult the table below:
- 01-02: Dryad (1-6 appearing)
- 03-05: Ghoul (1-6 appearing)
- 06-29:Humans (2-12 appearing)
- Note: These humans will most likely be the natives who live on the island. Refer to page 18 of the module for details on creating native encounters.
- 30-32: Killer Bee (2-8 appearing)
- Living Statues (When rolled, there’s a 50% chance they are living statues, and a 50% chance they are normal, inanimate statues):
- 33: Living Crystal Statue (1-6 appearing)
- 34-35: Living Iron Statue (1-4 appearing)
- 36: Living Rock Statue (1-3 appearing)
- Lizards, Giant:
- 37-40: Gecko (1-6 appearing)
- 41-43: Draco (1-4 appearing)
- 44-45: Horned Chameleon (1-3 appearing)
- 46: Tuatara (1-2 appearing)
- Lycanthropes:
- 47: Wererat (1-8 appearing)
- 48: Werewolf (1-6 appearing)
- 49: Wereboar (1-4 appearing)
- 50: Weretiger (1-3 appearing)
- 51: Werebear (1-2 appearing)
- 52: Mummy (1-3 appearing)
- 53-58: Rat, Giant (2-20 appearing)
- 59-60: Rhagodessa (1-4 appearing)
- 61-62: Robber Fly (2-8 appearing)
- 63-64: Scorpion, Giant (1-2 appearing)
- 65-69: Skeleton (4-16 appearing)
- Snakes:
- 70-71: Spitting Cobra (1-6 appearing)
- 72-73: Pit Viper (1-8 appearing)
- 74: Giant Rattlesnake (1-4 appearing)
- 75-77: Rock Python (1-3 appearing)
- Spiders, Giant:
- 78-79: Crab Spider (1-4 appearing)
- 80-82: Black Widow Spider (1-3 appearing)
- 83-84: Tarantella (1-3 appearing)
- 85-88: Toad, Giant (1-4 appearing)
- 89: Treant (1-2 appearing)
- 90: Wight (1-4 appearing)
- 91: Wraith (1-3 appearing)
- 92-00:Zombie (2-12 appearing)
- Note: Zombies will attack strangers on sight, unless the individual resembles a native. Zombies will only attack natives when explicitly commanded to do so by their master.
Wilderness Wandering Monster Table #2
When rolling for a wilderness wandering monster on the Isle of Dread, consult the table below:
- 01-03:Araneat (1-6 appearing)
- Note: This is a new monster. See its description at the end of the module.
- 04-08: Cave Bear (1-4 appearing)
- 09-10: Centaur (1-6 appearing)
- 11: Cyclops (1 appearing)
- 12-17: Dire Wolf (1-6 appearing)
- 18:Dragon, Black (1 appearing)
- Note: This dragon will be no older than average age.
- 19:Dragon, Green (1 appearing)
- Note: This dragon will be no older than average age.
- 20:Dragon, Red (1 appearing)
- Note: This will be a young red dragon only, with 7 or 8 HD.
- 21-22: Dryad (1-6 appearing)
- 23-27:Elk, Giant (1-3 appearing)
- Note: This is a new monster. See its description at the end of the module.
- 28-33:Grangerit (1 appearing)
- Note: This is a new monster. See its description at the end of the module.
- 34-38: Hydra, 5 heads (1 appearing)
- 39-43: Lizard Man (2-8 appearing)
- 44-49: Mastodon (1 appearing)
- 50-54:Megatherium (1 appearing)
- Note: This is a new monster. See its description at the end of the module.
- 55-60: Neanderthal (2-8 appearing)
- 61-65:Phanaton (4-16 appearing)
- Note: This is a new monster. See its description at the end of the module.
- 66-71:Phororhacos (1-6 appearing)
- Note: This is a new monster. See its description at the end of the module.
- 72-75:Rakasta (1-2 appearing, potentially with Sabre Tooth Tiger)
- Note: This is a new monster. See its description at the end of the module.
- 76-77: Roc (1-2 appearing)
- 78-82: Rock Baboon (2-8 appearing)
- 83-86: Sabre Tooth Tiger (1-2 appearing)
- 87-92: Titanothere (1 appearing)
- 93: Treant (1 appearing)
- 94-95: Troll (1-3 appearing)
- 96: Wyvern (1-2 appearing)
- 97-00: Zombie (2-12 appearing)
Wilderness Wandering Monster Table #3
When rolling for a wilderness wandering monster on the Isle of Dread, consult the table below:
- 01-06:Allosaurus (1 appearing)
- Note: This is a new monster. See its description at the end of the module.
- 07-14:Ankylosaurus (1 appearing)
- Note: This is a new monster. See its description at the end of the module.
- 15-21: Brontosaurus (1 appearing)
- 22-26: Crocodile, Giant (1 appearing)
- 27-34:Dimetrodon (1 appearing)
- Note: This is a new monster. See its description at the end of the module.
- 35:Dragon, Black (1 appearing)
- Note: This dragon will be no older than average size.
- 36:Dragon, Green (1 appearing)
- Note: This dragon will be no older than average size.
- 37:Dragon, Red (1 appearing)
- Note: This will be a young red dragon only, with 7 or 8 HD.
- 38-40: Dryad (1-6 appearing)
- 41-42: Giant, Hill (1 appearing)
- 43-44: Giant, Stone (1 appearing)
- 45-47: Hydra, 5 heads (1 appearing)
- 48-53:Plesiosaurus (1 appearing)
- Note: This is a new monster. See its description at the end of the module.
- 54-61: Pteranodon (1-3 appearing)
- 62-64: Roc (1-2 appearing)
- 65-71: Stegosaurus (1 appearing)
- 72-79:Trachodon (1 appearing)
- Note: This is a new monster. See its description at the end of the module.
- 80-82: Treant (1-2 appearing)
- 83-89: Triceratops (1 appearing)
- 90-94: Tyrannosaurus Rex (1 appearing)
- 95-97: Wyvern (1-2 appearing)
- 98-00: Zombie (2-12 appearing)
Key to the Main Island Encounter Areas
1. The Village of Tanaroa
What the GM can reveal immediately:
- You stand at the edge of a clearing, where the Village of Tanaroa sits, just south of a towering 50-foot high stone wall.
- This wall, built of huge stone blocks, stretches for two miles across a narrow strip of land, punctuated by 28 square towers (100 feet per side, 70 feet tall).
- In the center of the wall are massive wooden gates, 40 feet wide and tall, and five feet thick.
- A cleared trail leads south from the village, winds through it, and passes through these gates into the jungle beyond.
- The village itself consists of four roughly circular groups of huts, made of wood with interwoven palm-leaf roofs, raised 10 feet off the ground on wooden stilts. Each hut is about 50 feet long and 20 feet wide.
- Each group of huts faces a central graveyard, with the huts’ backs to the encircling path.
- In the center of the village is a flat-topped, artificially leveled hill, crowned by a 10-foot tall, stone-faced earthen pyramid with a huge alarm gong. A 300-foot square, 3-foot high earthen wall surrounds the pyramid.
- Between the clan sites and the central hill, the path encircles village gardens and animal pens for pigs, chickens, and goats.
- Beyond the village, towards the Great Wall, there’s a second line of defense: pits 20-30 feet deep filled with 5-10 feet of tar.
- Huts used by warriors garrisoning the Great Wall stand at the base of the towers.
- The area between the village and the Great Wall is cleared of trees and brush.
What players need to investigate:
- Clan Totems: Each group of huts represents a clan (Elk Clan to the south, Hawk Clan to the west, Tiger Clan to the north, Sea Turtle Clan to the east). A large wooden statue of the clan’s totem animal stands in the middle of each graveyard.
- Village Leadership: This is a matriarchal society; the village chief is a woman. Descent and inheritance are traced through the mother’s side. Each clan has a male leader, and the village elects a special official to advise the chief and lead in war.
- The Cult of the Walking Dead: There’s also a Village Zombie Master (or Mistress), a cleric or magic-user of at least 5th level, who heads a secret society whose members (except the leader) wear hooded masks during ceremonies where “Walking Ancestors” (zombies) are created. Villagers generally shun and fear these zombies.
- Great Wall Garrison: Each tower on the Great Wall is garrisoned by seven warriors from one clan, totaling 196 warriors.
- Trade Opportunities: The council of chiefs is interested in trading with the mainland.
- If the party has trade goods, they will receive a +2 bonus on reaction rolls and can sell their goods for 100% profit, up to a 5000 gp limit.
- Characters will receive experience points equal to the value in gold pieces of goods sold for opening this new trade route (only for the initial visit).
- Available Equipment: Most standard equipment is available at standard prices, except: battle axes, crossbows & quarrels, pole arms, two-handed swords, lances, chain and plate armor, all transport animals and related objects (like barding or animal-drawn carts). Only canoes, sailing boats, and rafts are available for water transport.
- Guides and Bearers:
- The party can hire a guide to the tar pits (5 gp per adventure), who will show safe crossing points.
- They can hire 2-12 bearers to carry supplies (1 gp each per adventure).
- Neither guides nor bearers will leave the path or go beyond the tar pits without a guard force of at least 30 fighters. Natives will not hire out as warriors.
Monster:
- Varies by encounter: The village contains its local population of human warriors, leaders, and possibly the Zombie Master and their creations. No specific monster encounter is guaranteed on entry, but the village’s defenses and social structure imply potential conflict or negotiation.
Treasure & Location:
- Trade Goods Profit: The primary “treasure” opportunity is the profit from trade goods if the party engages in commerce, up to 5000 gp worth of value.
- Experience Points: Awarded for opening the trade route.
- No specific hidden static treasure is mentioned within the village itself, beyond the economic opportunity.
2. Jaws from the Deep
What the GM can reveal immediately:
- This location features wide, white sand beaches and seemingly placid waters in a bay.
What players need to investigate:
- Hidden Danger: Swimming just out of sight are five Bull Sharks.
- Attack Trigger: These sharks will attack anyone who moves more than 20 feet into the bay.
- Reinforcements: If blood is drawn by either side, there is a 75% chance that five more sharks will be attracted by the scent, arriving in 8 rounds. They will prioritize attacking wounded creatures.
Monster:
- 5 Bull Sharks (AC 4, HD 2, hp 15, 10, 10, 7, 6, #AT 1, D 2-8, MV 180′ (60′), Save F1, ML 7, AL N).
- Potential Reinforcements: 5 additional Bull Sharks if blood is drawn.
Treasure & Location:
- None.
3. Lair of the Sea Snakes
What the GM can reveal immediately:
- You observe broad coral reefs in this area.
- Hundreds of large oysters cover the sea bottom, under 20 feet of water.
What players need to investigate:
- Pearl Harvesting: If the party gathers oysters, they will discover a pearl worth 100 gp in each.
- Daily Yield: Each day the party dives for pearls, they will find 1-4 (1d4) pearls, each worth 100 gp.
- Sea Snake Attacks: Every day the party dives for pearls (including the first dive), they will be attacked by 1-4 Sea Snakes.
- Limited Supply: The pearls will run out after 14 days of diving.
Monster:
- 1-4 Sea Snakes (AC 6, HD 2, hp 9, 8, 7, 6, #AT 1, D 1 plus poison, MV 90′ (30′), Save F1, ML 7, AL N). The number of sea snakes encountered is unlimited, as they will continually be drawn to the area.
Treasure & Location:
- Pearls: Each pearl found is worth 100 gp. Up to 14 days of diving will yield 1d4 pearls per day.
4. Random Encounter
What the GM can reveal immediately:
- There’s nothing specific to see or interact with at this exact location, but the surrounding area is part of a larger wilderness.
What players need to investigate:
- Wandering Monster Chance: For every day the party spends within two hexes of this location, they will encounter one wandering monster from Chart 2.
- Lair Proximity: If possible, this encounter should occur in or near the monster’s lair.
Monster:
- Determined by a roll on Chart 2 (Wandering Monster Chart).
Treasure & Location:
- Varies: Any treasure will be associated with the specific wandering monster encountered and its lair.
5. Caves of the Rock Baboons
What the GM can reveal immediately:
- You are drawn to a crumbling stone cliff by the noise of many loud hoots, grunts, and shrieks.
- The sounds emanate from a 6-foot high cave opening in the rock wall.
- A foul stench wafts out of the dark opening, and all you can see is a tunnel leading back into darkness.
What players need to investigate:
- Baboon Tribe: This cavern complex is home to a tribe of 15 Rock Baboons.
- Cavern Layout: The DM will use General Cave Lair #1, #2, or a custom design for the complex.
- Baboon Distribution: Each cave chamber will contain 1-4 baboons, with the remainder of the tribe and the leader found in the hearth-treasure room.
- Cave Conditions: None of the chambers have furniture or fire pits. Instead, large amounts of trash and dung are piled in the corners of each room, and fruit rinds and bones litter the floor.
Monster:
- 15 Rock Baboons (AC 6, HD 2, hp 14 each, leader 16, #AT 2, D 1-6/1-3, MV (40′), Save F2, ML 8, AL N).
Treasure & Location:
- Hidden Treasure: In a pile of gnawed bones in one corner of the hearth-treasure room, among miscellaneous debris, are a gold bracelet worth 700 gp and a silver-and-amethyst necklace worth 1300 gp. Both pieces are somewhat tarnished but in good shape.
6. Lair of the Giant Squid
What the GM can reveal immediately:
- You are in an area of open water.
What players need to investigate:
- Hunting Ground: This area is the hunting ground of an ancient Giant Squid.
- Attack Chance: There is a 50% chance that the squid will attack any ship passing through this hex.
- Attack Methods:
- 25% chance: The squid will wrap its two long tentacles around the ship, doing 1-10 points of hull damage. Its beak then inflicts 2 points of damage per round after grappling.
- 75% chance: The squid will try to drag characters on deck into the water and down to its cavern lair.
- Squid Lair: The squid lives in a rocky cave located 35 feet beneath the water’s surface.
- Lair Contents: Within the flooded lair are piles of bleached bones and miscellaneous trash, including old swords, boots, waterlogged clothing, and an opaque bottle.
Monster:
- 1 Ancient Giant Squid (AC 7, HD 6, hp 37, #AT 9, D 8x 1-4, 1-10, plus special, MV 120′ (40′), Save F3, ML 6, AL N).
Treasure & Location:
- Within the flooded lair: An opaque bottle containing a Potion of Heroism. Other miscellaneous trash and bones are found here but are likely worthless.
7. Pirate’s Camp (Map E-4)
What the GM can reveal immediately:
- You’ve discovered a hidden base camp. The air here carries the scent of salt, woodsmoke, and unwashed bodies.
- The camp is surrounded by a wall of thorn bushes, weighted down with rocks, about 5 feet tall and 3 feet wide.
- You see three 20-foot tall lookout towers interspersed around the camp.
- There are several grass huts with conical thatched roofs.
- There’s also a noticeable cave entrance within the camp.
- Beached on the shore, you can see at least some 20-foot long outrigger canoes with collapsible masts.
What players need to investigate:
- Pirate Activity: This is a base camp for pirates who raid coastal villages for slaves. They operate with 41 pirates in total, who might be present in the camp or out raiding.
- Leader: An F4 with 29 hp, AC 5, ML 10, armed with an ornate two-handed sword, chain mail, and a ring of water walking. He holds the key to the iron box in P4.
- 6 Pirates: F1 with 5 hp, AC 5, ML 7, wearing chain mail and armed with cutlasses.
- 20 Pirates: F1 with 5 hp, AC 7, ML 7, wearing leather armor and armed with cutlasses.
- 14 Pirates: F1 with 5 hp, AC 7, ML 7, wearing leather armor, armed with crossbows and cutlasses.
- At Sea vs. In Camp: When raiding, 7-8 pirates (including the leader if he chooses) will be in each of the four canoes. The remaining pirates will be guarding the camp.
- Camp Defenses (P1. Towers): Each of the three lookout towers can hold up to 4 pirates. There will always be at least one lookout in each tower (the DM may roll 1d4 for the exact number).
- Boats (P2. The Boats): The outriggers will be beached here unless pirates are raiding. When ashore, paddles and sails are stored in different huts to prevent theft.
- Huts (P3. The Huts):
- The hut marked “L” is the leader’s hut, containing a locked wooden cabinet where the outrigger sails are stored.
- The hut marked “S” is the supply hut, containing paddles, ropes, tools, buckets of tar, food, spare weapons, and other supplies.
- Huts marked “C” each contain 3-12 (3d4) captives, shackled to iron weights to prevent escape.
- Unmarked huts each house 4 pirates.
- The Cave (P4. The Cave):
- There will always be 2-8 (2d4) pirates guarding the cave.
- The pirate treasure is located here, kept in a large iron box cemented into the wall.
- The box is locked, and the leader holds the only key.
- Trap: If the box is forced open (not picked), a secret compartment in its side will slide open, releasing a deadly Pit Viper (AC 6, HD 1, hp 5, #AT 1, D 1-4 plus poison, MV 90′ (30′), Save F1, ML 7, AL N).
- Escape Tunnel (P5. The Escape Tunnel): Behind a hidden exit (treat as a secret door) in the cave, a 4-foot wide escape tunnel winds for 500 feet through the hill, exiting into a series of natural caverns. These caverns will be underwater at high tide (20% chance).
- The Wall (P6. The Wall): The thorn bush wall is 5 feet tall and 3 feet wide, designed to keep out all but the largest animals.
Monster:
- 41 Pirates (as detailed above, distributed between camp guard and raiding parties).
- Pit Viper (released from the treasure box).
- Captives: Not monsters, but their presence adds a moral and tactical dimension to the encounter.
Treasure & Location:
- Leader’s Gear: Ornate two-handed sword, chain mail, ring of water walking, key to iron box in P4.
- Other Pirates’ Gear: Cutlasses, chain mail (6 pirates), leather armor (34 pirates), crossbows (14 pirates).
- Leader’s Hut (Hut L): Locked wooden cabinet with outrigger sails (no gp value, but useful for travel).
- Supply Hut (Hut S): Paddles, ropes, tools, buckets of tar, food, spare weapons, other supplies (practical utility, limited gp value).
- Cave (P4. The Cave – Iron Box):
- 2000 cp
- 3000 sp
- 4000 ep
- 17 gems worth 1300 gp total
- Magic-user/Elf Scroll (Shield)
- Sword +1 (AL N, 18, E9, Detect Metal, Levitate for three turns per use, up to three times per day).
8. Hippogriff Nest
What the GM can reveal immediately:
- You observe the tallest hill on this island, with an obvious nest atop it.
- You can also see numerous wild sheep grazing on the surrounding hills.
What players need to investigate:
- Hippogriff Lair: A nest of five Hippogriffs resides here.
- Territorial Behavior: These creatures prey on the wild sheep. They will attack anyone climbing the hill within a half-mile of their nest, as they defend their territory.
Monster:
- 5 Hippogriffs (AC 5, HD 3+1, hp 21, 20, 16, 14, 10, #AT 3, D 1-6/1-6/1-10, MV 180′ (60′), flying 360′ (120′), Save F2, ML 8, AL L).
Treasure & Location:
- Hippogriff Nest: Any treasure will be what the hippogriffs have brought back to their nest, likely small, shiny trinkets or remnants of past victims. The module doesn’t specify any static treasure here, leaving it to the DM.
9. Rakasta Camp (Map E-5)
What the GM can reveal immediately:
- You discover a temporary camp in this hex, with large tents.
- You see figures that appear to be feline humanoids, walking erect but with cat-like heads and tawny fur. They appear fierce.
What players need to investigate:
- Rakasta Tribe: This is a tribe of nomadic feline humanoids called Rakasta. They are proud and barbaric, favoring metal “war claws” over their natural claws.
- Tents (R1): These Rakasta tents each house 1-4 Rakasta. Specifically:
- Upper left tent (clockwise): 4 Rakasta (one is a sabre-tooth tiger rider).
- Next tent: 2 Rakasta.
- Next tent: 3 Rakasta (one is a sabre-tooth tiger rider).
- Next tent: 3 Rakasta.
- Next tent: 4 Rakasta (one is a sabre-tooth tiger rider).
- Last tent: 3 Rakasta.
- Warrior Composition: The camp contains 16 normal warriors (AC 6, HD 2+1, hp 10 each, #AT 3, D 1-4/1-4/1-4, MV 120′ (40′), Save F2, ML 9, AL N) and three tiger riders (hp 16 each).
- Sabre-Tooth Tigers (R2): Three large waterproof tent pavilions with palm-leaf roofs, raised 10 feet off the ground, house the three sabre-tooth tigers, each chained to a heavy log. Only the three bravest and strongest Rakasta warriors can command their respect.
- Rider Combat: Tiger riders can leap up to 20 feet off their mounts and attack in the same round.
- Communal Pavilion (R3): A large tent pavilion, similar to the tiger pavilions, with a smoke hole in the center of the roof. Inside are cushions and rugs.
- Communal Fire Pit (R4): A fire pit, rimmed with rocks, complete with a turning spit and other cooking utensils.
Monster:
- 16 Normal Rakasta Warriors (AC 6, HD 2+1, hp 10 each, #AT 3, D 1-4/1-4/1-4, MV 120′ (40′), Save F2, ML 9, AL N).
- 3 Rakasta Tiger Riders (hp 16 each, also count as warriors for the total of 16).
- 3 Sabre-tooth Tigers (AC 6, HD 8, hp 36 each, #AT 3, D 1-8/1-8/2-12, MV 150′ (50′), Save F4, ML 5, AL N).
Treasure & Location:
- Tents and Pavilions (General): The tents are richly furnished within.
- Tribe’s Treasures (Total): The tribe’s treasures are worth a total of 10,000 gp, weighing about 10,000 coins. These treasures include:
- Silk tapestries
- Brightly colored carpets
- Bronze artifacts
- Gilded leatherwork
- Silverware
- Gold jewelry
10. Phanaton Settlement (Map E-6)
What the GM can reveal immediately:
- You are in a heavily forested area where the trees are particularly large.
- Because of dense foliage, you can’t see anything obvious on the ground level.
- As you get closer (within 20 feet if you’re not a Phanaton), you start to discern a hidden settlement 50 feet off the ground, built into the massive trees. It looks like a complex of wooden platforms connected by ropes and supporting numerous huts.
What players need to investigate:
- The Phanaton Tribe: This is a small settlement of about 100 Phanaton, halfling-sized creatures resembling a cross between a monkey and a raccoon, capable of gliding from tree branch to tree branch like flying squirrels.
- Settlement Structure: The settlement consists of a half-dozen wooden platforms supported by braces and a web of knotted ropes, like a suspension bridge. Each platform contains various sizes of wooden huts with safety rails. Rope bridges connect platforms for the young or infirm.
- Platform PH1:
- This platform has three huts housing a total of 14 Phanaton: 7 adult males, 5 adult females, and 2 children.
- The Phanaton young are unable to defend themselves and will flee if attacked.
- Platform PH2:
- This platform has five wooden huts containing a total of 20 Phanaton.
- This includes the Clan War Chief and his seven bodyguards.
- The remaining 12 Phanaton are the warriors’ mates.
- Platforms PH3, PH4, PH5, and PH6:
- Platforms PH3 and PH4 each have three huts.
- Platforms PH5 and PH6 each have four huts.
- In each hut on these platforms, you’ll find a family of Phanaton composed of an adult male, an adult female, and 1-4 children.
- The wooden huts are filled with skillfully carved furniture made from exotic woods.
- The interiors are decorated with dozens of hanging plants and ornate wood and bone mobiles.
- Ground Access (Platform PH5): One platform (PH5) has a trap door in the center of the floor, from which a rope ladder can be unrolled to the jungle floor for the convenience of non-flying guests. Guests usually sleep on platform PH5.
Monster:
- PH1 Phanaton:
- 12 Adult Phanaton (AC 7, HD 1-1, hp 7×4, 5×3, #AT 1, D 1-6 or by weapon, MV 90′ (30′), glide 150′ (50′), Save F1, +2, ML 7, AL L).
- 2 Phanaton Children (AC 7, HD 1-1, hp 2×1, #AT 1, D 1-6 or by weapon, MV 90′ (30′), glide 150′ (50′), Save F1, +2, ML 7, AL L; will flee if attacked).
- PH2 Phanaton:
- 1 Clan War Chief (AC 6, HD 3, hp 15, #AT 1, D 1-6 or by weapon, MV 90′ (30′), glide 150′ (50′), Save F3, +2, ML 7, AL L).
- 7 Bodyguards (AC 6, HD 2, hp 10 each, #AT 1, D 1-6 or by weapon, ML 7, AL L).
- 12 Warriors’ Mates (AC 7, HD 1-1, hp 3 each, #AT 1, D 1-6, MV 90′ (30′), 150′ (50′), Save F1, +2, ML 7, AL L).
- PH3, 4, 5, 6 Phanaton:
- Families: Each of the 14 huts on these platforms will contain an adult male, an adult female, and 1-4 children. Use the adult Phanaton stats for the adults, and the child Phanaton stats for the children.
Treasure & Location:
- PH2 Clan Treasure: Hidden beneath the war chief’s bed is a locked wooden chest containing the clan treasure: 3000 sp.
- General Huts: The wooden huts are filled with skillfully carved furniture made from many different types of exotic woods. Interiors are decorated with dozens of hanging plants and ornate wood and bone mobiles. These items likely hold artistic or cultural value but may not have direct gold piece equivalents unless players can find a buyer.
14. Aranea Lair (Map E-7)
What the GM can reveal immediately:
- You’ve entered a section of forest where webs are strung between trees, about 40 feet above the jungle floor.
- These lairs cannot be seen unless one climbs above the first layer of leaf growth, about 20-30 feet above the ground.
- Part of the webs are roofed over with a waterproof mixture of leaves, bark, twigs, and web strands, resembling crude caves.
- The area beneath the webs seems to be patrolled by something large.
What players need to investigate:
- Aranea Nature: The Aranea are a race of highly intelligent, magic-using arachnids (spiders). They look like huge, greenish-brown spiders (about the size of a small pony) with a massive, odd-shaped lump on their backs housing a large brain.
- Lair Proximity: Each aranea has a separate lair, but the web walls are close enough for them to jump between with ease.
- Lair Interiors: The webbed-over sections of their lairs resemble caves and are filled with crude “furniture” made of wood, vines, and web, webbed in place on the floor. This includes storage chests and libraries used for spell research.
- Treasure Storage: Aranea treasure is typically woven into the roofs of their lairs for safekeeping.
- Bugbear Guards: The area beneath the aranea webs is patrolled by two Bugbears. They guard the grounds from intruders for the aranea, earning treasure and favors.
- These bugbears live nearby in thatched huts.
- Each bugbear carries a large alarm horn that it will sound at the first sign of trouble, warning the aranea.
- Aranea A1: This aranea knows the magic-user spells: detect magic, sleep, and levitate.
- Aranea A2: This aranea knows the spells: floating disc, ventriloquism, and phantasmal forces.
- Aranea A3: This aranea has a scroll laid out on its table for quick use.
Monster:
- 2 Bugbears (AC 5, HD 3+1, hp 16, 14, #AT 1, D 2-8, MV 90′ (30′), Save F3, ML 9, AL C). They will sound an alarm if they spot intruders.
- Aranea A1 (AC 7, HD 3, hp 19, #AT 1, D 1-6 plus poison, MV 60′ (20′), 120′ (40′) in web, Save M3, ML 7, AL C).
- Aranea A2 (AC 7, HD 3, hp 19, #AT 1, D 1-6 plus poison, MV 60′ (20′), 120′ (40′) in web, Save M3, ML 7, AL C).
- Aranea A3 (AC 7, HD 3, hp 19, #AT 1, D 1-6 plus poison, MV 60′ (20′), 120′ (40′) in web, Save M3, ML 7, AL C).
Treasure & Location:
- Bugbears: Each bugbear carries a pouch containing scraps of food, personal mementos (bones and teeth), and 10 gp.
- Aranea A1 Lair (woven into the roof): A shield -1 (cursed) and a potion of undead control.
- Aranea A2 Lair (hidden in the roof): A broom of flying.
- Aranea A3 Lair (in the web ceiling and on its table): A potion of poison and a scroll (light, read languages, mirror image).
15. Pteranodon Terror
What the GM can reveal immediately:
- You are approaching or on a 300-foot long rope bridge.
What players need to investigate:
- Pteranodon Attack: There is a 75% chance that three Pteranodons will attack the party as they cross the bridge.
- Falling Hazard: Anyone hit by one of the pteranodons has a 10% chance of falling off the bridge, taking 10-100 points of damage from the fall to the rocks below.
Monster:
- 3 Pteranodons (AC 6, HD 5, hp 26, 23, 18, #AT 1, D 1-8, MV 30′ (10′), flying 240′ (80′), Save F3, ML 8, AL N).
Treasure & Location:
- None.
16. The Rocs’ Roost
What the GM can reveal immediately:
- You’ve discovered a large nest.
What players need to investigate:
- Roc Inhabitants: This nest belongs to two small Rocs.
- Hidden Map: Woven into the nest is a map showing that a treasure worth 17,000 gp can be found at the location in hex #19.
Monster:
- 2 Small Rocs (AC 4, HD 6, hp 32, 26, #AT 3, D 2-5/2-5/2-12, MV 60′ (20′), flying 480′ (160′), Save F3, ML 6, AL L).
Treasure & Location:
- Woven into the nest: A map leading to a treasure worth 17,000 gp in hex #19.
17. Dimetrodon Peril
What the GM can reveal immediately:
- You hear a series of horrible screams.
- In the center of a grassy clearing, you see a Dimetrodon attacking a frantically struggling native.
What players need to investigate:
- Native’s Condition: The native is mortally wounded.
- Native’s Plea: If the Dimetrodon is slain or driven off, the native will give the party his only treasure – a nugget of platinum – if they swear to bury him in a special location (DM’s choice).
Monster:
- 1 Dimetrodon (AC 5, HD 7, hp 36, #AT 1, D 2-16, MV 120′ (40′), Save F4, ML 8, AL N).
Treasure & Location:
- From the dying native: A nugget of platinum (worth 50 gp).
18. The Ogre’s Lair
What the GM can reveal immediately:
- You’ve entered an ancient burial chamber.
- Each chamber of the cavern complex is lit by a crude torch attached to the rock wall by a glob of sticky, black adhesive (tar).
- The dim illumination reveals burial chambers with dozens of old, shrunken bodies strewn about the stone floor in various stages of decay.
What players need to investigate:
- Ogre Inhabitants: This chamber is home to five Ogres.
- Lair Layout: The DM should use General Cave Lair #1 or #2, or create a custom layout.
- Ogre Distribution: There is a 50% chance that each room will contain an ogre, except for the hearth-treasure room, which will house the rest of the group.
- Treasure Location: The ogres’ treasure chest is hidden amongst a pile of shrouds in the hearth room. The chest is locked.
Monster:
- 5 Ogres (AC 6, HD 4+1, hp 21, 18, 18, 15, 9, #AT 1, D 1-10, MV 90′ (30′), Save F4, ML 10, AL C).
Treasure & Location:
- Inside the locked wooden chest in the hearth room:
- 2000 sp
- 1000 gp
- 3 sabre-tooth tiger skulls (likely of aesthetic/trophy value, DM discretion for monetary worth).
19. Deranged Ankylosaurus
What the GM can reveal immediately:
- As the party moves through this lightly wooded area, a massive, armored beast rushes out.
What players need to investigate:
- Ankylosaurus Behavior: An Ankylosaurus will rush out and attack the party in a frenzy of tail-bashing.
- Cause of Frenzy: Although normally docile, this beast recently grazed on a patch of loco weed and is now under its influence.
- Duration of Frenzy: The giant beast will attack until slain, or until the drug wears off (in about two hours).
- Allosaur Hunting Ground: This area is also the hunting ground of an Allosaur.
- Buried Treasure (from Roc’s Roost map): If the party has the treasure map from The Roc’s Roost (#16), they can dig for a large treasure buried here.
- The hoard is buried 10 feet underground and will take 2-5 (1d4+1) turns to dig up.
- The DM rolls for wandering monsters each turn while digging. If one appears, it will be the Allosaur.
Monster:
- 1 Ankylosaurus (AC 0, HD 7, hp 33, #AT 1, D 2-12, MV 60′ (20′), Save F4, ML 8, AL N). It will fight to the death or until the drug wears off.
- 1 Allosaur (AC 5, HD 13, hp 55, #AT 3, D 1-6/1-6/4-24, MV 150′ (50′), Save F7, ML 9, AL N). This monster serves as a potential wandering encounter during digging.
Treasure & Location:
- Buried 10 feet underground (if map from #16 is present and dug up):
- 2000 gp
- 3 diamonds worth 3000 gp each (total 9000 gp).
- 1 sapphire necklace worth 6000 gp.
20. Abode of the Green Dragon
What the GM can reveal immediately:
- As the characters pass a low, stony hill, they notice a broad opening in the rocky hillside.
- Once at the mouth of the cave, you can hear heavy, labored breathing coming from inside the dark cavern.
What players need to investigate:
- Dragon Lair: This is the lair of a Green Dragon.
- Lair Layout: The DM should use General Cave Lair #1 or #2, or design a custom lair. If a general design is used, the dragon will have blocked all tunnels too small for it to move through.
- Dragon’s Location: If characters enter the caverns, all rooms will be empty except the hearth-treasure chamber, where the dragon lies.
- Dragon’s State: The dragon is a creature of great age and fearsome aspect. There is a 33% chance it will be asleep atop its pile of treasure and can be surprised.
- Awake Dragon: If awake when the party enters, the dragon will know the characters are there.
- Dragon’s Offer: There is a 50% chance that, instead of slaying the party, the dragon will allow the characters to leave if they give him all of their magic items.
Monster:
- 1 Green Dragon (AC 1, HD 9, hp 45, #AT 3 or breath, D 1-6/1-6/3-24 or breath, MV 90′ (30′), flying 240′ (80′), Save F9, ML 9, AL C).
Treasure & Location:
- Dragon’s Treasure Hoard (in the hearth-treasure chamber):
- 40,400 sp
- 2000 gp
- 30 assorted pieces of jewelry worth a total of 18,000 gp.
21. Lair of the Wretched Troglodytes
What the GM can reveal immediately:
- As the party nears this area, a particularly foul stench begins to assault their noses.
- As you continue, the smell worsens until you reach a dark opening in the ground, from which the odor seems to emanate.
What players need to investigate:
- Troglodyte Inhabitants: This lair contains 17 Troglodytes. They have recently moved here due to the pleasantly damp climate.
- Lair Layout: The DM should use General Cave Lair #1 or #2, or design a custom lair.
- Troglodyte Distribution: There will be 1-4 Troglodytes in each room, except for the hearth-treasure chamber where the rest will be.
- Treasure Location: The chest containing their valuables is chained to the bottom of a 3-foot deep, evil-smelling pool of dark liquid. The rusty box is attached to a bolt in the center of the pool’s floor.
- Retrieving the Chest:
- The chain must first be severed. The DM must decide the party’s chance of severing the chain based on their actions.
- Although the chest is locked, the lock mechanism may be picked once the box is removed from the water.
- Key Location: Underneath the slime at the bottom of the pool is the key to the lock. There is only a 20% chance that the party will find it accidentally. If the party actively searches for a key, each character searching has a 1-in-6 chance of finding it.
Monster:
- 17 Troglodytes (AC 5, HD 2, hp 10 each, #AT 3, D 1-4 each, MV 120′ (40′), Save F2, ML 9, AL C).
Treasure & Location:
- Inside the chained and locked chest at the bottom of the pool:
- 2000 cp
- 2000 sp
- 1000 ep
- 3000 gp
- 6 amethyst stones worth a total of 3000 gp.
22. Plesiosaur Menace
What the GM can reveal immediately:
- You are at the shore of a lake. The water looks placid.
What players need to investigate:
- Hidden Predator: Beneath the surface of this lake awaits a hungry Plesiosaur.
- Attack Trigger: The beast will attack anyone coming within 15 feet of the shore.
- Attack Effect: If it hits, it will pull its victim into the lake on the following round.
- Hidden Treasure: If the Plesiosaur is slain and its body cut open, the party will find a skeletal arm and hand wearing a ring of regeneration.
Monster:
- 1 Plesiosaur (AC 6, HD 16, hp 60, #AT 1, D 4-24, MV 150′ (50′), Save F8, ML 9, AL N).
Treasure & Location:
- Inside the Plesiosaur’s body (if slain and cut open): A skeletal arm and hand wearing a ring of regeneration.
23. Random Encounter
What the GM can reveal immediately:
- There’s nothing specific to see or interact with at this exact location, but the surrounding area is part of a larger wilderness.
What players need to investigate:
- Wandering Monster Chance: For every day the party spends within two hexes of this location, they will encounter one wandering monster from Table #3.
Monster:
- Determined by a roll on Table #3 (Wandering Monster Chart).
Treasure & Location:
- Varies: Any treasure will be associated with the specific wandering monster encountered and its lair.
24. The Sea Dragon
What the GM can reveal immediately:
- You are in a hex of open water, potentially on a ship.
What players need to investigate:
- Dragon Attack Trigger: If a ship passes within one hex of this location, it will be attacked by a Sea Dragon.
- Dragon’s Tactics:
- The beast will first surface 150 feet away and bombard the deck with globs of poison for two rounds.
- The dragon will then sink, only to reappear a turn later next to the ship, attacking normally (biting or using its breath, it does not use magic).
- Dragon Lair: The dragon’s lair is located 200 feet beneath the surface in a flooded cave.
- Lair Contents: The cave contains treasure the dragon has gleaned from sunken ships and unfortunate passers-by.
Monster:
- 1 Sea Dragon (AC 2, HD 6, hp 25, #AT 1, D 2-16, MV 180′ (60′), gliding 180′ (60′), Save F6, ML 8, AL N).
Treasure & Location:
- Inside the flooded cave lair:
- 10,000 gp
- 1 untarnished coat of chain mail +3
- 1 rusted cutlass with a jeweled pommel worth 500 gp
- 1 potion of water breathing
I can certainly help with that! It looks like we’re consolidating information and revising some existing entries to fit the “Key to the Plateau Encounter Areas” section. I’ll make sure to use our established formatting.
Central Plateau Encounter Table
Unlike the main island, there is a 2 in 6 chance of an encounter every 3 hexes travelled, regardless of terrain. If an encounter occurs, roll two 6-sided dice (2d6) to determine the encounter type:
2. Cave Bears (2) HD: 7 AC: 15 MV: 120′ (40′) ML: 9 LR: NA AP: 2 (1d4) TR: NA ATK: 1d8 / 1d8 / 2d12 Massive, aggressive cave-dwelling bears. They attack with two powerful claws and a devastating bite.
3. Woolly Rhino (1) HD: 8 AC: 16 MV: 120′ (40′) ML: 6 LR: NA AP: 1 (1d2) TR: NA ATK: 1d12 Large, shaggy rhinos with a formidable horn. They prefer to charge their foes.
4. Pteranodons (4) HD: 5 AC: 14 MV: 240′ (80′) Fly ML: 8 LR: NA AP: 4 (1d6+2) TR: NA ATK: 1d12 Large flying reptiles with a long, toothless beak and a distinctive head crest. They swoop down to attack.
5. Pterodactyls (7) HD: 1 AC: 13 MV: 240′ (80′) Fly ML: 7 LR: NA AP: 7 (2d6) TR: NA ATK: 1d3 Smaller, agile flying reptiles that attack in flocks.
6. Boars (2) HD: 3 AC: 13 MV: 150′ (50′) ML: 9 LR: NA AP: 2 (1d4) TR: NA ATK: 2d8 Fierce wild boars known for their tusks and charging attacks.
7. Antelope (5) HD: 2 AC: 13 MV: 240′ (80′) ML: 5 LR: NA AP: 5 (2d6+2) TR: NA ATK: 1d2 / 1d2 / 1d4 Swift-footed herbivores that can defend themselves with two hoof attacks and a headbutt. Often encountered in herds.
8. Dire Wolves (4) HD: 4+1 AC: 14 MV: 150′ (50′) ML: 8 LR: NA AP: 4 (1d6+2) TR: NA ATK: 2d8 Large, powerful wolves that hunt in packs. They attack with a fierce bite.
9. Mastodons (2) HD: 15 AC: 17 MV: 120′ (40′) ML: 8 LR: NA AP: 2 (1d2) TR: NA ATK: 2d12 / 2d12 / 4d32 Colossal, hairy elephants with long tusks. They attack with two massive tusks and a powerful stomp.
10. Titanothere (1) HD: 12 AC: 15 MV: 120′ (40′) ML: 11 LR: NA AP: 1 (1d2) TR: NA ATK: 2d12 or 3d24 Huge, rhinoceros-like mammals with bony horns on their snout. They can gore with their horn or stomp.
11. Sabre-tooth Tigers (2) HD: 8 AC: 14 MV: 150′ (50′) ML: 10 LR: NA AP: 2 (1d4) TR: NA ATK: 1d8 / 1d8 / 2d8 Giant predatory felines with massive fangs. They are highly aggressive, making 3 attacks per round (two claws and a bite).
12. TREMOR This is a minor earthquake caused by volcanic activity underground. Roll 1d6 to determine severity:
- 1-4 – Minor Shock: No effect on characters or ground.
- 5 – Major Shock: Characters knocked off their feet. If climbing cliffs, 30% chance of falling.
- 6 – Severe Shock: Trees tilt, rocks fall, small cracks appear in the ground. Characters knocked off their feet. If in a forest, 5% chance per character of taking 3d6 damage from falling trees. If climbing cliffs, 60% chance of falling. All tremors will last for 10 to 30 seconds.
Key to the Plateau Encounter Areas
1. Gold Vein
What the GM can reveal immediately:
- A recent tremor has opened a fissure in the rock, revealing a glint of metal within.
- The exposed rock appears to contain a lode of high-quality gold ore.
What players need to investigate:
- Identifying the Ore: A dwarf or any character with mining knowledge can identify the ore and estimate its potential value.
- Estimated Yield: For every 10 coins of raw ore mined, 5 gold pieces of refined gold can be extracted.
- Limited Resource: The vein is small and will not yield more than 15,000 pieces of refined gold.
- Mining & Transport Logistics:
- To obtain the full yield, characters will need to mine, transport, and refine 3,000 pounds (30,000 coins) of raw ore.
- Mining Rate: Two men can mine 200 pounds of ore in one day.
- Workers: Workers can be brought in from the mainland to assist with mining and transport. Each worker costs 1 gold piece per week plus food and transportation.
- Native Labor: The natives living on the plateau will not work the vein unless enslaved. The DM may wish to discourage this by having slave labor be slower, rebel often, etc.
- Transportation: Once removed, the raw ore must be carried overland by mules or porters, loaded onto a ship, and taken to the mainland.
- Refining Cost: Refining the gold will cost 10-20% of its final value and can be done in any major mainland city of the DM’s choice.
Monster:
- None specific to the vein itself, though interactions with workers or natives might arise.
Treasure & Location:
- Raw Gold Ore: Up to 15,000 gp worth of refined gold, requiring significant effort to extract and process.
2. Treant Forest
What the GM can reveal immediately:
- This forest feels open and relatively easy to move through on the ground.
- However, the tree branches overhead are so tightly woven that they create a dark and gloomy canopy, letting little light through.
What players need to investigate:
- Treant Presence: This small forest is inhabited by 15 Treants. They are reclusive and will try to avoid any contact with the party.
- Encounter Chance (Not Searching): If the party moves through the forest without actively searching, there is only a 1 in 20 chance of encountering a Treant.
- Treant Spotting: Treants can only be spotted at a range of 30 feet or less.
- Surprise: If encountered, Treants will surprise the party on a roll of 1-3 on a d6.
- Treant Behavior (General): Treants will usually ignore the party unless specific actions are taken.
- Actions and Responses:
- Searching:
- If the party is searching for creatures, they have a 1 in 6 chance of discovering a Treant.
- If they are searching specifically for Treants, this chance increases to 3 in 6.
- Cutting Trees: If the characters try to cut down a tree, one Treant will arrive in the first turn of activity. This Treant will try to avoid being noticed, but will cause the tree being cut down to move away at 30 feet per turn. Each turn thereafter, one additional Treant will arrive. The Treants will do whatever they can to drive the party from the forest, avoiding direct combat as long as possible.
- Starting a Fire:
- If a small campfire is lit, the forest will gradually recede from the camp, leaving a clearing 50 feet in diameter.
- Three Treants will position themselves around the camp, controlling the trees.
- They will do nothing if the party uses dead branches and brush for the fire.
- If the party collects living branches or wood, each of the three Treants will send 2 trees through the camp late at night. The characters will not be attacked unless they try to destroy the trees, but the trees will attempt to take or destroy as much gear as possible on one pass.
- If a fire-based spell is used, the Treants will attack the caster.
- Climbing Trees: If a character climbs a tree, there is a 1 in 20 chance it is a Treant.
- If nothing harmful is done, the Treant will not move or reveal its presence.
- If attacked or hurt, it will immediately capture or kill the offender while calling loudly for assistance (2-5 additional Treants will arrive in 2-12 rounds).
- Searching:
Monster:
- 15 Treants (AC 2, HD 8, hp 34-41 (33+1d8), #AT 2, D 2-12/2-12, MV 60′ (20′), Save F8, ML 9, AL L).
Treasure & Location:
- None explicitly mentioned as being found within the Treant Forest itself.
3. Cliff Wall
What the GM can reveal immediately:
- You stand before a high, imposing wall of upthrust rock that forms cliffs surrounding a central volcanic lake.
- The tops of these cliffs often appear jagged and are sometimes shrouded in low clouds, even appearing snow-covered in places.
- There are no clear trails over the cliff wall, but it seems it can be scaled in many places, with obvious handholds and routes up the rock face.
What players need to investigate:
- Climbing Difficulty: Even characters without climbing skill may attempt the climb.
- For all characters except thieves, the base chance of falling is 50%.
- This chance can be reduced:
- By 10% if a thief is with the party (to give guidance).
- By 10% if the character’s Dexterity is 15 or greater.
- By 20% if the characters are roped together.
- The DM may further adjust the chance based on other party actions.
- Climbing Time: It will take 12 hours of climbing time to reach the top of the cliffs.
- Encounters During Climb: During the climb, normal encounters are still rolled for, but only the following apply: Pteranodons (#4 in the previous section), Pterodactyls (#5 in the previous section, if detailed), and Tremors (#12 in this module, if detailed elsewhere).
- At the Top (Summit Conditions):
- The rocks are covered with ice and snow, and the temperature is below freezing.
- No encounters will occur here.
- Characters attempting to stay overnight without warm clothing will suffer 2-12 points of damage from exposure.
- If the party has brought firewood, they can start a fire to keep warm, but there is none to be found here.
- Descent into Crater (Descent Conditions):
- Descending into the volcanic crater takes 8 hours of climbing.
- The temperature will become warm and near tropical.
- Jungle vegetation covers the lower slopes.
- The valley is sparsely populated with animal life.
- No normal encounters of importance will occur, but on a roll of 12 on 2d6, a minor tremor will shake the ground.
Monster:
- Potential during ascent: Pteranodons (#4), Pterodactyls (#5, if applicable).
- Potential during descent: Minor tremors (not monsters, but environmental hazards).
Treasure & Location:
- None explicitly mentioned as being on the cliff face or summit.
4. Village of Mantru (Map E-8)
What the GM can reveal immediately:
- This small village lies on the shore of a large crater lake.
- Its landward side is surrounded by a crude palisade of palm trunks and branches that extends into the water on both sides.
- Part of this wall has been expanded to form two fish pens.
- The village consists of six palm-thatched lodges raised about 2 feet off the ground on stilts.
- Further out in the lake, you see two more lodges, kept 3 feet above the water on stilted platforms.
- The smaller one (20′ x 40′) appears to belong to an aged man.
- The larger building (30′ x 50′) is a main council lodge.
What players need to investigate:
- Village Inhabitants: The village has 50 inhabitants who live by fishing and farming small gardens. They are divided into five large families who share food and work. They are not warlike but will defend themselves if attacked.
- Initial Reception:
- If the characters do not attack the village, they will be met by a band of men armed with spears.
- Initially, spears will be thrown to fall short of the party.
- The villagers will then try to frighten the party away by shouting and gesturing.
- If the party remains non-hostile and friendly, the villagers will welcome them and lead them into the village.
- Key Figures & Customs:
- You will be introduced to Fano, the “talking chief” and village leader, and Umiat, the tribal cleric.
- The true “chief” is revealed to be a small stone carving of an old man kept in the council lodge on the lake. All major decisions come from this carving, with Fano acting as messenger and interpreter.
- After a solemn meeting, a feast will be held on the beach, featuring baked fish, fruits, yam paste, turtle soup, roasted birds, and fermented yam beer, with large smoking fires to drive away insects.
- Lodging will be provided by several families, who will insist at least one character sleep in each lodge.
- The natives will freely give anything a character asks for, but will expect the same in the future.
- Village Threat & Quest: After a short stay, the party will be asked to help by destroying a threat to the village.
- Fano and Umiat will describe attacks by a group of renegade tribesmen (headhunters) preying on lone villagers.
- These renegades are settled in a great ruined temple on the western side of an island in the center of the lake.
- The villagers cannot fight them because the renegades are stronger, and the island is taboo.
- Villagers will provide canoes and equipment but will not set foot on the taboo island.
- Fano, the “Talking Chief”:
- AC 9, F4, hp 26, #AT 1, D 1-6 or by weapon type, MV 120′ (40′), ML 8, AL L.
- An elderly man, badly scarred and crippled in the left arm.
- His infirmity, tribal responsibilities, and superstitious fear of the island prevent him from joining the party.
- His good will is crucial as it determines how the villagers treat the party. He is good-natured but proud of his position and will not tolerate mockery of it or the “chief.”
- Umiat, the Tribal Cleric:
- AC 9, C 6, hp 22, #AT 1, D 1-6 or by weapon type, MV 120′ (40′), ML 8, AL L.
- A pious man, devoted to his deity (Oloron, Lord of the Skies).
- Extremely aged, living beyond normal tribal lifespans (ascribed to deity’s favor), but frail and weak (speculated to be due to a past failing).
- His condition prevents him from adventuring or actively assisting the party, but he will make his spells available.
- Normal Spells: Cure Light Wounds, Purify Food and Water (1st level); Bless, Snake Charm (2nd level); Cure Disease (3rd level).
- He will pray for other spells, given one day’s notice.
Monster:
- 50 Human Villagers (general stats for basic humans with spears; their intent is to deter, then welcome, not to fight unless attacked).
- Fano (NPC, F4 stats).
- Umiat (NPC, C6 stats).
- Renegade tribesmen/headhunters (implied future encounter on Taboo Island).
Treasure & Location:
- General Village: Canoes, nets, tools, and basic lodge furnishings (utilitarian, not high value).
- Quasi-Treasure/Reward: The platinum nugget from the Dimetrodon encounter (#17) can be given to the native, implying a social reward rather than material one.
- Magic Items/Spells: Umiat’s spellcasting services are available.
5. Taboo Island
What the GM can reveal immediately:
- This island is located in the center of the lake, and the villagers call it “Taboo.”
What players need to investigate:
- Details are in Part 4 of the module. This is the destination for the quest given by the villagers of Mantru.
Monster:
- (Details will be in Part 4 of the module).
Treasure & Location:
- (Details will be in Part 4 of the module).
Understood. We’re now delving into the “Taboo Island” dungeon, focusing on the first level of the temple, which serves as the headhunters’ lair. I’ll maintain our established format.
PART 4: TABOO ISLAND
This rocky island, once the center of the Kopru kingdom (a mystery for players to uncover), is now dotted with small ruins, statues, and broken terraces. The largest ruin is a temple carved into the cliff wall on the island’s western shore. It’s most easily accessed from the lake side, where its broad steps descend into the water. This is where the adventure’s final stage begins. The entire dungeon is damp and foul-smelling, with hot, stale air. Small, blind creatures constantly scatter, flitting around.
KEY TO THE FIRST LEVEL (Map E-9)
1. Temple Entrance
What the GM can reveal immediately:
- The entrance to the temple is carved directly into the side of a rocky cliff.
- Two primitive docks, made of narrow poles and weak planking, extend from the temple steps, with several canoes moored there.
- Two steps lead up to a landing lined with pillars, all made of red marble.
- Thrust into cracks in the floor of the landing are poles adorned with many shrunken heads, jawbones, feathered totems, and other primitive tribal symbols.
- Three short flights of steps lead up to a second landing 5 feet above the first.
- To either side of the center steps, you see a stone foot and ankle, the remains of a huge statue that once straddled the stairs.
- The end stairways are each flanked by another red marble pillar.
- At the back of the second landing is an opening leading deeper into the cliff, flanked by another pair of pillars.
- Carved out of the angled back walls of the landing are two bas-reliefs of humans holding lighted braziers.
What players need to investigate:
- Headhunter Presence: This is the lair of the renegade tribesmen (headhunters) that the Mantru villagers spoke of. Their lair is on this first level.
- Moorings: The canoes suggest the headhunters use this entrance regularly.
- Symbolism: The shrunken heads and tribal symbols indicate the violent nature and customs of the inhabitants.
- Defaced Statue: The remains of the “huge statue” might hint at the temple’s original purpose or its former inhabitants.
Monster:
- None actively present in this area, but it’s the gateway to the headhunter lair.
Treasure & Location:
- None explicitly mentioned. The primitive tribal symbols are more thematic than valuable.
2. Guard Post
What the GM can reveal immediately:
- The passage ahead has been deliberately narrowed by mounds of rubble, allowing only one character to pass through at a time.
- You can hear movement and voices from beyond the narrow opening.
What players need to investigate:
- Ambush Point: This narrowing is a deliberate defensive chokepoint.
- Guard Composition: Waiting on the other side are three 1st-level fighters and a 5th-level fighter.
- Tactics: These guards can observe intruders moving down the hall and will attempt to slay opponents one at a time as they come through the choke point.
- Defensive Advantage: If attacked with a fireball, lightning bolt, or similar spell, these guards gain a +1 bonus on their saving throws due to their cover.
- Morale Failure: Should their morale fail, they will retreat to area 3, the main chamber.
Monster:
- 3 Headhunter Fighters (AC 7, F1, hp 7 each, MV 120′ (40′), #AT 1, D 1-6 or by weapon type, ML 8, AL C).
- 1 Headhunter Leader (AC 5, F5, hp 32, MV 120′ (40′), #AT 1, D 1-6+1, ML 9, AL C) – wearing bone armor and carrying a shield and spear +1.
Treasure & Location:
- Headhunter Leader: Spear +1, bone armor, shield (valuable for combat, but “bone armor” may have limited resale value depending on DM interpretation).
- Other Fighters: Standard weapons (likely spears, clubs, or daggers) and possibly primitive armor (leather/hide equivalent to AC 7).
3. Main Chamber
What the GM can reveal immediately:
- You enter a large hall, clearly repurposed from its original function, now serving as the central living area of a tribe.
- The floor is covered with mats, bowls, and eating utensils made of bone.
- A blazing fire roars in the center of the chamber, filling the air with smoke and warmth.
- The hall is two stories high with balconies on three sides.
- There is a rectangular hole (20′ x 30′) in the center of the ceiling that is open to the sky, covered by a net to prevent debris and small creatures from entering.
- A rope hangs from one corner of this opening to the floor.
- On the wall opposite the entrance, a carved face fills the area from floor to ceiling. It looks like a human or humanoid with its mouth agape, but it has been cut and defaced, making its original form difficult to identify.
What players need to investigate:
- Net Functionality: The net covering the ceiling hole will not prevent characters from entering through here, nor will it support a character’s weight. The rope is the primary means of vertical travel for the inhabitants.
- Other Doors: All other doors from this chamber are located on the balcony level.
- Inhabitants: In this chamber are 10 men and 12 women, the renegade tribesmen, along with 8 children.
- Combat Behavior: The men and women will fight, while the children will attempt to escape up the rope to the surface.
- Reinforcements: Men from areas 3A and 3C will reinforce the natives here within two melee rounds.
- Morale Failure: Should the morale of the adults fail, those fighting will attempt to charge towards the exit to area 1.
Monster:
- 10 Headhunter Men (AC 9, F1 or NM, hp 5 each, #AT 1, D 1-6 or by weapon, MV 120′ (40′), ML 9, AL C).
- 12 Headhunter Women (AC 9, F1 or NM, hp 5 each, #AT 1, D 1-6 or by weapon, MV 120′ (40′), ML 9, AL C).
- 8 Children (non-combatants, will flee).
Treasure & Location:
- General: Mats, bone bowls, eating utensils (likely no significant value).
- No specific treasure mentioned in this main hall, beyond the gear carried by the individual headhunters.
3A. Unmarried Men’s Rooms (Multiple Rooms)
What the GM can reveal immediately:
- These rooms are decorated with ornaments and headdresses of bones, feathers, and fish scales.
- Short bows and spears lean against the walls.
- Mats, gourd pots of paints, and carved obsidian bowls filled with mud and ash are arranged in a circle around a small, smoldering fire.
- The ceiling is heavily stained with soot, and the air reeks of grease, smoke, sweat, and fish.
- You can hear the sounds of voices telling boastful stories.
What players need to investigate:
- Inhabitants: Each room contains seven young men of the tribe.
- Equipment: They are armed with spears and bows, and wear primitive leather armor.
- Poisoned Arrows: Their arrows are coated with a gummy vegetable poison, which will cause 1-6 points extra damage and violent sickness and fever for 2-20 hours. A successful saving throw vs. Poison will negate the sickness and the additional damage.
- Reinforcement: These men will reinforce the main chamber (Area 3) in two melee rounds if an alarm is raised.
Monster:
- 7 Young Headhunter Men per room (AC 7, F1, hp 6 each, #AT 1, D 1-6 or by weapon type, MV 120′ (40′), ML 9, AL C). They use poisoned arrows.
Treasure & Location:
- Personal Effects: Ornaments, headdresses (likely ceremonial, low monetary value), gourd pots, obsidian bowls (minor value).
- Weapons: Short bows and spears (poisoned arrows are a tactical asset).
- No specific static treasure mentioned in these rooms.
3B. Unmarried Girls’ Room
What the GM can reveal immediately:
- This room is decorated similarly to 3A, with ornaments.
- You see many tools: scrapers, needles, mallets, etc.
- You observe 5 girls engaged in activities like hairstyling, tattooing, and teeth filing.
What players need to investigate:
- Inhabitants: There are 5 girls in this room.
- Weapons: Their weapons are daggers of bone and metal.
- Behavior: These girls will not attack but will try to flee if possible (likely towards the main chamber or up the rope).
Monster:
- 5 Headhunter Girls (AC 9, hp 3 each, MV 120′ (40′), AL C). They are non-combatants but will attempt to flee.
Treasure & Location:
- Personal Effects: Ornaments (low value).
- Tools: Scrapers, needles, mallets (utilitarian, low value).
- Weapons: Daggers of bone and metal (minor value).
- No specific static treasure mentioned.
3C. Tribal Chief’s Quarters
What the GM can reveal immediately:
- This is a large room, cluttered with pots, gourds, a rack of skulls, necklaces of bones, and many skins and furs of animals. The scent of something powerful and ancient hangs in the air.
What players need to investigate:
- Inhabitants: This room houses the Tribal Chief, his three sons, the Witchdoctor, and five women.
- Reinforcement: The Chief, his sons, and the Witchdoctor will come to the aid of the families in Area 3 should the alarm be raised. They will also investigate any unusual noises from the area.
- Morale Failure: Should their morale fail, they will retreat to this room and make a final stand.
Monster:
- 1 The Chief (AC 5, F7, hp 44, #AT 1, D 1-8+2, MV 120′ (40′), ML 10, AL C) – armed with a sword +2, bone armor, and shield.
- 3 Chief’s Sons (AC 7, F3, hp 16, 20, 17, #AT 1, D 1-6, MV 120′ (40′), ML 9, AL C) – armed with spears and leather armor.
- 1 The Witchdoctor (AC 6, C5, hp 21, #AT 1, D 1-6, MV 120′ (40′), ML 9, AL C) – armed with a bone club and bone armor.
- Spells:
- First Level: Cause Light Wounds (x2)
- Second Level: Hold Person, Snake Charm
- Spells:
- 5 Women (AC 9, hp 3 each, MV 120′ (40′), AL C) – these women will not fight.
Treasure & Location:
- The Chief’s Gear: Sword +2, bone armor, shield.
- Witchdoctor’s Gear: Bone club, bone armor.
- Hidden in one of the skulls on the rack: 5 gems (1000 gp, 500 gp, 800 gp, 1200 gp, 50 gp).
- In a wax-sealed gourd: A potion of flying.
- Hanging on the walls: 6 furs worth 100 gp each.
4. Secret Viewing Chamber
What the GM can reveal immediately:
- You find a secret door (unknown to the natives) leading to a small chamber near the main entrance.
- The hallway to this chamber is extremely dusty and appears unused.
- Inside the chamber, the floor is dotted with moldering rags and unidentifiable lumps presenting a variety of vivid colors.
- Along the south wall are several large stone levers and a corroded bronze tube.
- Hanging from small holes in the ceiling are three rotted ends of rope.
What players need to investigate:
- Function of Mechanisms: These ropes and levers once operated mechanisms within the now-ruined statue that stood over the temple’s entrance (Area 1). The metal tube was used as a megaphone for the “god’s” voice.
- Viewing Niche (B): A slanted section of the wall has a small niche carved into the back of the statue (B) in the northeast wall of Area 1. A person can stand in this niche and observe the landing (Area 1) through two small spy holes.
- Hidden Danger: The walls of the niche are lined with a brownish mold, which is actually yellow mold. It’s filmed with damp dust, obscuring its true color.
Monster:
- Yellow Mold (AC special, HD 2, hp 8, MV 0′, #AT Special, D 1-6 plus spores, Save F1, ML Special, AL N). It will release damaging spores if disturbed.
Treasure & Location:
- None explicitly mentioned, other than the mechanical components that are part of the ruin.
5. Priest’s Quarters
What the GM can reveal immediately:
- You discover a secret chamber, bare of furniture, with a heavy layer of dust and fine sand on the floor.
What players need to investigate:
- Original Purpose: This chamber was where “the gods” (likely the Kopru) watched the services held in their honor.
- Hidden Trap Door: The dust covers a trap door in the northeast corner, which is unlikely to be noticed (1 in 6 chance).
- The trap door is weak and will break when stepped on, dropping the character into Room 3 on the second level (details for which are in a later section).
- The falling character will take 1-6 points of damage.
- Viewing Platform (A): In the northwest corner are stairs leading up to a narrow platform (A) located above the corridor behind the eyes of the carved face looking into Area 3 on the first level.
- Spy Holes & Piston: Two small holes allow a character standing on the platform to view the main chamber (Area 3). Between the two spy holes is a large wooden piston and handle.
- If given a strong, hard pull, this piston will spray a 20-foot diameter cloud of inflammable dust through the nose of the face into the main chamber.
- Any open flames in Area 3 will cause a fiery explosion for 4d6 damage (a successful saving throw vs. Dragon’s Breath reduces damage by half).
- There is a 50% chance that any explosion in the main hall will cause a similar explosion on the platform where the piston is, resulting in 2d6 points of damage to anyone there.
Monster:
- None actively present, but the trap door and explosion mechanism present environmental hazards.
Treasure & Location:
- None explicitly mentioned.
6. Blocked-Up Passage
What the GM can reveal immediately:
- The hallway you’re following ends abruptly in a crude wall of stones that completely closes the passage.
What players need to investigate:
- Purpose: This wall was built by the renegades to prevent creatures from the lower levels of the temple from entering their tribal home.
- Guard Status: The natives no longer bother to guard it, as so seldom has anything attempted to come through this wall.
- Breaching the Wall: If they have suitable tools, the characters can make an opening large enough for one character to get through in one hour.
Monster:
- None actively present.
Treasure & Location:
- None explicitly mentioned.
7. Weakened Floor
What the GM can reveal immediately:
- You are in a section of the floor that looks unusually aged and potentially precarious.
What players need to investigate:
- Condition: Unused for many years, this section of the floor has been weakened from below. The stone and supporting beams have rotted due to water and slimes.
- Support Capacity: The section marked by the “T” (on the map, but implied here as a specific sturdy point) is strong enough to support one person crossing it at a time.
- Collapse Hazard: If two or more people cross this section simultaneously, it will break, dropping characters to the water-filled room below (Level 2, Room 1).
- Fall Damage: No damage will be taken by the characters from this fall, as they land in water.
Monster:
- None actively present, but the weakened floor presents an environmental hazard.
Treasure & Location:
- None explicitly mentioned.
8. Private Altar
What the GM can reveal immediately:
- You’ve entered an altar room containing several items that appear to have been used by priests in the worship of their “gods.”
- Across from the door is a square stone pedestal.
- Next to it are several bone rhythm sticks, a crumbling bamboo flute, and the remains of a feather fan.
What players need to investigate:
- Valuable Bowls: Next to the pedestal are 3 inlaid and bejeweled bowls.
- The Statuette: On the pedestal is a small, intricately carved stone box with two hinged doors. Inside is an unusual statuette of gold and coral.
- It depicts an amphibious humanoid with a smooth head, large eyes, and a tentacled, sphinctered mouth. Its torso is human-like with two arms ending in webbed, clawed hands. From the waist down, the body divides into three long tentacles ending in fluke-like fins, each tipped with a single large claw. (This is a Kopru).
- Kopru Influence (Curse): All who look at this statuette must make a saving throw vs. Spells.
- Failure means the character becomes a secret servant of the Kopru until the power of the statuette is destroyed.
- The statuette’s power can be destroyed by being blessed by a Lawful cleric or by being physically destroyed.
- Blocked Corridor: The corridor beyond this room is blocked by fallen rock and is impassable. (The DM can have this lead to additional areas of their own design if desired).
Monster:
- None actively present, but the statuette poses a magical threat.
Treasure & Location:
- On the altar / next to the pedestal:
- 3 inlaid and bejeweled bowls worth 500 gp each (total 1500 gp).
- 1 intricately carved stone box (value not specified, but contains the statuette).
- 1 gold and coral statuette of a Kopru, worth 2000 gp.
- Other items: Bone rhythm sticks, crumbling bamboo flute, remains of a feather fan (likely no significant monetary value).
KEY TO THE SECOND LEVEL (Map E-10)
Special Note: Part of this level is underwater to a depth of 5 feet. The GM should meticulously track which areas are flooded and the water’s depth, periodically reminding players through description. Pay careful attention to normal light sources, as these can easily be extinguished or rendered useless if they get wet.
1. Water-Filled Chamber
What the GM can reveal immediately:
- This room is largely submerged, with water filling it to a depth of 5 feet.
- The ceiling above is a disturbing reddish-black from an oxidizing rot, and the supporting beams look almost entirely rotted away.
- You see the open door leading out of this chamber into a passage that is also filled with water to a depth of 5 feet.
- Along the passage, you discern the shapes of cells with iron bars.
What players need to investigate:
- Drowning Hazard: Characters less than 4 feet tall and wearing metal armor must find a way to keep their heads above the water or they will quickly drown.
- Ceiling Weakness: Characters who enter from the hall (above) may be able to break and smash their way through the ceiling to Room 5 on the first level.
- Aquatic Life: Several small, harmless cave fish live in this room and the flooded corridors beyond. They will occasionally bump against characters’ legs, feeling cold and slimy.
- Hidden Dangers: Several sharp metal, stone, and glass items are hidden underwater.
- Unless characters probe ahead with a sword, spear, staff, or pole, each character has a 1 in 6 chance of stumbling and stepping on a sharp item every 10 feet traveled.
- Stepping on an item will cause 1-2 points of damage.
- Empty Cells: The iron bars of the cells are badly corroded and may be broken by any character who rolls their Strength or less on 1d20. All the cells are empty.
Monster:
- Small, harmless cave fish (non-combatants).
Treasure & Location:
- None explicitly mentioned.
2. Chamber of the Great One
What the GM can reveal immediately:
- The doors to this chamber are notably high, about 15 feet above the level of the chamber floor.
- The chamber itself is filled with water to the same level as the surrounding flooded passages.
What players need to investigate:
- Hidden Stairs: If characters are not actively probing ahead (e.g., swimming carefully), they will stumble on submerged stairs (or dais steps) and fall into the room, taking no damage.
- Albino Mako Sharks: Three albino Mako sharks inhabit this chamber. They are extremely hungry and will attack any character or creature who tries to swim across the chamber.
Monster:
- 3 Albino Mako Sharks (AC 4, HD 4, hp 26, 29, 19, #AT 1, D 2-12, MV 180′ (60′), Save F2, ML 7, AL N).
Treasure & Location:
- 2A. Giant Oyster: At this point on the dais, 5 feet below the water’s surface, rests a giant oyster.
- The DM must decide when the party can see it.
- Between its open valves is a large black pearl (3000 gp).
- Attack Response: If the oyster is attacked from a distance, it will close its shell and not open for at least one turn.
- Pearl Extraction: The pearl may be “picked” from the open oyster (non-thieves can be given a 5% worse chance than a 1st level thief, at the DM’s option). Failure means the oyster closes, possibly trapping the unsuccessful character (roll a normal melee attack).
- Opening the Oyster: The oyster will not open by itself while under attack. It can be pried open by several characters with a combined Strength of 50+ (a knock spell will also work).
3. Lair of Guardians
What the GM can reveal immediately:
- The floor of this room is covered with small puddles.
- The walls are lined with statuary: some of graceful creatures, others of women with children, and others of fierce monsters.
- All the statues are well-fashioned but have deteriorated due to age and moisture. The stone glistens a green-streaked red when struck by light, giving even the simplest pieces an unwholesome look.
- A larger puddle of water sits at the point where a secret door is located.
- In the center of the room’s ceiling is an obvious trap door to an upper floor (Level 1, Room 5). This wooden trap door appears severely rotted.
What players need to investigate:
- Hidden Cobras: Coiled around several of the statues are a total of 4 spitting cobras. They are cold-blooded and cannot be distinguished from the statues by infra-vision. Although visible in normal light, the snakes will not attack unless approached.
- Exits: There are two exits from this room: the passageway north to Area 8, and the secret door in the south wall.
- Portcullis Trap: At the point on the map marked “T” (or “11” as per the original text, clarifying it’s a specific trigger point) is a hidden trigger that will drop the portcullis across the north entrance to this room when the first character steps on it.
- Raising the portcullis will require the efforts of several characters (with a combined Strength of 50+, for example).
- Secret Door Water Trap: On the other side of the secret door, the hallway is flooded. The doors open inward, and any characters near this door when it is opened will be swept off their feet and 20-120 feet (2d6 x 10′) down the hall towards the shaft in Area 8.
- They will be knocked around considerably, taking 2-8 points of damage.
- Characters not standing near the secret door will be able to brace themselves and remain on their feet.
- Should the secret door be opened from the other (hall) side, all characters in the water will be swept through the door as above.
Monster:
- 4 Spitting Cobras (AC 7, HD 1, hp 6, 4, 2, 2, #AT 1, D 1-3 plus special, MV 30′ (10′), Save F1, ML 7, AL N). Their special attack is spitting venom.
Treasure & Location:
- At the base of a statue in the northeast corner: A 50 gp gem.
4. Piranha Pool
What the GM can reveal immediately:
- Just in front of this section of the hallway, a short staircase leads up to a platform just above the water level.
- The floor of the platform is damp and covered with pale fungus, which is cold and slimy to the touch.
- Beyond the platform, steps lead back down into the flooded hall.
What players need to investigate:
- Dwarf’s Observation: If the fungus is cleared away and the floor is examined by a dwarf, they will notice that the rock below must have been too hard to carve through, necessitating this change in passage depth.
- Giant Piranhas: This lower, flooded section contains 3 giant piranhas. They have only fed on small lizards, rats, and snakes, and will attack anything that enters the water.
Monster:
- 3 Giant Piranhas (AC 6, HD 3+3, hp 14, 18, 20, #AT 1, D 1-8 bite, MV 50′ (15′), Save F2, ML 8, AL N).
Treasure & Location:
- None explicitly mentioned.
5. Priest’s Chamber
What the GM can reveal immediately:
- The door to this room is closed and appears tightly sealed, suggesting it has successfully kept the water out.
What players need to investigate:
- Flooding Hazard: Should the door be opened without precautions, anyone in the water nearby will be swept into the room for 1-6 points of damage as it floods.
- Room Contents: In the chamber are several stone benches and a small altar stone.
- Hidden Mace: Hanging from a stone hook on the wall is a bone-handled mace +2.
- Secret Compartment: Hidden in a secret compartment on the right side of the altar are 500 gp and 2 coral statuettes worth 1000 gp each. This compartment will be underwater if the room is flooded.
- Empty Room: There is nothing else in the chamber.
Monster:
- None actively present.
Treasure & Location:
- Hanging from a stone hook: A bone-handled mace +2.
- Hidden in a secret compartment on the right side of the altar: 500 gp and 2 coral statuettes worth 1000 gp each (total 2000 gp).
6. Rat Lair
What the GM can reveal immediately:
- As characters move down this hallway, they will see several large, rough holes in the walls just above water level.
What players need to investigate:
- Giant Rat Attack: These holes are the tunnels of giant rats, who will swim out and attack characters from both sides as they pass by. They are attracted by light and scent.
- Rat Morale: Should the morale of the rats fail, they will retreat into the tunnels and hide.
- Tunnel Size: The tunnels are dug out of dirt and are wide enough for a halfling to crawl through.
- Main Lair: The large chamber at the end of several of the tunnels is the main lair of the giant rats.
- Rat Behavior (Lair): The rats will attempt to flee if invaded, but if cornered, they will fight ferociously to the death.
Monster:
- 10 Giant Rats (AC 7, HD 1/2, hp 2 each, #AT 1, D 1-3 bite plus disease, MV 40′ (12′), swimming 20′ (6′), Save NM, ML 8, AL N).
Treasure & Location:
- In the main lair:
- Rags, some bones (no value).
- A gnawed scroll with a levitation spell on it.
- Three metal potion bottles: 2 potions of healing and a contaminated potion, now a deadly poison.
7. Fire Trap
What the GM can reveal immediately:
- This room is flooded with 5 feet of water.
- Across the center of the room, you might notice something glinting faintly just below the water’s surface.
What players need to investigate:
- Original Trap: This room had originally been trapped to fire a burst of flame from a hole near the north wall.
- New Trap Function: Even flooded, the trap still operates, but in a different manner. Across the center of the room is a wire set about ankle height (therefore hidden underwater).
- Trap Trigger: If the wire is broken or pulled, it will release a spray of fine oil into a 10-foot wide, 10-foot long area in front of the north door.
- Flammable Oil: This is a special oil that will ignite on contact with water.
- Fire Damage: As the oil bursts into flame, a mist of water will cover any character in the area, igniting any remaining oil. The oil will burn for 6 rounds and will do 3 points of damage per round to characters caught in the fire. The oil may be wiped off.
- Smoke Hazard: The burning oil will make the air in the chamber smoky and hard to breathe, requiring characters to leave this room as quickly as possible. The DM should try to enforce a sense of urgency (e.g., describe rapidly dwindling air supply, minor damage, or even saving throws vs. Death Ray for unconsciousness).
- North Door Obstacle: The door screened by the flame may be opened by characters moving underwater on a roll of 1 on a six-sided die.
- Water Release: When the door is opened, the water will rush out of the room, sweeping unprepared characters into the lowered portcullis beyond. This will cause 1-4 points of damage to the first character to strike.
- Portcullis Flow: If the door to the flooded hall is opened, water will rush through the portcullis (and down the stairs) for 2 minutes (12 rounds). Characters will be thrown against the portcullis and underwater, taking 1-2 points of damage each round until they take action to keep their heads above the water.
- Portcullis Lever: On the east wall, between the door and the portcullis, is a lever which will raise the portcullis if pulled down.
- Downward Rush: If characters raise the portcullis while the water is still flowing, they will be swept down the stairs to Level Three, causing 2-12 points of damage to all characters involved.
Monster:
- None actively present, but this is a complex, multi-stage environmental trap.
Treasure & Location:
- None explicitly mentioned.
8. Boiling Well
What the GM can reveal immediately:
- In the center of the hallway, you see a circular shaft of carved stone that descends out of sight.
What players need to investigate:
- Shaft Depth: The shaft descends 65 feet below the level of the floor.
- Boiling Water: At its bottom, the shaft is filled with boiling water.
- Shaft Configuration: The shaft forms a “U” shape, trapping water at the bottom. The other end of the “U” opens into a ledge overlooking the great cavern on Level Three (Location C).
- Heat Source: This water is heated by volcanic action.
- Swimming Hazard: Characters may swim the distance, but unless they have some method to protect themselves from the boiling water, they will suffer 2-20 points of damage.
- Continuous Flow: The water in the well cannot be bailed out, as hot water constantly seeps in.
Monster:
- None actively present, but the boiling water is a severe environmental hazard.
Treasure & Location:
- None explicitly mentioned.
KEY TO THE THIRD LEVEL (Map E-11)
This is a single natural cavern of great size. The air is hot, steamy, and foul with volcanic gases. The cavern floor is a dangerous landscape of bubbling mud pots, small geysers, hot springs, and mineral crusts. The colors are vivid, ranging from rich reds, browns, and yellows, combined with blacks and grays. Terraces crusted with mineral spring deposits extend from the cavern sides at several points. Stalactites hang from the ceiling, merging with stalagmites in places to form massive pillars. The intense heat of the chamber will prevent the use of infravision. Occasional flares of ruddy light, combined with great bursts of steam from the depths of some hot springs, briefly illuminate small points in the room.
Environmental Hazards (1 in 6 chance per turn when moving on the cavern floor – roll 1d6):
- Mudpot Bursts: A mudpot bursts, spraying a random party member with hot mud (1-3 points of damage).
- Geyser Spray: A geyser sprays a random party member with hot steam (1-4 points of damage).
- Steam Cloud: A cloud of steam from hot springs covers a 10-foot diameter area, blinding all within it for 1-4 rounds (randomly determine which member it centers upon).
- Boiling Water Splash: Boiling water splashes a random party member (1-3 points of damage).
- Gas Bubble Burst: A gas bubble bursts near a random party member; they must make a save vs. Poison or be nauseated for 1 round (no action may be taken).
- Small Tremor: A small tremor shakes the cavern.
A. The Mineral Terrace
What the GM can reveal immediately:
- This terrace, gleaming white with calcium deposits, leads to a set of stairs.
What players need to investigate:
- Access to Level 2: This terrace connects to the stairs leading back up to Level 2. Characters who were washed down these stairs (from Level 2, Area 7, for example) will be able to stop themselves here.
- Painful Heat: The terrace is hot enough to be painful, but it doesn’t cause damage simply from contact.
- Slippery Footing: All terraces in this cavern are somewhat slippery. There is a 1 in 10 chance of slipping if care is not taken.
- Combat Penalties: Characters fighting on these terraces will attack at -3 to hit and defend at -3 AC (3 AC worse) due to the wet, unsure footing.
- Slipping in Combat: Characters in combat on the terrace have a 10% chance per round of slipping.
- Characters who slip will lose at least one melee round while they stand.
- The DM may also rule that they slip off the terrace entirely.
Monster:
- None actively present.
Treasure & Location:
- None explicitly mentioned.
B. The Kopru
What the GM can reveal immediately:
- As you traverse the cavern, you notice strange disturbances in the bubbling mud at these two specific locations.
What players need to investigate:
- Concealed Kopru: At each of these two locations, a Kopru is concealed within the bubbling mud. They are amphibious humanoids who dwell in the hot geyser pools.
- Charm Ability: The Kopru will primarily use their special charm ability to capture party members, or to lure them off the paths and into the geyser basins.
- Geyser Basin Hazard: Characters who fall into a geyser basin will take 1-8 points of damage each round from the boiling water.
- Combat Behavior:
- If charm attempts fail, the Kopru will either physically attack characters on the paths or hide in the hot mud, awaiting a chance to strike again.
- If the party is obviously stronger or is trapped on a terrace, the Kopru will not pursue them, but will wait in the bubbling mud.
- If the party is badly hurt or obviously weak, the Kopru will attack both mentally and physically.
- Relentless Enemies: The Kopru will never surrender and will attempt to enslave as many characters as possible.
- Campaign Impact (DM Note): Should the entire party be enslaved, the Kopru will attempt to use them to restore their ancient kingdom. If this happens, the DM can either devise ways characters can serve the Kopru or retire the captured characters from the campaign, perhaps re-introducing them later as NPCs. The DM and players should discuss and decide on a solution.
Monster:
- 2 Kopru (AC 3, HD 8+4, hp 44, 49, #AT 2, D 1-4/3-18 or charm, MV 150′ (50′), Save F9, ML 9, AL C).
Treasure & Location:
- None explicitly mentioned here, other than the potential for enslavement.
C. Boiling Well
What the GM can reveal immediately:
- You are on the topmost terrace of this level, beside a hot spring.
What players need to investigate:
- Connection to Level 2: This hot spring is directly connected to the U-shaped shaft leading to Area #8 of Level 2.
- Swimming Hazard: Characters may swim to the other side of the shaft and climb out, but they will take 2-20 points of damage unless protected from the heat of the boiling water.
- Hidden Treasure: On the terrace beside the spring, almost unnoticeable under a crust of minerals, is a bag containing 5 emeralds worth 1000 gp each.
- Discovery: The party will only find this bag if they actively search the terrace.
Monster:
- None actively present.
Treasure & Location:
- On the terrace, under mineral crust: A bag containing 5 emeralds worth 1000 gp each (total 5000 gp).
D. Caverns
What the GM can reveal immediately:
- This set of terraces leads into a series of natural caverns, extending beyond the mapped area.
What players need to investigate:
- Unmapped Area (DM’s Discretion): These caverns are left unmapped for the DM to create their own special encounter areas.
- Potential Inhabitants: Many cave-dwelling creatures might live here.
- Potential Exits: There may be exits leading up to the plateau above.
Monster:
- Varies based on DM’s design.
Treasure & Location:
- Varies based on DM’s design.
E. Weak Crust
What the GM can reveal immediately:
- This section of the path appears solid, but there’s something subtly off about the ground here.
What players need to investigate:
- Hidden Hazard: This section of trail is actually nothing but a weak crust over a hot spring.
- Collapse Trigger: Unless the path is probed first (e.g., with a pole or cautious testing), the lead character will break the surface and drop into the hot water.
- Damage: The character will suffer 1-10 points of damage the first round and 1-8 points each round thereafter until rescued.
- Rescue Difficulty: The crust around the edges will be crumbling and dangerous, and characters will not be able to come closer than 5 feet to the edge without also falling in. Ropes, poles, and rescue techniques similar to those used on thin ice may be used to save the character.
Monster:
- None actively present.
Treasure & Location:
- None explicitly mentioned.
F. The Hidden Throne
What the GM can reveal immediately:
- Set on the topmost terrace, directly under a dripping stalactite, is a throne.
- On the throne sits a grinning skeleton.
- Mineral-rich waters, dripping from the ceiling for many years, have heavily encrusted both the skeleton and the throne, hiding all but their most general features.
What players need to investigate:
- Concealed Items: In front of the throne (and hard to see under the mineral crust) is a sword. On the skeleton’s finger is a ring, similarly concealed by mineral deposits.
- Appearance: Both items are entirely ordinary in appearance.
- Magic Items: The ring is a ring of telekinesis, and the sword is a sword +2 with a charm person ability (non-intelligent).
Monster:
- None actively present (skeleton is just decoration).
Treasure & Location:
- Concealed under mineral crust:
- 1 ring of telekinesis.
- 1 sword +2 with charm person ability.
Further Adventures On The Isle of Dread
Here are some detailed suggestions for extending your campaign on the Isle of Dread, complete with numbers and specific encounters to integrate.
1. Destroy the Zombie Master
This adventure is perfect for a low-level party (typically Levels 1-3) looking to gain trust in Tanaroa before venturing deeper inland.
The Problem: The village of Tanaroa has been experiencing escalating attacks from undead creatures for the past 10 days. The villagers are terrified, and the tribal leader, Chief Kuroa (Neutral, F3, HP 20, ML 7), is losing control. They whisper of a “Zombie-Master.” At night, 2-5 (1d4+1) zombies and 1-3 (1d3) ghouls prowl the village paths, preying on lone travelers. Three villagers have already been killed, and five more are missing.
The Source: Each section of Tanaroa village (as marked on the map, typically 3-4 sections) surrounds a graveyard. These graveyards are honeycombed with crude tunnels, culminating in the lair of the Zombie Master.
Graveyard Lair (DM must draw and populate):
- Entrances: Each graveyard has 1-3 inconspicuous openings (e.g., collapsed crypt entrances, shallow graves that have been dug out) leading to a network of damp, cramped tunnels. These tunnels are typically 5-10 feet wide and 5-7 feet high.
- Tunnel Inhabitants (Per 100 feet of tunnel):
- 50% chance of encountering 2-4 (1d3+1) Giant Centipedes (AC 9, HD 1/2, hp 2 each, #AT 1, D 1 plus poison, MV 60′, Save NM, ML 7, AL N).
- 25% chance of encountering 1-2 (1d2) Carrion Crawlers (AC 3, HD 3+1, hp 15 each, #AT 8 tentacles, D paralysis, MV 120′, Save F2, ML 9, AL N). These are often found near rotting corpses.
- Crypts/Chambers (Typical graveyard tunnel network contains 3-5 chambers):
- Zombie Hordes: 5-10 (1d6+4) Zombies (AC 8, HD 2, hp 9 each, #AT 1, D 1-8, MV 60′, Save F1, ML 12, AL C) guarding crude burial sites or piles of bones.
- Ghoul Feeding Pits: 3-6 (1d4+2) Ghouls (AC 6, HD 2, hp 10 each, #AT 3, D 1-3/1-3/1-3 plus paralysis, MV 90′, Save F1, ML 9, AL C) often found near freshly unearthed graves or in areas where victims have been dragged.
- Ghast Lairs (1 per graveyard): A particularly large crypt might house 1-2 Ghasts (AC 4, HD 4, hp 18 each, #AT 3, D 1-4/1-4/1-8 plus paralysis and stench, MV 90′, Save F2, ML 13, AL C). They are more cunning and may try to ambush.
- The Zombie Master’s Lair (Central Chamber): A large, disturbed crypt or natural cavern.
- The Zombie Master: A Necromancer (C6, AC 7 (leather), HP 25, #AT 1, D 1-4 (dagger) or by spell, MV 120′, ML 10, AL C).
- Spells: Cause Fear, Command, Hold Person, Spirit Hammer, Animate Dead, Speak with Dead. (The Animate Dead spell is key to their power).
- Guards: He is always accompanied by 4-6 (1d3+3) freshly animated Zombies and 2 Ghasts.
- Treasure: The Zombie Master’s crude altar might contain 500-1000 gp in various coinages, 1-3 (1d3) small gems (100-300 gp each), and a scroll with 1-2 necromantic spells. He might also possess a +1 Dagger he uses for rituals.
- The Zombie Master: A Necromancer (C6, AC 7 (leather), HP 25, #AT 1, D 1-4 (dagger) or by spell, MV 120′, ML 10, AL C).
2. Map the Island
This is a long-term adventure, suitable for Levels 3-6, focusing on exploration and survival. It requires extensive travel and careful resource management.
The Mission: A wealthy merchant prince from Specularum (e.g., Lord Varen of the Trade Council, Lawful, F6, HP 40, ML 10, AL L) or a renowned Imperial mapmaker (e.g., Master Gerardus of Thyatis, Neutral, MU5, HP 18, ML 9, AL N) is offering a substantial reward for a comprehensive survey of the Isle of Dread.
The Reward:
- Initial Payment: 500 gp upon contract signing.
- Per Hex Mapped: 50 gp for each hex fully explored and accurately mapped, including significant features (rivers, mountains, ruins, major monster lairs, etc.).
- Bonus for Unique Discoveries: 500-2000 gp for discovery of new, valuable resources (e.g., a large diamond mine, a previously unknown species of megafauna, a lost ancient ruin) or establishing contact with new native tribes.
- Completion Bonus: An additional 5,000 gp upon completion of a map covering at least 80% of the island’s terrestrial area.
The Dangers:
- Time & Resources: Mapping a significant portion of the island (e.g., 20-30 hexes) could take 2-4 months of in-game time. This requires constant provisioning of food, water, and other supplies.
- Navigation: While the module provides a map, in-game the party must navigate using compass, stars, and landmarks. Losing direction could result in wasted time and resources.
- Random Encounters: Increase the frequency of wandering monster checks to 2-3 times per day of travel. Encounters should be diverse, drawing from the entire island’s monster list (dinosaurs, giant insects, aggressive natives, undead, etc.).
- Terrain Challenges: Navigating dense jungle, scaling cliffs, crossing rivers, and enduring the humid climate are constant challenges. These might impose penalties on movement rates or require skill checks.
- Dense Jungle: Movement reduced by 50%. Visibility reduced to 30-60 feet.
- Swamps: Movement reduced by 75%. High chance of disease (10% chance per day, Save vs. Poison or contract a debilitating fever that inflicts 1d4 strength damage per day).
- Mountainous/Hilly Terrain: Increased chance of rockslides (1 in 6, 2d6 damage, DEX Save for half) or encountering cliff-dwelling creatures (e.g., Pterodactyls, Rocs).
3. The Dinosaur Hunt
This adventure is for a powerful and well-equipped party (Levels 5-8) seeking glory and great wealth.
The Objective: Acquire rare dinosaur parts for wealthy clients (e.g., a Royal Apothecary from Karameikos seeking exotic ingredients, or an eccentric Collector of Arcane Curiosities from Minrothad).
Target Species & Value (per creature):
- Pteranodon: Skull (500 gp), Wingspan (trophy, 200 gp). Relatively common.
- Stegosaurus: Plated Hide (1,500 gp, could be crafted into special armor), Spiked Tail (trophy, 750 gp). Found in open plains/light jungle.
- Allosaurus: Claw (rare ingredient, 1,000 gp), Jawbone with teeth (2,000 gp), Heart (arcane component, 3,000 gp). Fierce, found in hunting grounds.
- Tyrannosaurus Rex: Tooth (large, 100 gp each, 20-30 teeth per jaw), Femur (arcane component, 5,000 gp), Brain (rare alchemical ingredient, 10,000 gp). Apex predator, found in deeper jungle.
- Brontosaurus/Brachiosaurus: Neck Vertebrae (huge trophy, 2,500 gp), Liver (alchemical component, 4,000 gp). Found near large water sources. Transport is extremely difficult.
- Triceratops: Horns (1,000 gp each), Skull (trophy, 3,000 gp). Found in light jungle/open areas.
Logistical Challenges:
- Tracking: Requires Wilderness Survival or Tracking skills (DC 15, takes 1d4 hours per target).
- Killing: Dinosaurs are tough; a T-Rex (AC 5, HD 13, hp 55) or Brontosaurus (AC 5, HD 20, hp 90) represent significant combat challenges.
- Processing: Skinning, butchering, and preserving parts takes time (e.g., 2-6 hours per dinosaur depending on size) and requires appropriate tools (axes, large knives). This time also increases the chance of wandering monster encounters.
- Transport: This is the primary difficulty.
- Weight: A single T-Rex femur could weigh 200-300 lbs. A Stegosaurus plate might be 50-80 lbs. Transporting these requires wagons, sleds, or magical assistance (e.g., Levitate, Teleport).
- Overland: Overland transport through dense jungle is slow (e.g., 1/4 normal speed) and attracts more attention.
- Shipment: Loading large parts onto a ship requires ingenuity and possibly hiring local labor (1 gp/day per worker).
4. Exterminate the Pirates
This is a naval and tactical adventure suitable for Levels 4-7, focused on naval combat and raiding.
The Mission: Merchants from a mainland city (e.g., Specularum, Thyatis, Ierendi) are suffering crippling losses due to piracy around the Isle of Dread. They offer the adventurers the use of a fully provisioned War Galley (AC 0 (Hull), HP 150, MV 60’/turn, Crew: 50 Sailors, 10 Marines; Weapons: 1 Light Ballista, 2 Swivel Cannons) and a bounty of 500 gp per pirate leader eliminated, plus 200 gp per pirate ship sunk or captured.
The Pirate Fleet: The pirates described in the module can be used as a base. To enhance the challenge:
- Captain Redbeard’s Revenge: The main pirate lair (perhaps a hidden cove on a smaller, unmapped isle near Dread, or a fortified natural harbor on Dread’s coast).
- Flagship: A Heavy Galleon, “The Serpent’s Kiss” (AC -2 (Hull), HP 250, MV 40’/turn, Crew: 80 Sailors, 20 Marines; Weapons: 2 Heavy Cannons, 4 Light Ballistae, 2 Scorpion ballistae).
- Captain Redbeard (Neutral, F8, HP 55, AC 2 (Plate + Shield), #AT 2, D 1d8+2 (Longsword +1), MV 90′, ML 11, AL C). He has a magical spyglass that grants +1 to surprise rolls in naval combat.
- Lieutenants: 3-5 (1d3+2) F4 Fighters (AC 4, HP 25, MV 90′, ML 9, AL C).
- Support Ships: 2-3 (1d2+1) Light Galleys (AC 1 (Hull), HP 100, MV 50’/turn, Crew: 40 Sailors, 10 Marines; Weapons: 1 Light Ballista, 2 Swivel Cannons). Each commanded by an F3 Pirate Leader (AC 5, HP 18, ML 8, AL C).
- Flagship: A Heavy Galleon, “The Serpent’s Kiss” (AC -2 (Hull), HP 250, MV 40’/turn, Crew: 80 Sailors, 20 Marines; Weapons: 2 Heavy Cannons, 4 Light Ballistae, 2 Scorpion ballistae).
- Fortified Base: The pirates may have built a fortified shore base with:
- Watchtowers: Guarded by 2 F2 archers each (AC 7, HP 12, #AT 1, D 1-6 bow, MV 120′, ML 8).
- Shore Batteries: 1-2 Heavy Cannons (AC 4, HP 50, D 4d10, #AT 1/2 rounds) manned by 4 F2 crewmen each.
- Land Forces: 20-30 F1 Pirates (AC 7, HP 6, ML 7, AL C) defending the base.
- Captured Treasure: A vault containing 10,000-25,000 gp in various currencies and goods.
5. Bring ‘Em Back Alive
This is a high-level challenge for strong characters (Levels 7-10), demanding extreme planning and ingenuity.
The Patron: A whimsical Glantrian Prince/Princess (e.g., Prince Jaggar of Aalborg, MU10, HP 38, ML 12, AL C; or Princess Adeline of Braejr, C10, HP 45, ML 12, AL L) desires a living specimen of an exotic monster from the Isle of Dread for their personal menagerie or arcane research. The reward is substantial, rumored to be 50,000-100,000 gp or a direct magical boon (e.g., a Wish spell, a Major Artifact).
Target Monsters (Capture Difficulty):
- Pterodactyl: (AC 6, HD 3, hp 15). Relatively “easy.” Requires nets, tranquilizer darts (DC 15 Constitution Save or fall unconscious for 1d6 hours), and a sturdy cage (500 gp to construct).
- Stegosaurus: (AC 2, HD 10, hp 45). Difficult. Requires pits, strong ropes, and sedative potions (DC 18 Constitution Save or fall asleep for 2d6 hours). Needs a reinforced mobile cage or a large transport barge (2,000 gp to construct/hire).
- Tyrannosaurus Rex: (AC 5, HD 13, hp 55). Very Difficult. Requires massive pit traps, magical containment (e.g., Wall of Force, Hold Monster spells), powerful tranquilizers (DC 20 Constitution Save or unconscious for 3d6 hours), and a custom-built, magically reinforced transport ship (10,000 gp to construct/hire).
- Giant Ape: (AC 6, HD 12, hp 50). Extremely Difficult. Intelligent enough to escape cunningly. Might require charm magic (Charm Monster from a high-level caster, requiring a successful save by the Ape), or elaborate bait-and-trap scenarios. Requires a fortress-like cage.
- Chimera: (AC 4, HD 9, hp 40). Legendary. Its multiple heads and breath weapons make it nearly impossible to capture without killing. This would be a quest for characters who can bend reality.
Logistical Steps & Challenges:
- Reconnaissance (1-3 weeks): Scouting the monster’s territory, learning its habits, patrol routes, and potential weaknesses. Requires Stealth, Survival, and Knowledge (Nature) checks.
- Trap Construction/Preparation (1-2 weeks):
- Pit Traps: 30ft deep, lined with smooth stone, requires 5-10 laborers and 100-200 gp in materials.
- Nets: Giant reinforced nets, perhaps enchanted to hold.
- Sedatives/Poisons: Research and acquisition of appropriate tranquilizers. Requires MU/Casting ability or a Potion of Paralysis.
- The Capture (1-3 days): The actual confrontation and capture. Success heavily relies on planning and teamwork. High risk of TPK if plans go awry.
- Containment & Transport (Weeks to Months):
- Overland: Moving a large, sedated monster through jungle. Requires custom-built sleds, rollers, or magical levitation. Attracts many curious (or aggressive) creatures. Progress might be 1-2 hexes per day.
- Food & Water: Maintaining the creature’s health. A T-Rex might need 500 lbs of fresh meat per day.
- Ocean Crossing: A custom-built ship (as above) capable of holding the beast securely and resisting its attempts to break free. The voyage to the mainland could take 1-2 weeks, encountering storms, sea monsters, and rival collectors.
6. Sunken Treasure
This is a classic treasure hunt, suitable for Levels 3-5, involving exploration, puzzle-solving, and underwater combat.
The Map: The characters acquire (or find a fragment of) a faded, salt-stained treasure map. It describes a shipwreck near the Isle of Dread.
Map Clues:
- Island Recognition: Mentions a “Wall of Stone that splits the land” (the central volcanic cliff), “great thunder-lizards roaming the plains,” and “men with strange fish-faces” (Kopru, or other unusual races).
- General Location: “On the southwestern side, between the smoking mountains and the great coral reef, in the Shadow of the Skull Peak.” This points to a specific hex or two.
- Ship’s Cargo: The ship, “The Sea Serpent’s Kiss” (or “The Golden Dawn”), was a merchant vessel carrying a diplomatic tribute or valuable trade goods. It sunk 50 years ago in a sudden storm.
The Wreck:
- Location: The ship lies 100-150 feet below the surface, likely nestled in a coral reef or against an underwater cliff face.
- Condition: Partially intact, but heavily encrusted with barnacles and coral. Decks are collapsed, and cargo holds are exposed.
- Underwater Hazards:
- Currents: Strong currents (25% chance per round to be pushed 10-20 feet off course, DEX Save DC 12 to resist).
- Visibility: Limited to 30-50 feet (unless magical light is used).
- Oxygen: Characters without magical breathing (e.g., Water Breathing spells or potions) can hold their breath for 1 round per CON point, after which they begin to drown.
- Inhabitants:
- Swarm of Giant Crabs: 5-10 (1d6+4) Giant Crabs (AC 3, HD 3, hp 15 each, #AT 2 pincers, D 2-8/2-8, MV 90′, Save F2, ML 7, AL N) have made the wreck their home.
- Giant Octopus: A Giant Octopus (AC 7, HD 6, hp 30, #AT 8 tentacles, D 1-3 each plus constrict, MV 30′ (land), 60′ (water), Save F3, ML 8, AL N) lurks within the main cargo hold, guarding its territory. It can use its ink cloud to obscure vision.
- Merrow (optional): For a higher-level party, 1-2 Merrow (AC 4, HD 4+4, hp 20 each, #AT 1 (spear), D 2-12, MV 120′ (water), Save F4, ML 10, AL C) might have claimed the wreck and its treasure.
The Treasure:
- Main Hoard: In a collapsed captain’s cabin or secured cargo hold: 15,000 gp in various forms (gold bars, silver ingots, gemstones).
- Individual Items:
- A Water Breathing Potion (1-2 doses).
- A Pearl of Wisdom (worth 500 gp, grants +1 to Wisdom permanently if consumed).
- A Masterwork Trident (worth 200 gp, but +0 to hit/damage, beautifully crafted).
- A Locked Sea Chest (requiring a DC 15 Open Locks check or a DC 18 Strength check to break) containing 2000 sp, 500 gp, and a Waterproof Scroll of Control Weather (single use).