

PART 2: TIERS 1 AND 2 (Dungeon Level 1)
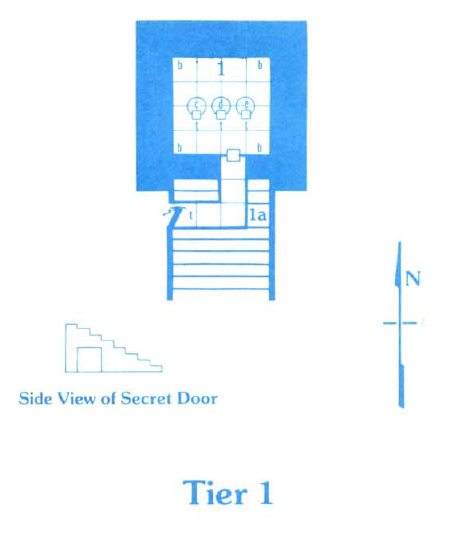
1. Statue Room
Immediate Perception:
- A stone slab, revealing a 10-foot wide passage into the pyramid, is propped open by the dead body of a hobgoblin.
- The hobgoblin has a large crossbow bolt in its chest and appears to have been dead for several weeks. Its equipment has been looted.
- The passage floor is covered in dust with several pairs of footprints leading inward.
- Opposite the secret door, in a niche, a large, unloaded crossbow is pointed towards you.
- The room beyond the passage is a 40-foot square, smelling old and musty.
- Dust on the floor has been disturbed.
- Three huge bronze cylinders reach from floor to ceiling in the middle of the room. Each cylinder has a bronze door with a handle at floor level, facing you. If tapped, the cylinders sound hollow.
Investigation Required:
- Hobgoblin’s Demise: The hobgoblin was killed by a crossbow trap triggered by a hidden pressure plate just inside the secret door.
- Secret Door Closure: The secret door will swing shut behind the party unless it is jammed open.
- Gas Trap (Trap 1b): Opening the room’s door triggers an invisible, odorless, and tasteless gas trap. Small holes in each corner of the room release the gas.
- An elf or thief has a 50% chance to hear the hiss of escaping gas.
- The gas takes one round to build up, during which characters will feel dizzy.
- After the first round, the gas deals 1 point of damage per round, and characters will realize it’s hard to breathe.
- Jamming rags or iron spikes into the holes will stop the gas.
- If both the room’s door and the secret door are jammed open, the gas will escape harmlessly.
- Bronze Cylinders (Statue Bases): These are the hollow bases of the Cynidicean god statues located on top of the pyramid.
- Trap 1c (West Wall/Gorm Statue): Pulling the handle on the door of the left (western) statue (Gorm) fires four darts from the wall. Darts can only hit someone directly in front of the door, dealing 1-3 points of damage per hit (roll to hit as a 1 HD monster).
- Trap 1d (Center Statue/Usamigaras): The trap in the base of the center statue (Usamigaras) is currently harmless. Searching the area reveals dried blood in front of the cylinder, indicating it was triggered by an earlier party.
- GM Note: Normally, this trap would fire two spears, dealing 1-6 points of damage per hit (roll to hit as a 1 HD monster). The GM may reset this trap if the party leaves and returns.
- Trap 1e (Right Statue/Madarua): Pulling the handle on the door of the right (eastern) statue (Madarua) causes a special hinged paving stone in front of it to drop open. Anyone standing in front of the door will fall to room 6 below, taking 1-6 points of damage.
- Inside the Cylinders: Each cylinder contains a ladder going both up and down.
- Upwards: Climbing up leads into one of the statues on top of the pyramid. Inside, characters will find a speaking tube (for priests to “speak the god’s will”) and levers that can move parts of the statue (arms, head, eyes, etc.).
- Downwards: Climbing down any ladder enters room 6.
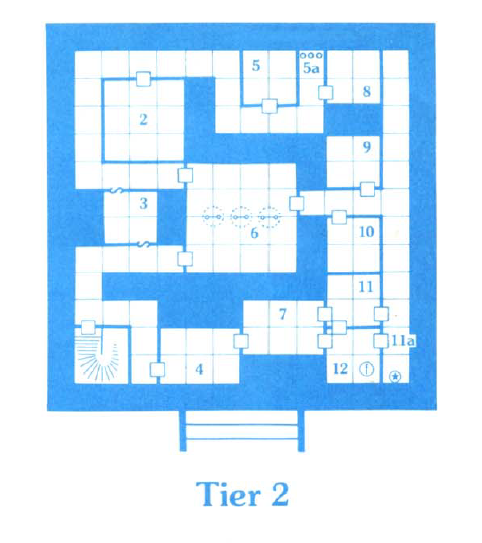
2. Storage Room
Immediate Perception:
- The room contains rotting bales of what might be cloth and dusty crates.
- The room smells as if it has been closed off for a long time.
Investigation Required:
- The room is an old, abandoned storage room.
- The contents of the crates (food) and bales (clothing) are rotted and worthless. The room is otherwise empty.
3. Secret Room
Immediate Perception:
- You see seven bird-like creatures with long, tube-like beaks.
- A faint glitter catches your eye from the center of the room as the creatures fly toward you.
Investigation Required:
- Creatures: The bird-like creatures are seven stirges (AC 7; HD 1*; hp 4 each; MV 60′; #AT 1; D 1-3; Save F1; ML 9; AL N).
- Flying stirges gain a +2 bonus to hit due to their speed.
- Once a stirge hits, its beak attaches, and it sucks blood for an automatic 1-3 points of damage every round until either the victim or the stirge dies.
- Treasure: The glitter comes from four gems in a pile of dust, worth 100 gp, 100 gp, 500 gp, and 1000 gp respectively.
- Stirge Access: A small hole high in the north wall is where the stirges fly through when hunting at night.
4. Priest’s Quarters
Immediate Perception:
- The room is sparsely furnished with rotting furniture, including a bed, a desk, a chest, a writing table with a wooden chair, and a wooden holy symbol shaped like a lightning bolt.
- All furniture is covered in a thick layer of dust.
- On the floor lies the body of a dead hobgoblin, appearing several weeks old, with a swollen and discolored left arm.
Investigation Required:
- Former Occupant: This room was once the quarters of a high priest of the Brotherhood of Gorm.
- Hobgoblin’s Demise: The hobgoblin was killed by a killer bee from room 7.
- Hobgoblin’s Possessions: The hobgoblin’s body carries a full water bottle and a purse containing 135 sp and 40 gp. The room is otherwise empty.
5. Fireworks Storeroom
Immediate Perception:
- The room seems drier than the rest of the pyramid.
- In the center are a half-dozen small crates.
- Seated on the crates are nearly a dozen 1-foot tall winged people, speaking a strange musical language and laughing merrily.
Investigation Required:
- Winged People: These are 10 sprites (AC 6; HD 1/2; hp 3 each; MV 20′, fly 60′; #AT 1; D curse; Save E1; ML 7; AL N).
- They are friendly and will chatter if approached amicably, but are easily distracted. They will not join the party.
- If attacked, five sprites acting together can cast one curse spell, which takes the form of a magical practical joke (e.g., armor turns to rust, boots glue to the floor).
- Sprites will cast one or two curses, then escape through a 1-foot by 1-foot concealed door high in the northeast wall. If pursued, they will try to fly over the green slime in room 8.
- Crates: The crates contain fireworks packed in sawdust.
- There is only a 1 in 1d6 chance that a crate of fireworks is still usable.
- A usable crate has a resale value of 100 gp.
- Usable fireworks (used by ancient priests to fake “miracles”) contain 1-6 charges of flash powder, 2-8 roman candles, 1-4 skyrockets, and 3-12 strings of small firecrackers.
- GM Note: These firecrackers create smoke, bright lights, and noise, but do not cause damage or blindness.
5a. Pottery Jars
Immediate Perception:
- Three 4-foot tall pottery jars are present.
- The first jar contains sand. The other two are dry and empty.
Investigation Required:
- The jars were intended to store water for fire suppression in the fireworks room.
6. Special Storeroom
Immediate Perception:
- A 10-foot radius circle at the foot of each ladder (from Area 1) is lit by a glowing, 2-foot long beetle with three glowing spots.
Investigation Required:
- Beetles: The three beetles are fire beetles (AC 4; HD 1+2; hp 6 each; MV 40′; #AT 1; D 2-8; Save F1; ML 7; AL N).
- Each beetle has three glands that glow and emit light for a 10-foot radius. These glands continue to glow for 1-6 days after removal.
- The beetles are hungry and will attack if disturbed.
- Room Contents: This room holds spare parts for the machinery inside the statues.
- Clay Pots: Several large, covered clay pots once held oil for lubrication. The oil has mostly evaporated, but 6 flasks of poorly burning, thick-smoke-producing oil can be recovered (takes 2 turns).
- Foundry: There is a small foundry for fixing broken statue parts, equipped with a forge, an anvil, tongs, hammers, and other tools.
7. Treasure Room
Immediate Perception:
- In the center of the room is a 10-foot tall cage.
- At the bottom of the cage is a pile of coins and gems.
- A giant beehive hangs from the top of the cage.
- Several large, 1-foot long bees are buzzing around the room. The cage mesh is wide enough for them to fly through.
- There is a 1-foot square hole high in the south wall.
Investigation Required:
- Treasure Cage: The locked cage holds the treasure of the Brotherhood of Gorm (from rooms 11 and 12).
- Guardians: The treasure is guarded by 5 killer bees (AC 7; HD 1/2*; hp 2 each; MV 50′; #AT 1; D 1-3 + special; Save F1; ML 9; AL N) flying around the room.
- Killer bees recognize anyone wearing a mask of Gorm as friendly and will not attack them unless provoked.
- They will automatically attack anyone else entering the room.
- If a bee’s attack hits, the victim must Save vs. Poison or die.
- A bee dies after stinging. Even if the save is successful, the victim must spend 1 round removing the stinger, otherwise it continues to do 1 point of damage per round.
- Treasure Contents: The treasure in the cage includes 2000 sp, 500 gp, 2 gems (100 gp each), and one piece of jewelry worth 700 gp.
- Beehive: The bees inside the hive will not attack unless the hive itself is attacked.
- The hive contains 4 more bees (1 HD, 4 hp each) and a 2 HD queen bee (9 hp).
- The queen can sting repeatedly without dying.
- A special honey is found inside the hive. All the honey in the hive (enough for one dose) acts as a half-strength potion of healing, curing 1-4 points of damage.
8. Abandoned Room
Immediate Perception:
- The entire floor of this room is covered with green, oozing slime.
- The room otherwise appears to be empty.
Investigation Required:
- Green Oozing Slime: This is green slime (AC n/a; HD 2*; hp 9; MV 1″; #AT 1; D special; Save F1; ML 12; AL N).
- It can only be damaged by fire or cold.
- It dissolves wood and metal in 6 rounds.
- If it touches flesh, it turns the victim into green slime in 1-4 rounds after the initial 6 rounds.
- It can be burned off, but this deals half damage to the slime and half damage to the character.
9. Abandoned Priest’s Quarters
Immediate Perception:
- The room contains an old bed, writing table, chair, and a chest, all suggesting long abandonment.
- From behind the bed, you hear scuffling sounds.
- Suddenly, the head of a large, pale blue lizard with orange spots bursts into view.
Investigation Required:
- Lizards: The lizard you see is a Gecko (AC 5; HD 3+1; hp 15; MV 40′; #AT 1; D 1-8; Save F2; AL N). It is munching on the body of an unfortunate Cynidicean.
- If the party enters the room without looking up, a second Gecko (hp 12) will drop from the ceiling, surprising them.
- Treasure: The Cynidicean’s body wears a bird-like mask inlaid with gold, worth 80 gp.
10. Abandoned Priest’s Quarters
Immediate Perception:
- This room appears to have once been a cleric’s quarters but has been abandoned for a long time.
- It contains musty, dust-covered furniture: a sleeping pallet, a writing desk with a wooden stool, a chest, and a wooden holy symbol shaped like a balance.
Investigation Required:
- The room holds nothing valuable.
11. Brotherhood of Gorm
Immediate Perception:
- The room contains three double bunk beds.
- Five men are seated on the lower bunks, talking.
- Each man wears iron chain mail over a blue tunic, a steel helmet, and a golden mask showing a long-haired, bearded man with a stern gaze. All masks are identical.
Investigation Required:
- Occupants: The five men are members of the Brotherhood of Gorm (AC 5; F1; hp 5 each; MV 20′; #AT 1; D 1-8; Save F1; ML 8; AL L). They control rooms 11, 12, and 24.
- Joining the Brotherhood: If the party doesn’t attack, the men might invite them to join.
- DM Roll (2d6):
- 9-12: Party will be asked to join.
- 6-8: Party may join, but won’t be asked directly.
- 2-5: Brothers assume characters are thieves/spies and will attack or drive them away.
- Only male fighters, dwarves, halflings, and elves of Lawful alignment can become full members. Any character can become a lesser member.
- Characters wanting to join are taken to room 12.
- DM Roll (2d6):
- Combat Reinforcements: If fighting starts, Brothers of Gorm from room 12 will rush to assist.
- Contents: The room contains the Brothers’ equipment, food, and water.
- Treasure: The only treasure is the Brothers’ masks, worth 100 gp each.
11a. Statue of Gorm
Immediate Perception:
- At the end of the corridor, you see a glittering statue.
- The statue appears to be a smaller version of the bearded man wielding a lightning bolt seen on top of the pyramid.
Investigation Required:
- The statue appears to be made of gold but is actually a wooden statue painted with gold paint.
- It is man-sized and firmly set into a heavy stone base.
- This statue of Gorm has no gold piece value.
12. Grand Master of the Brotherhood of Gorm
Immediate Perception:
- The room has three double bunk beds along the walls.
- Six men stand around the room talking.
- All wear chain mail armor over blue tunics, steel helmets, and golden masks resembling a stern, long-haired, bearded man.
Investigation Required:
- Occupants: Five of the men are Brothers of Gorm (AC 5; F1; hp 5 each; MV 20′; #AT 1; D 1-8; Save F1; ML 8; AL L).
- The tallest, oldest man is Kanadius, the Grand Master of the Brotherhood of Gorm (AC 4; F3; hp 25; #AT 1 at +1; D 1-8 +1; Save F3; AL L; S 14, I 12, W 9, D 12, C 10, Ch 12).
- Kanadius wears a fancier helmet and grants all Brothers a morale of 9 when they are with him.
- Kanadius is stern but kind, preferring to outmaneuver opponents, but brave in a fight. He is somewhat absent-minded about minor details but sharp on major ones, leading his men effectively.
- Combat Reinforcements: If the party attacks, the Brothers in room 11 will rush to aid.
- Secret Escape Route: A secret trapdoor is hidden behind one of the beds in the southeast corner.
- If the party attacks and is winning, Kanadius may try to escape through this door, which leads to a secret chamber next to room 24 on Tier 3.
- Brothers will fight to help Kanadius escape unless their morale fails.
- GM Note: If Kanadius escapes, the DM may create a future encounter with him and a dozen Brothers seeking revenge.
- Contents: The area contains the Brothers’ equipment, food, and water.
- Treasure: The Brothers’ masks are worth 100 gp each. Kanadius’s fancy helmet is a helm of telepathy, usable three times daily.
- Joining the Brotherhood (Initial Encounter): If this is the party’s first encounter with the Brothers, they may become suspicious and attack (2d6 roll of 2-5). They remain neutral on a 2d6 roll of 6-8.
- Joining the Brotherhood (Continued): If the party does not attack, the Brothers in this room may invite them to join (2d6 roll of 9-12, see room 11 details).
- Before characters join, Kanadius will secretly test their sincerity with the helm of telepathy. The DM will ask the player about their character’s sincerity, emphasizing that future actions against this decision may be forbidden.
- Only male fighters, dwarves, halflings, and elves of Lawful alignment can become full members.
- Full members are taken to room 24 on Tier 3 for an initiation ceremony by Kanadius. They receive tunics, masks, and any normal armor/weapons needed.
- Lesser members receive a necklace with a small golden mask of Gorm (worth 20 gp).
- Extra masks and necklaces are stored in a stronghold in the underground city (half a day’s travel for a messenger).
- While waiting for supplies, the Brotherhood will aid the party against wandering monsters. The Brotherhood’s rooms can be treated as “safe,” allowing rest and spell memorization.
PART 3: TIERS 3 AND 4 (Dungeon Level 2)
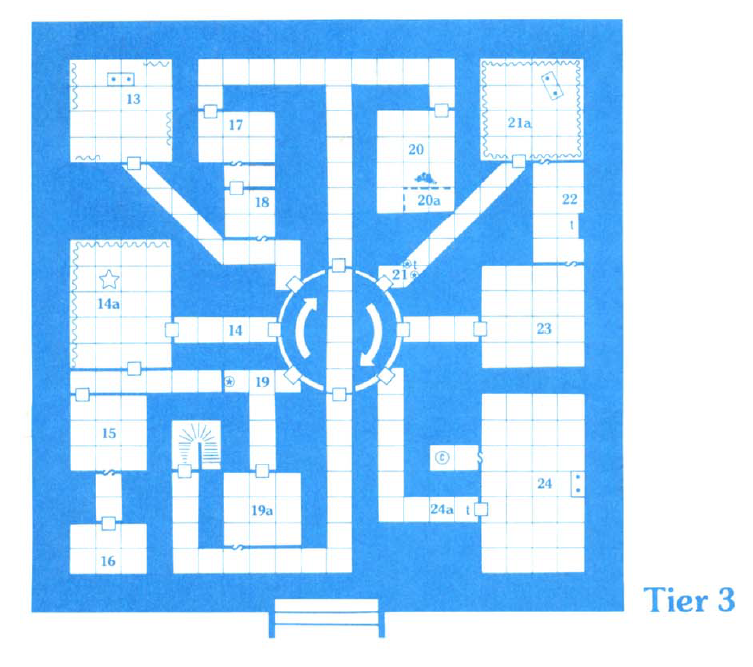
Overview: The second level of the dungeon comprises Tier 3 (Rooms 13-24) and Tier 4 (Rooms 25-40) of the pyramid.
- Tier 3 serves as the headquarters for the Brotherhood of Gorm, the Magi of Usamigaras, and the Warrior Maidens of Madarua. For characters who join these groups, these areas can become “safe zones.”
- Tier 4 holds the burial chambers of King Alexander, Queen Zenobia, and many important court officials from their era.
Revolving Passage (Central Feature of Tier 3):
- Immediate Perception: The central area features a passage on a turntable, designed to rotate via a system of weights and counter-weights.
- On the wall inside each end of the revolving passage, there is a row of eight buttons, mirroring those in the surrounding halls.
- Next to each door leading into the central revolving passageway, there’s a button with a symbol on it.
- Investigation Required:
- Passage Rotation: Pressing an inside button will cause that end of the passage to swing clockwise, aligning with the corresponding hall.
- Pressing a button next to a door leading to the revolving passage will cause the passage to swing clockwise to align with that door, producing faint grinding noises. If already aligned, nothing happens.
- A door to the central area will only open if the revolving passage is correctly lined up with it.
Wandering Monsters (Level 2):
- Check Frequency: Check for wandering monsters once every 2 game turns.
- Encounter Chance: An encounter occurs on a roll of 1 on 1d6.
- Wandering Monster Table (Roll 1d8, or choose):
1. Giant Bat (AC 7; HD 2; hp 9; MV 60′ Fl; #AT 1; D 1-4; Save F1; ML 8; AL N)
- Perception: Giant bats “see” using echolocation.
- Special Encounter: One of the giant bats you encounter is a giant vampire bat.
- Bite Effect: Any character bitten by this bat must save vs. Paralysis or fall unconscious for 1-10 rounds.
- Death Effect: If a character is killed by this bat’s bite, they must save vs. Spells or become an undead creature 24 hours after death. The specific undead type is determined by the DM.
2. Brotherhood of Gorm (AC 5; HD 1; hp 5; MV 20′; #AT 1; D 1-8; Save F1; ML 8; AL L)
- Encounter: This will be a party of Brothers of Gorm traveling to their shrine in room 24.
- More Details: Refer to rooms 11 and 12 for extensive information about the Brotherhood and their interactions.
3. Cynidicean
- Encounter: For details on these encounters, refer to the “Cynidicean” section in Part 6: New Monsters, or the DM can create new scenarios.
4. Hobgoblin (AC 6; HD 1+1; hp 6; MV 30′; #AT 1; D 1-8; Save F1; ML 8; AL C)
- Details: Hobgoblins are described in both editions of the D&D Basic rules.
- Mission: These hobgoblins are on a mission for the Priests of Zargon, such as capturing prisoners or raiding another faction.
5. Magi of Usamigaras (AC 5; HD 1; hp 3; MV 40′; #AT 1; D 1-4; Save M1; ML 8; AL N)
- Encounter: This will be a party of Magi traveling to their shrine in room 14.
- More Details: Refer to room 14 for further information about the Magi.
6. Rock Baboon (AC 6; HD 2; hp 9; MV 40′; #AT 2; D 1-6/1-3; Save F2; ML 8; AL N)
- Nature: These are larger, more intelligent versions of normal baboons.
- Diet: They will eat anything but prefer meat.
- Tools: They don’t make tools but use bones or branches as clubs.
- Temperament: They are ferocious and have vicious tempers.
- Encounter: These baboons are hunting for food.
7. Snake, Spitting Cobra (AC 7; HD 1; hp 5; MV 30′; #AT 1; D 1-3 + poison; Save F1; ML 7; AL N)*
- Appearance: A 3-foot long grayish-white snake.
- Venom Spit: Can squirt a stream of venom a distance of 6 feet, aiming for the eyes.
- Hit Effect: If the venom hits, the victim must save vs. Poison or be blinded.
- Blindness Note: A blinded character cannot attack (or attacks at -4, DM’s discretion). The DM may allow specific methods to cure blindness, such as washing eyes with holy water then casting cure light wounds (which won’t restore HP but can return sight in 1-6 turns).
- Bite: While it usually spits, it may bite instead.
- Bite Effect: If bitten, the victim must save vs. Poison or die.
8. Warrior Maidens of Madarua (AC 5; HD 1; hp 5; MV 20′; #AT 1; D 1-8; Save F1; ML 8; AL N)
- Encounter: This party of Warrior Maidens is traveling to their shrine in room 21.
- More Details: Refer to room 23 for further information about the Warrior Maidens.
DM’s Note on Faction Encounters: The outcome of encounters with the Brotherhood of Gorm, Magi of Usamigaras, or Warrior Maidens of Madarua is often influenced by previous interactions. For example, characters who have joined the Brotherhood of Gorm and are wearing their masks or necklaces are likely to find a group of Warrior Maidens unfriendly, if not openly hostile.
13. Abandoned Ceremonial Chamber
Immediate Perception:
- This room appears to be a ruined chapel.
- Tattered tapestries hang from the walls.
- A dusty altar along the north wall is covered with a rotted altar cloth.
- On the altar are wooden candlesticks, an offering bowl, and a holy symbol shaped like an eye.
- Next to the altar, you see a 6-foot long lizard with wide flaps of skin between its legs.
Investigation Required:
- Creature: The giant lizard is a Draco (AC 5; HD 4+2; hp 20; MV 40′, fly 70′; #AT 1; D 1-10; Save F3; ML 7; AL N).
- Remains: Behind the altar are the remains of a human thief.
- The body has a full canteen and a sack containing 400 gp and two gems (100 gp each).
- Altar Items: The candlesticks, bowl, and holy symbol are crafted from rare teakwood. They are worth 50 gp, 25 gp, and 25 gp respectively.
14. The Magi of Usamigaras
Immediate Perception:
- The corridor leading to this chamber is painted black with tiny white stars, resembling the night sky.
- The door on the north wall (to chamber 14a) is iron and has a star carved into it.
- If the door is opened, a bell begins to ring.
14a. The Chamber of the Magi
Immediate Perception:
- Large tapestries showing major constellations hang along the north and west walls.
- You have interrupted a religious service: thirteen figures in rainbow-colored robes and silver masks stand in front of a stone, star-shaped altar.
- The masks match the face of the middle statue on the pyramid (the winged child).
- The center-most figure wears a silver crown.
Investigation Required:
- Worshippers: The figures are 12 Magi of Usamigaras (AC 9; M1; hp 3 each; MV 40′; #AT 1; D 1-4; Save M1; ML 8; AL N), who are first-level magic-users.
- The one wearing the silver crown is Auriga Sirkinos, Chief Mage of Usamigaras (AC 9; M3; hp 10; MV 40′; #AT 1; D 1-4; S 9, I 18, W 10, D 12, C 10, Ch 15).
- Each Mage has silver lines forming a small star symbol on the palm of their right hand.
- Auriga Sirkinos’s Nature: Auriga appears jolly and fun-loving, but this hides a ruthless, fanatic personality. He will do anything to promote the cult and his own power, often hiding his true nature. While welcoming, he prioritizes his personal power within the cult.
- Combat:
- The twelve first-level magic-users each have one of the 12 basic first-level spells: charm person, detect magic, floating disc, hold portal, light, magic missile, protection from evil, read languages, read magic, shield, sleep, and ventriloquism.
- Auriga Sirkinos has detect magic, hold portal, and phantasmal force.
- Those with attack spells will cast them, while those with defensive spells will use them. All will engage in hand-to-hand combat.
- If things go badly, Auriga will try to escape through the door, casting hold portal on it.
- Altar Treasure (Hidden): The stone altar contains a secret compartment.
- It is protected by a poison needle trap (save vs. Poison or die). The trap triggers if the compartment is opened without finding and removing it first.
- Inside are a mace +1 and a wand of magic detection with 5 charges.
- Other Treasure: The silver masks are worth 20 gp each, and the crown is worth 200 gp. Each magic-user also carries a silver dagger worth 30 gp.
- Non-Combat Interaction/Joining: If the party doesn’t attack:
- They can learn the Magi are another cult trying to restore Cynidicea’s glory. All current members are Cynidiceans, but outsiders can join.
- DM Roll (2d6):
- 9-12: Party members are asked to join.
- 6-8: Party members may join, but won’t be asked.
- 2-5: Party will be attacked or driven off as enemies/spies.
- Modifiers: Subtract 3 if the party shows signs of belonging to another group (e.g., wearing a Mask of Gorm). Add 2 if the party convinces the Magi they’ve defeated members of another cult.
- Full Membership: Only magic-users, elves, thieves, and clerics can become full members.
- Initiation involves placing the right hand palm down on the altar and reciting a pledge. Upon saying “Usamigaras,” a five-pointed star will be magically burned into the character’s palm.
- Full members receive silver masks, daggers, and rainbow-colored robes.
- Lesser Membership: Other classes can become lesser members.
- No initiation. They receive a silver ring carved with Usamigaras’s face.
- Faction Support: Robes, masks, daggers, and rings are kept in a stronghold in the underground city, taking about half a day to retrieve. While waiting, the Magi will aid against wandering monsters and provide food and drink. The DM may designate this as a “safe” area.
15. Quarters for the Magi of Usamigaras
Immediate Perception:
- The room contains six double bunk beds.
- At the foot of each bunk bed are two wooden chests.
- The room appears clean and well-kept.
Investigation Required:
- The wooden chests are footlockers. They contain spare robes and various personal belongings, but nothing of great value.
- This is where the first-level Magi from room 14 stay when not at their faction’s Lost City stronghold.
16. Quarters for the Chief Mage of Usamigaras
Immediate Perception:
- This is a comfortable-looking bedroom showing signs of recent occupation.
- A gray wolf is chained to the foot of the bed.
- The wolf growls when the door is opened.
Investigation Required:
- Creature: The wolf (AC 7; HD 2+2; hp 11; MV 60′; #AT 1; D 1-6; Save F1; ML 6; AL N) was captured as a cub and trained as a watchdog.
- Treasure: It is guarding Auriga Sirkinos’s personal funds: 2500 sp and 200 gp, kept in a locked metal chest under the bed.
17. Abandoned Storeroom
Immediate Perception:
- This room is filled with shelves, most of which are empty, but some contain old crates.
- The shelves are covered with dust and a vile-looking yellow fungus growing in large, thick clusters.
Investigation Required:
- Fungus: The yellow fungus is yellow mold (AC n/a; HD 2 per 10 sq ft; hp 9 per 10 sq ft; MV 0; #AT 1; D 1-6 + spores; Save F2; ML n/a; AL N).
- It covers shelves along all four walls. Each 10-foot square of the room has 2 HD (9 hp) of mold. There are six separate sections of mold.
- Yellow mold can only be killed by fire.
- If touched, there’s a 50% chance the mold will shoot a 10’x10’x10′ cloud of spores. Anyone caught in the cloud takes 1-6 points of damage and must save vs. Death Ray or choke to death within 6 rounds.
- Crates: There is nothing of value in the crates.
17a. Water Trap
Investigation Required:
- Trigger: When a human-sized character crosses the room, roll 1d6. On a 1 or 2, the trap is sprung.
- Effect: Both doors slam shut, and water pours into the 10’x10′ area from vents high in the walls.
- Unless the trapped character forces open a door within three tries, or finds another way to breathe, they will drown.
- Reset: Once the room fills, concealed drains open in the floor, and the water drains, automatically resetting the trap.
- Door to Room 18: If a character opens the door to room 18 while water is pouring in, the water will rush into room 18, overturning the basket and freeing the pit vipers (see room 18), then disappear down concealed drains.
18. Secret Room
Immediate Perception:
- The room appears empty except for a large wicker basket in the middle.
Investigation Required:
- Creatures: Coiled atop the pile of treasure in the basket are two 5-foot long pit vipers (AC 6; HD 2*; hp 9 each; MV 30′; #AT 2; D 1-4 + poison; Save F1; ML 7; AL N).
- Their bite is poisonous.
- Pit vipers are very quick and always attack first (no initiative roll needed).
- Treasure: The wicker basket contains 3000 sp and 5 gems (10 gp, 50 gp, 100 gp, 100 gp, and 500 gp).
19. Shifting Wall
Immediate Perception:
- At the end of this short corridor is an 8-foot tall bronze statue of a winged child with two snakes twined around its body.
- It holds a wand in one hand and a handful of coins in the other.
- The statue appears firmly connected to the wall.
Investigation Required:
- Nature: This statue of Usamigaras is hollow and hides a shifting wall.
- Wand Actions:
- Pulling Left: If the wand is pulled left, the wall shifts westward, blocking the last 10-foot section of the hall for 3 turns before returning to its original position.
- Pulling Right: If the wand is pulled right, the statue breathes out a cloud of choking gas covering the 30-foot length of the corridor.
- Anyone staying in the gas takes 1 point of damage per round.
- The gas disappears after 2 turns (120 rounds).
- There is only one gas charge in the statue (the Magi recharge it when necessary).
19a. Storeroom
Immediate Perception:
- The room is filled with crates and barrels.
- Four large brown beetles, each about 3 feet long, are breaking into them.
Investigation Required:
- Creatures: The beetles are oil beetles (AC 4; HD 2*; hp 9; MV 40′; #AT 1 + oil; D 1-6; Save F1; ML 8; AL N).
- Oil beetles can squirt an oily fluid up to 5 feet away.
- If the oil hits, it causes painful blisters, imposing a -2 penalty to “to hit” rolls until a cure light wounds spell is used or 24 hours pass. Cure light wounds used for blisters will not restore hit points.
- Oil beetles also have a bite attack.
- Contents: The crates are filled with dried food and the casks are filled with wine.
- This food was recently stored here by the Magi of Usamigaras and is edible.
- As long as the crates and casks haven’t been broken open, the food and wine are good, even if sprayed with the beetles’ oil.
20. Abandoned Ceremonial Chamber
Immediate Perception:
- This room appears to be a ruined chapel.
- It has been looted and deliberately wrecked.
- The stone altar has been smashed, and no ceremonial equipment is visible.
- The word “Zargon” is scrawled in large letters on one wall.
Investigation Required:
- This ceremonial chamber, once dedicated to the old gods of Cynidicea, was destroyed by followers of Zargon centuries ago.
- Aside from the wreckage, the room is empty.
20a. Entrance to Tier 4
Immediate Perception:
- A 20-foot long section of the floor in the southern part of the room appears hinged.
Investigation Required:
- Mechanism: This hinged floor section is the entrance to Tier 4. It is designed to swing down to the west when anyone steps on it, resting against a ramp in room 38.
- Access: Characters can walk down this floor section into room 38.
21. Arch of the Warrior Maidens
Immediate Perception:
- You see two 10-foot tall statues of women fighters.
- The fighters wear masks with the face of the female statue atop the pyramid.
- The statues stand with spears outstretched to form an arch.
- The only way down the corridor appears to be in single file under the crossed spears.
Investigation Required:
- Pressure Plate: Just beyond the arch formed by the spears is a hidden pressure plate in the floor.
- Alarm: Each time someone steps on the plate, a hidden chime rings in room 23. This chime warns the Warrior Maidens that someone is approaching their shrine and reveals how many are in the party.
21a. The Chamber of Madarua
Immediate Perception:
- The door to this room is locked.
- Near the northeast corner is an altar covered with a green and white cloth.
- On the altar sits a 3-foot tall statue of a woman holding a sword and a sheaf of wheat.
- A large white candle burns on each side of the statue.
- In front of the altar, incense burns in three small braziers.
- White drapes hang on all walls, and the floor is covered by a green carpet.
- The room is dust-free and appears meticulously clean.
- Except for the ceremonial equipment, the room seems empty.
Investigation Required:
- Door Access: If the party cannot unlock the door, it can be battered down in 1 turn. If battered down, the Warrior Maidens in room 23 will investigate.
- Maintenance: The Warrior Maidens of Madarua keep their shrine immaculately clean, with candles and incense burning continuously.
- Listening Holes: Tiny holes, hidden by the white wall drapes, allow the Warrior Maidens in room 23 to hear any loud noises made here. The sound also carries through room 22, which is similarly fitted with listening holes.
- Investigation/Attack: The Warrior Maidens will investigate any loud noises. If any party member has desecrated the shrine, the Warrior Maidens will attack.
22. Treasure Room of the Warrior Maidens of Madarua
Immediate Perception:
- The room appears empty except for a large stone vault in the middle of the east wall.
- The vault has a keyhole.
- The stone slabs making up the vault appear too heavy to be moved.
Investigation Required:
- Treasure: The stone vault contains the treasure of the Warrior Maidens.
- Trap: It is trapped. Any character standing in front of the keyhole who tries to open the vault and fails will be hit by a large stone block falling from the ceiling.
- The block will not fall if the key is used or the lock is successfully picked.
- The stone block deals 2-12 points of damage.
- Alarm: The Warrior Maidens in room 23 will hear any loud noises made in this room (as detailed in room 21a).
- Contents: The treasure of the Warrior Maidens of Madarua is 600 ep, 1000 gp, and 300 pp.
23. Warrior Maidens of Madarua
Immediate Perception:
- Ten women are seated around a table.
- All wear bronze chain mail over green tunics.
- Each woman’s face is covered by a bronze mask resembling the face of the woman statue atop the pyramid.
Investigation Required:
- Occupants: These women are all Warrior Maidens of Madarua.
- Seven are 1st level fighters (AC 5; F1; hp 5 each; MV 20′; #AT 1; D 1-8; Save F1; ML 8; AL N).
- Two are 2nd level fighters (AC 5; hp 9; MV 20′; #AT 1; D 1-8; Save F2).
- The leader is Pandora, Madarua’s Champion, the tallest and oldest woman (AC 5; F3; hp 20; MV 20′; #AT 1 at +3; D 1-8+3; AL N; S 17, I 12, W 11, D 12, C 15, Ch 14).
- She wields a sword +1, has a +2 combat bonus from Strength, and raises the morale of Warrior Maidens to 9 when with them.
- She carries the key to the treasure vault in room 22.
- Pandora’s Personality: Pandora presents herself as a simple, action-oriented fighter (“When in doubt, attack”). However, she is more subtle, always assessing the odds and trying to ensure advantages before resorting to force.
- Non-Combat Interaction/Joining: If the party doesn’t attack:
- They may learn the Warrior Maidens are another group trying to restore Cynidicea’s lost glory. Current members are Cynidicean female fighters, but outsiders can join.
- DM Roll (2d6):
- 9-12: Party members are asked to join.
- 6-8: Party members may join, but won’t be asked.
- 2-5: Party will be attacked or driven off as enemies/spies.
- Modifiers: Subtract 3 if characters show signs of belonging to another group. Add 2 if the party proves they’ve defeated another cult.
- Full Membership: Only female fighters, female dwarves, female halflings, and female elves can become full members. Other characters can only become lesser members.
- Initiation involves pricking a finger with a sword, smearing blood on the blade, placing the sword on Madarua’s altar, swearing to uphold Madarua’s honor, and receiving a small sickle brand on the inside of the left wrist.
- Full members receive bronze masks and green robes.
- Lesser Membership: No initiation. They receive a bronze bracelet showing Madarua’s face.
- Faction Support: Bracelets, robes, and masks are kept in an underground city stronghold (half a day to fetch). While waiting, the Warrior Maidens will aid against wandering monsters, provide food/drink, and this may be a “safe” area.
24. Door Trap
Immediate Perception:
- You see an iron door at the end of the corridor.
- The door has three lightning bolts engraved on it.
- When anyone comes within 10 feet of the door, it glows with a crackling blue light.
Investigation Required:
- Purpose: The door guards the ceremonial chamber of Gorm (room 24a).
- Locked: The door is locked.
- Safety Mechanism: To safely enter, the words “By the great god Gorm” must be spoken; the door will then stop glowing.
- Damage: Anyone who touches the door without speaking the proper words automatically takes 1-4 points of electrical damage.
- Lock Picking: A thief can pick the lock, but will take damage while attempting it.
24a. The Ceremonial Chambers of Gorm
Immediate Perception:
- The walls, ceiling, and floor of this room are painted sky blue.
- A golden marble altar, surrounded by golden candleholders and braziers, rests along the middle of the east wall.
- On top of the altar is a small stone statue of a bearded man throwing a lightning bolt.
- Next to the statue rests a golden bowl.
Investigation Required:
- Purpose: These are the ceremonial chambers of Gorm.
- Access Restriction: No non-members are allowed in this room.
- Initiation: New members of the Brotherhood of Gorm are initiated here.
- The initiation is simple: The character dresses in a white robe, ritually washes their hands in the water-filled bowl, draws their weapon, kneels before Gorm’s altar, and swears (in Law) to uphold the Brotherhood’s ideals and promote Gorm’s worship.
- Finally, the new member receives a tattoo of a blue lightning bolt on their right shoulder.
- Secret Passage: A secret door in the west wall conceals a ladder leading up to room 12 on Tier 2.
KEY TO TIER 4
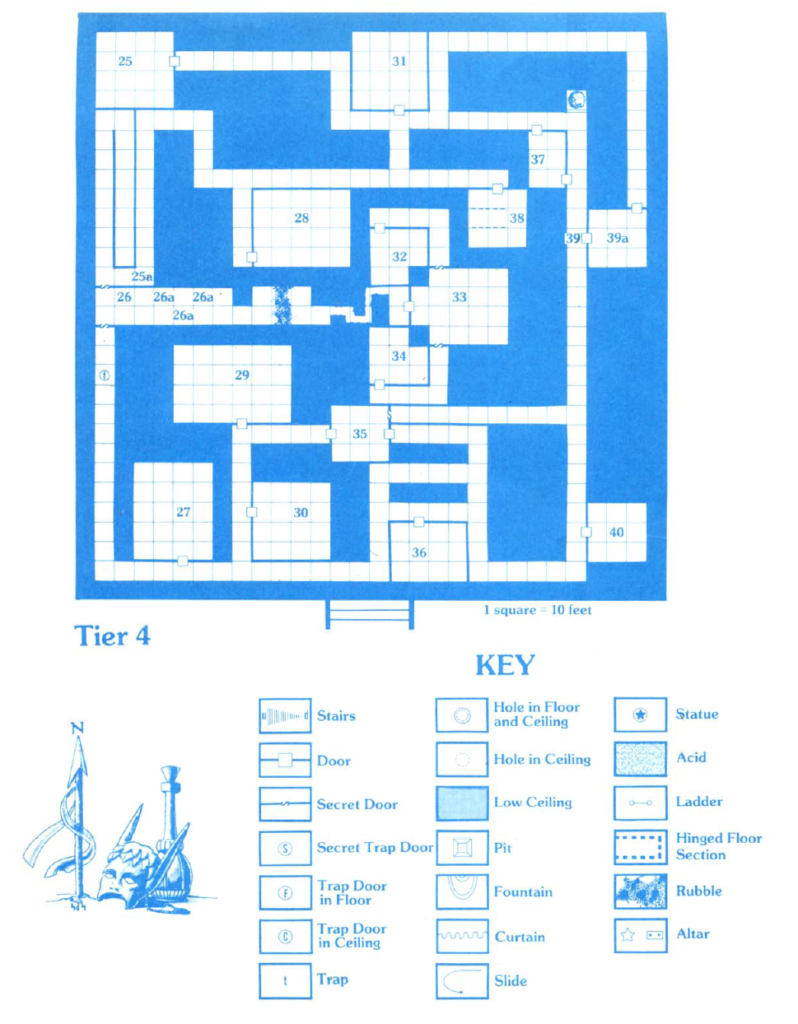
Overview: Tier 4 of the pyramid contains the burial chambers for King Alexander, Queen Zenobia, and other significant figures from their reign, including nobles, clerics, and court officials.
25. Nobleman’s Burial Room
Immediate Perception:
- The walls of this room are painted with scenes of warfare.
- A large wooden sarcophagus stands upright along the south wall, painted with the image of a warrior in armor.
- Squatting on each side of the sarcophagus is a large ape with white fur.
Investigation Required:
- Creatures: The two creatures are white apes (AC 6; HD 4; hp 18 each; MV 40′; #AT 2; D 1-4/1-4; Save F2; ML 7; AL N). They have made this room their lair.
- When the door opens, they will beat their chests and threaten the party. If ignored, they will attack.
- These apes have a plentiful supply of rocks and will sometimes throw rocks for 1d6 points of damage each.
- Sarcophagus Contents: Inside the sarcophagus is a mummified body wearing full plate armor and holding a sword. The sword is a magical sword +1.
25a. Ghostly Haunts
Immediate Perception:
- As you walk down the corridor, the shimmering, ghostlike figures of a man and a woman appear before you.
- They are dressed in costly clothing and both wear golden crowns.
- The man raises his hand and gestures for you to stop, warning, “Go no further, lest the curse of King Alexander overtake you!”
- The woman states, “I am Queen Zenobia. Turn back; only death awaits you!”
Investigation Required:
- Nature: The shimmering figures of King Alexander and Queen Zenobia are harmless haunts.
- Characters who see the haunts must save vs. Spells or try to run away in fear for 1-4 turns.
- As they have no physical existence, haunts cannot be hurt by physical attacks or spells.
26. Tomb Annex
Immediate Perception:
- The floor of this long, narrow room has a red and white checkerboard pattern of 2’x2′ squares.
- Court scenes are painted on the north and south walls.
- In the east wall, near the southeast corner, there is a 2-foot high opening at floor level.
Investigation Required:
- Purpose: Room 26 is an annex to the burial chambers of King Alexander and Queen Zenobia. This corridor was kept open during the pyramid’s construction to bring in the bodies, then sealed from the outside after the funerals.
26a. Tomb Traps
Immediate Perception:
- You can see the 2-foot high opening in the east wall, where a ceiling block appears to have not fallen all the way.
- Further into the passage, there are two stone blocks that cracked into rubble.
- Beyond the rubble, the corridor becomes narrow and twisting, wide enough for only one person at a time.
Investigation Required:
- Pendulum Blades: Three pendulum blades are hidden in the ceiling.
- Trigger: If a character walks into any of the three marked squares (on the checkerboard floor), roll 1d6. On a 1, the trap triggers.
- Damage: Victims caught or running through swinging blades can avoid damage if they roll their Dexterity score or lower on 1d20. Those who fail take 1d10 points of damage.
- Appearance: The pendulum shafts are covered with a sticky green goo resembling green slime, but it is harmless.
- Reset: The blades swing for one turn, then automatically reset.
- Fallen Blocks: Special 10-foot square ceiling blocks were designed to fall and block the passage after the burials.
- The 2-foot high opening in the east wall was formed when one block failed to fall completely.
- The DM should emphasize creaking noises coming from the stone block as characters crawl underneath to increase tension, even though it looks like it won’t fall further.
- Rubble Obstacle: The next obstacle is the two stone blocks that cracked into rubble. It will take the party a full turn to clear enough rubble to proceed.
- Twisting Corridor: The final obstacle is a narrow, twisting corridor, formed by several crookedly fallen stone blocks, allowing only one person at a time.
27. Councilor’s Burial Room
Immediate Perception:
- The door to this room has a 2-foot wide hole gnawed in it near the floor.
- The walls are painted with scenes of a throne room, showing a man giving advice to kings and queens.
- In the center of the room lies a wooden coffin with large holes gnawed in its sides.
Investigation Required:
- Creatures: The holes in the coffin and door were gnawed by 3 giant shrews (AC 4; HD 1*; hp 4 each; MV 60′; #AT 2; D 1-6/1-6; Save F1; ML 10; AL N). They have made the coffin their lair.
- Like bats, giant shrews use echolocation (“sound echoes”) to “see.”
- They attack as soon as they sense anything nearby.
- Due to their quickness, they always gain initiative on the first attack and have a +1 bonus on initiative for the second attack.
- Their ferocity is so great that any character of third level or less attacked by them must save vs. Death Ray or run away in fear.
- A silence, 15′ spell will blind them.
- Looted Coffin: The coffin is empty except for the giant shrews. The body and any treasure have been stolen.
- Shrew Access: The giant shrews burrowed through a weak spot in the door and use the hole as an exit for hunting in the pyramid corridors.
27a. Trap Door
Immediate Perception:
- In the middle of the floor at this point is a large stone slab with a bronze ring bolted deeply into it.
Investigation Required:
- Purpose: The slab is a trap door.
- Access: When opened, the trap door reveals an iron ladder leading down to room 44 on Tier 5.
28. High Priest’s Burial Room
Immediate Perception:
- The door to this room is scorched, as is the end of the corridor.
- The outline of a man-sized humanoid form is etched into the scorched wall section.
- The door is slightly open, but not enough to see inside.
- Along the walls are paintings of a priest performing ceremonies.
- On a raised dais in the middle of the room lies an open bronze sarcophagus.
- Inside the sarcophagus, three hideous, beast-like humanoids are tearing a mummified body apart with their sharp claws.
Investigation Required:
- Scorched Outline: The man-sized outline is that of a ghoul, which was blasted to ashes when it accidentally triggered a magical trap guarding the door.
- Door Access: Now that the trap has been triggered, the door can be opened safely.
- Creatures: The three creatures inside are ghouls (AC 6; HD 2*; hp 9 each; MV 30′; #AT 3; D 1-3 all; Save F2; ML 9; AL C).
- Any non-elf creature hit by a ghoul must make a save vs. Paralyzation or be paralyzed.
- Sarcophagus Contents: Tossed inside the sarcophagus are a jeweled necklace worth 1500 gp and two jeweled bracelets each worth 600 gp. The ghouls stripped these from the body.
29. Embalming Room
Immediate Perception:
- This room contains several large tables.
- Around the walls are a number of large jars and casks.
- There is a bin in the northwest corner of the room.
Investigation Required:
- Purpose: This room was used for embalming (preparing bodies for burial).
- Creatures: Concealed in the room are 5 shadows (AC 7; HD 2*; hp 11 each; MV 30′; #AT 1; D 1-4 + drain strength; Save F2; ML 12; AL C).
- They will surprise the party on a roll of 1-5 on 1d6.
- These intelligent, ghost-like creatures resemble real shadows.
- If a shadow hits, it drains 1 point of Strength in addition to normal damage. This weakness lasts 8 turns.
- Shadows cannot be affected by sleep or charm spells.
- They can only be hit by magic weapons.
- DM Note: If the party has no magic weapons, the DM is suggested to let them run away after the first shadow attack. The shadows will not leave this room.
- Room Contents (After Shadows are Dealt With):
- The jars and casks are filled with various spices used in embalming, but they are now worthless due to age.
- The bin is filled with rotten linen winding cloths.
- Underneath the rotten linen is a potion of invisibility and a chest filled with 3000 gp.
30. Lady-in-Waiting’s Burial Room
Immediate Perception:
- A white ivory coffin lies in a niche in the east wall.
- Painted on the walls are scenes from court life, focusing on the lives of ladies-in-waiting to Queen Zenobia.
Investigation Required:
- The coffin is empty.
- Except for the coffin, the room is empty.
31. Guard Captain’s Burial Room
Immediate Perception:
- A mummified human in plate armor, holding a halberd, stands at attention against the west side of the south wall.
- Grouped around the mummy are nine skeletons holding swords, also at attention.
Investigation Required:
- Mummy: The mummified body is one of King Alexander’s guard captains. It is not an undead monster, and its armor and weapons are normal.
- Skeletons: The skeletons are undead monsters (AC 7; HD 1; hp 4 each; MV 20′; #AT 1; D 1-6; Save F1; ML 12; AL C).
- They will attack the party immediately upon entry and fight until destroyed.
- Treasure: There is no treasure here.
K EY TO TIER 4
Overview: Tier 4 of the pyramid contains the burial chambers of King Alexander, Queen Zenobia, and other important figures from their reign.
32. Queen Zenobia’s Burial Chamber
Immediate Perception:
- The walls of this room are plain stone.
- An oblong box made from stone slabs lies in the center of the room.
- Inscriptions in several languages on the side of the box read: “May the curse of darkness destroy all who dare desecrate my resting place.“
- The box measures 3 feet high, 7 feet long, and 3 feet wide.
Investigation Required:
- Contents: The stone box contains the wooden coffin of Queen Zenobia.
- Undead: If the coffin is opened, Zenobia is now a wight (AC 5; HD 3*; hp 24; MV 30′; #AT 1; D energy drain; Save F3; ML 12; AL C).
- She will attack on sight (roll initiative normally).
- A wight can only be hit by silvered or magical weapons.
- Each hit by the wight drains one level of experience (including one hit die) from the victim.
- Treasure: Queen Zenobia’s chamber once held a treasure trove, but the only remaining items are the jeweled crown she wears (5000 gp) and her sceptre (actually a wand of paralyzation with 8 charges).
- Since becoming a creature of darkness, she has forgotten how to use the wand.
33. False Tomb
Immediate Perception:
- This room contains two large sarcophagi, both gleaming with golden highlights. One is marked “Alexander,” the other “Zenobia.”
- A number of large wooden chests surround the sarcophagi.
- The room is littered with broken objects: two smashed thrones, a broken chariot, smashed pottery, broken weapons, and torn clothing.
- Piles of bones cover the floor.
- On the walls is a mosaic showing famous events from the reign of King Alexander and Queen Zenobia.
Investigation Required:
- Deception: This is a fake tomb designed to fool grave robbers. The real burial chambers are rooms 32 and 34.
- Sarcophagi: The sarcophagi are made of wood, painted to look like gold. They contain the bodies of royal slaves.
- Chests: The chests contain small items a king and queen might need in the afterlife, all ritually “killed” (broken, ripped, or smashed).
- Bones: The piles of bones are the remains of royal slaves and royal animals, killed after the funeral.
- Counterfeit Treasure: Four chests appear to contain 5000 sp, 6000 gp, 3000 ep, and 2000 pp. The sarcophagi contain 50 gems and 12 pieces of jewelry. However, all coins, gems, and jewelry are cheap counterfeits.
- The actual value of all items in the room is only 450 gp.
- Dwarves or thieves will notice the deception on a roll of 1-5 (on 1d6, one roll only). Without a dwarf or thief, the deception is noticed only on a roll of 1-3.
- Secret Doors: Tapping on the walls (with a hammer or similar object) will reveal hollow sounds where secret doors open into hidden corridors.
- If the party cannot open them, breaking them down will take 6 + 1d6 turns. The DM should describe slow progress and the significant noise made, rolling for wandering monsters normally.
34. King Alexander’s Burial Chamber
Immediate Perception:
- The walls of this room are bare.
- In the center of the room is an oblong box made from stone slabs.
- Suddenly, a translucent, ghost-like figure with glowing red eyes and a large, dark mouth rises out of the stone box.
Investigation Required:
- Creature: The translucent, ghost-like figure is a banshee (AC 3; HD 5*; hp 26; MV 50′; #AT 1; D wail for 1-4; Save F5; ML L 12; AL C).
- Banshees can only be hit by magical weapons or harmed by magical spells.
- This banshee guards King Alexander’s grave and attacks by wailing.
- Wail Effect: The banshee’s piercing wail causes an icy, death-like chill. All individuals within 30 feet of the wailing banshee take an automatic 1-4 points of damage per round.
- If the party wins initiative and runs out of range, they take no damage. If they can get outside the room and close the door, they will be safe from the wail.
- The banshee attacks as soon as the tomb door is opened.
- Looted Tomb: King Alexander’s tomb was largely looted long ago, except for the treasure inside the wooden coffin (which is within the stone box).
- Treasure: King Alexander wears a jeweled crown worth 5000 gp. He also has plate armor +1 and a sword +2.
35. Slave’s Burial Room
Immediate Perception:
- This room is filled with skeletons.
- The bones lie in piles on the floor, covering it so thickly it’s impossible to walk without stepping on them.
Investigation Required:
- Nature: The skeletons are the remains of household slaves belonging to individuals buried in the pyramid. They were killed and tossed into this room upon their masters’ deaths.
- Status: The skeletons are not undead; they are merely bones.
36. Chamberlain’s Burial Room
Immediate Perception:
- The walls of this room show painted scenes of a man signing documents and organizing tax collection.
- A wooden coffin that has been smashed open lies on the floor.
- Six pale-skinned humans stand around the coffin, all bearing wounds severe enough to kill a normal person.
Investigation Required:
- Creatures: The six humans are zombies (AC 8; HD 2; hp 9 each; MV 40′; #AT 1; D 1-8; Save F1; ML 12; AL C). Zombies are undead.
- They will attack on sight and fight until destroyed, always striking last.
- Zombies are immune to sleep and charm spells.
- Looted Coffin: The coffin has already been looted.
37. Giant Rat Lair
Immediate Perception:
- The room appears empty except for an odd-shaped mound in the southwest corner.
- Rustling and faint squeaking noises come from the mound.
Investigation Required:
- Creatures: Ten 3-foot long, gray giant rats (AC 7; HD 1/2; hp 2 each; MV 40′; #AT 1; D 1-3 + disease; Save F1; ML 8; AL N) have nested in the corner.
- Disease: Each giant rat has a 1 in 20 chance of carrying a disease.
- A character bitten by a diseased rat must save vs. Poison or be infected.
- The disease has a 1 in 4 chance of being fatal in 1d6 days. Otherwise, the character will be sick in bed for one month (no adventuring).
- Disease: Each giant rat has a 1 in 20 chance of carrying a disease.
- Access/Treasure: The rats’ nest conceals a small hole in the west wall, just large enough for a giant rat to crawl through, leading to the corridor to the west.
- Treasure: Inside the rat’s nest are 300 gp and four 500 gp gems.
38. Jester’s Burial Room
Immediate Perception:
- The floor from the tier above (20a) hinges down to meet a ramp in this room.
- The walls are painted with court scenes showing King Alexander and Queen Zenobia being entertained by a dwarven jester.
- A small coffin rests in a niche in the east wall.
- In each corner of the room is a large brass jar.
Investigation Required:
- Coffin Trap: If the lid of the coffin is touched, it will spring off, revealing an oversized, brightly painted wooden model of the dwarven jester’s head, attached to a coiled spring (like a jack-in-the-box).
- The coffin also contains the ashes of the jester.
- Brass Jars: The brass jars appear empty, but any item completely placed into them will be instantly teleported into a large, concealed hollow beneath the coffin.
- The jars were part of the jester’s “master trick.”
- The party can access the hollow by removing the coffin.
39. Rolling Boulder Trap
Immediate Perception:
- You are in a long corridor.
Investigation Required:
- Trigger: Any character reaching the west door to room 39a will trigger this trap.
- Effect: The wall in the north corridor opens, and a 10-foot wide, round boulder rolls out of the hidden area.
- The boulder rolls down the long corridor at 40 feet per round.
- When it stops, it will block the corner near room 40.
- Intent: This trap is primarily for scaring characters, not killing them.
- Unless the party acts obviously stupidly (e.g., arguing while the boulder approaches), the DM should allow them to escape narrowly into a room or around a corner.
- The DM should describe the boulder’s movement graphically: crashing sounds, flying stone chips, shaking floor. The encounter should be exciting but not deadly.
- Damage: If the boulder strikes a character, it deals 3-30 points of damage.
- Stop Condition: The boulder will stop after striking one character or reaching the end of the hall.
39a. Noble Lady’s Burial Room
Immediate Perception:
- A sarcophagus rests on a 10-foot square dais in the center of the room.
- From each corner of the dais rises a slender, 6-foot tall column. The tops of these columns meet the corners of an arched dome above the sarcophagus.
- On the dais at each end of the sarcophagus is a brass jar from which flames dance.
- The walls of this room are painted with scenes from the life of a noble lady.
Investigation Required:
- Sarcophagus Contents: The noble lady’s mummified body rests in the sarcophagus. The jewelry she once wore has been stolen.
- Brass Jars: The brass jars are bolted to the floor, and their flames cannot be put out.
- Hidden Map: Behind one of the brass jars is a small bronze tube containing a piece of parchment.
- The parchment is a map of the southwest part of this tier, marked with a large black “X,” indicating the location of the trap door at 27a.
- The DM can either provide a map or guide the party to the trapdoor when they are close.
40. Master Thief’s Burial Room
Immediate Perception:
- An elaborate jeweled coffin lies in the center of the room.
- Next to the coffin is a worm-like creature, 9 feet long and 3 feet high, with many legs and a mouth surrounded by eight 2-foot long tentacles.
Investigation Required:
- Creature: The creature is a carrion crawler (AC 7; HD 3+1*; hp 13; MV 40′; #AT 8; D paralysis; Save F2; ML 9; AL N).
- A hit by a carrion crawler paralyzes the victim unless a save vs. Paralysis is made.
- The paralysis can be removed by a cure light wounds spell (which will have no other effect) or wears off naturally in 2-8 turns.
- Coffin Treasure: The jewels on the coffin are worth 3000 gp.
- Body Search: A search of the body inside the coffin will discover a set of lockpicks.
- Backstory: This tomb belongs to a master thief from King Alexander and Queen Zenobia’s reign who used his skills to swap his own coffin for that of the nobleman originally meant for this room, securing his place near the royals in the afterlife.
PART 4: TIER 5 (Dungeon Level 3)
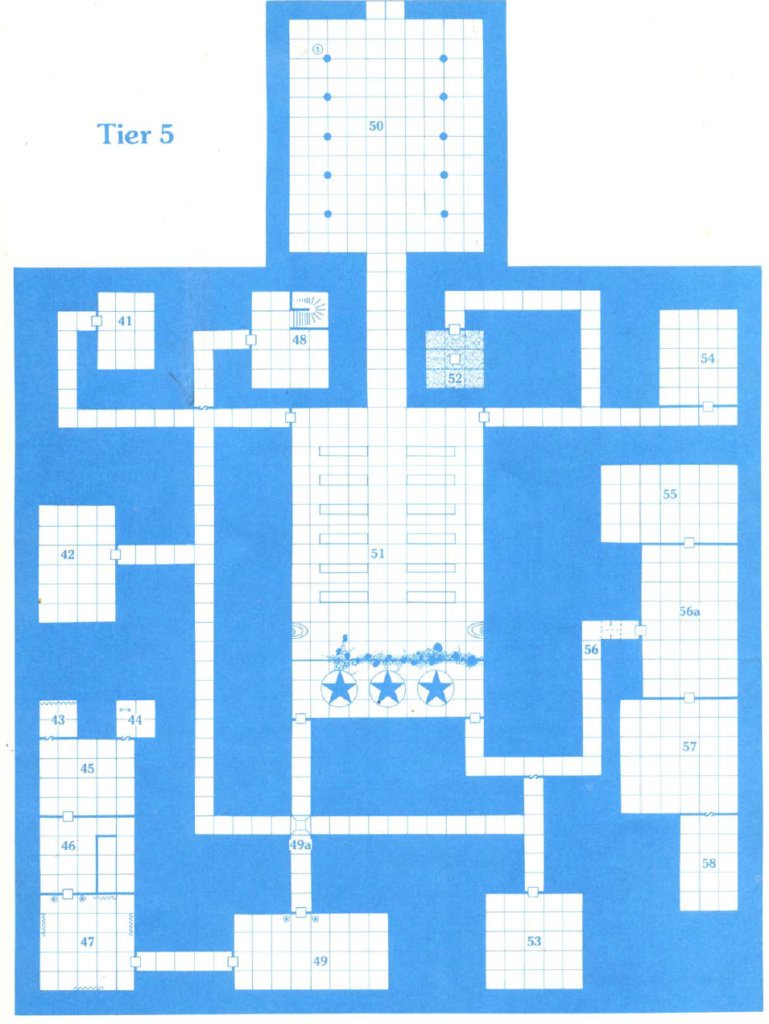
This section covers Tier 5, encompassing rooms 41-58. This entire tier, including the pyramid’s main entrance (room 50), is currently buried under sand. Within the main entry chamber, a secret door leads to a passage to the underground city (for more on this, refer to Part 5: Expanding the Adventure).
Wandering Monsters (Level 3)
You’ll check for wandering monsters once every 2 turns. An encounter occurs on a roll of 1 on 1d6. Roll 1d8, or choose, for the type of monster encountered:
- 1. Crocodile (AC 5; HD 3; hp 14; MV 30′; #AT 1; D 2-8; Save F2; ML 7; AL N)
- For more details, see Part 6: New Monsters.
- 2. Tiger Beetle (AC 3; HD 3+1; hp 15; MV 40′; #AT 1; D 2-12; Save F2; ML 9; AL N)
- These are 4-foot long beetles with striped carapaces resembling tiger skins.
- They are carnivorous and will attack if hungry.
- 3. Cynidicean
- As usual, you can use encounters provided in Part 6: New Monsters or create new ones. This could also be an encounter with members of one of the pyramid’s factions.
- 4. Driver Ant (AC 3; HD 4; hp 18; MV 50′; #AT 1; D 2-12; Save F2; ML 10; AL N)
- These are giant black ants, about 6 feet long.
- When hungry, they will eat anything in their path.
- Once in combat, they will fight to the death with no morale checks.
- You can add a special tunnel leading to their lair if you wish.
- 5. Tuatara (AC 4; HD 6; hp 27; MV 50′; #AT 1; D 2-12; Save F3; ML 8; AL N)
- An 8-foot long giant lizard that resembles a cross between an iguana and a toad.
- It has pebble-colored olive skin and white spikes along its back.
- It’s carnivorous and attacks when hungry.
- A tuatara has a membrane over its eyes which, when lowered, grants it 90 feet of infravision.
- 6. Rust Monster (AC 5; HD 5; hp 22; MV 40′; #AT 2; D rust; Save F3; ML 7; AL N)
- These creatures are described in both editions of the D&D Basic rules.
- This specific rust monster escaped from the Magi of Usamigaras.
- 7. Thoul (AC 6; HD 3+3; hp 16; MV 30′; #AT 1; D 2-8; Save F3; ML 10; AL C)
- A thoul is a magical combination of a ghoul, a hobgoblin, and a troll.
- They look like hobgoblins, so the party will likely mistake them for hobgoblins until they attack.
- Special Attacks:
- In combat, a character hit by a thoul must save vs. Paralysis or be paralyzed (similar to a ghoul’s touch, despite thouls not being undead).
- A thoul regenerates 1 lost hit point at the beginning of each combat round while it is alive.
- Alignment/Purpose: Thouls serve the Priests of Zargon and hunt for prisoners to take back to the Underground City.
- 8. Crocodile, Giant (AC 3; HD 5; hp 23; MV 30′; #AT 1; D 3-18; Save F3; ML 8; AL N)
- For more details, see Part 6: New Monsters.
Adventure Keying Format
Custom Gem
KEY TO TIER 5
41. Storage Room
Immediate Perception:
- Shelves line the walls, displaying items for religious ceremonies (candles, incense, clerical robes, etc.).
- Three huge, fearsome human-like creatures wearing animal skins have smashed a box of candles and are currently eating them.
Investigation Required:
- Creatures: The three human-like creatures are ogres (AC 5; HD 4+1; hp 19 each; MV 30′; #AT 1; D 1-10; Save F4; ML 10; AL C).
- They aren’t very intelligent and are eating the candles because they thought they looked good.
- Treasure: They carry three large leather sacks containing 500 gp, 500 gp, and 400 gp respectively.
- Magic Items: They also possess a ring of fire resistance and a magic-user/elf scroll (containing continual light, levitate, read languages).
42. Cleric’s Quarters
Immediate Perception:
- This room contains three bunk beds.
- Lying on the beds are humans dressed in bright yellow robes, wearing masks of a boar, a tiger, and a wolf.
Investigation Required:
- Creatures: The masked humans are actually doppelgangers (AC 5; HD 4*; hp 18 each; MV 30′; #AT 1; D 1-12; Save F10; ML 10).
- They took the forms of three Cynidiceans and killed the originals.
- They will attempt to join the party, choosing one victim each.
- When they have a chance to act secretly, they will change shape to resemble the victim, then try to kill the victim and take their place.
- They are immune to sleep and charm spells.
- Treasure: The doppelgangers carry 9 gems worth a total of 1500 gp.
43. Treasure Room
Immediate Perception:
- A slight breeze stirs in the room when the door is opened.
- A large, padlocked wooden chest sits near the north wall.
- Behind the chest is a huge tapestry of a desert scene.
Investigation Required:
- Tapestry Creature: The tapestry is actually a polymar (AC 9; HD 10; hp 45; MV 20′; #AT 3; D 1-6/1-6/1-6; Save F5; ML 10; AL C).
- A polymar is a semi-intelligent, many-celled creature that can reshape its body to look like any creature of 10 HD or less, or any object up to 10′ x 10′ x 10′. It takes only the shape, not special abilities.
- A close examination reveals the tapestry is not made from woven threads.
- There’s a 1 in 6 chance a PC notices something suspicious without close examination (2 in 6 if an elf is present). For example, the tapestry won’t move in the breeze like a real one.
- If not detected, the polymar will attack with surprise.
- Chest Treasure: The treasure in the locked chest includes 3000 ep, 5000 gp, a potion of invisibility, chainmail +1, and a dagger +1.
44. Secret Room
Immediate Perception:
- The ladder from the trap door at 27 leads down into this room.
- The room is empty.
45. Bedroom
Immediate Perception:
- This room contains a bed, a table, a chair, a lantern, and a wooden holy symbol of two intertwined snakes. The furniture is wooden.
- A hooded white robe is draped over the chair.
- Except for the furniture and robe, the room appears empty.
Investigation Required:
- Former Occupant: This was once the bedroom of Demetrius, a 6th-level cleric and elder in the cult of Usamigaras. His twin brother, Darius (room 58), was a 6th-level cleric in the cult of Zargon. Demetrius was assassinated before he could fulfill his vow to destroy the cult of Zargon.
- Spirit Possession: Demetrius’s dying wish was for his spirit to live on until Darius was destroyed. His spirit now rests in the white robe.
- Any character touching the robe must save vs. Dragon Breath or be taken over by Demetrius’s spirit.
- Demetrius will possess the character only long enough to kill Darius (room 58).
- Possessed Character’s Stats: The outwardly unchanged, possessed character becomes a 6th-level Lawful cleric. They gain Demetrius’s Wisdom (16), Intelligence (10), and hit points (31).
- Their saving throws become: Death Ray or Poison = 9, Wands = 8, Turn to Stone = 12, Dragon Breath = 14, Spells = 10.
- If Demetrius is reduced to 0 hp, the possessed character will die.
- Demetrius’s spells:
- 1st level: cure light wounds, detect evil
- 2nd level: bless, hold person
- 3rd level: striking (Expert Rules only)
- 4th level: cure serious wounds (Expert Rules only)
- DM Guidance for Roleplay: The DM should allow the player whose character is possessed to play Demetrius, providing necessary background and encouraging role-playing aligned with Demetrius’s sole goal of killing Darius, even if it means disallowing out-of-character actions.
- Demetrius’s Knowledge: Demetrius knows the way to room 58, including secret doors, but does not know about any traps on this level.
- Demetrius’s Aid: As long as the party moves by the quickest route to Darius (room 58), Demetrius may help them defeat monsters.
- Spirit’s Departure: Once Darius is dead, Demetrius will depart, and the white robe will disintegrate. The possessed character will be magically restored to their own full hit points when Demetrius leaves.
46. Kitchen-Dining Room
Immediate Perception:
- This room appears to be an abandoned kitchen and dining room.
- Cupboards, a table, and chairs are covered with a thin layer of dust.
- Near the table, two large snakes with brown and yellow scales are coiled around the body of a woman wearing a rabbit mask.
Investigation Required:
- Creatures: The two snakes are rock pythons (AC 6; HD 5*; hp 23 each; MV 30′; #AT 2; D 1-4/2-8; Save F3; ML 8; AL N). They will attack on sight.
- If a python’s bite hits, it will immediately constrict the victim for an additional 2-8 points of damage in the same round. Thereafter, the constriction automatically hits each round.
- Treasure: Around the neck of the dead Cynidicean is a necklace worth 700 gp.
- Supplies: Concealed in her robes are a full water bottle and a small pouch of food.
47. Living Room
Immediate Perception:
- The room appears to be a living room, containing wall hangings and ornate divans.
- There are several pieces of sculpture.
- An iron statue of a warrior stands on each side of the doorway just inside the room.
- Everything is covered by a thin layer of dust.
Investigation Required:
- Creatures: The statues are actually living iron statues (AC 2; HD 4*; hp 18 each; MV 10′; D 1-9/1-8 + special; Save F4; ML 11; AL N).
- They will attack if the party enters the room and allows the door to swing shut.
- While the door is held or jammed open, the statues will not attack.
- If a statue is hit by a non-magical metal weapon, the attacker must save vs. Spells. Failure means the weapon sticks to the statue and cannot be removed until the statue is destroyed.
- Living iron statues are not affected by sleep spells.
48. Hidden Guardroom
Immediate Perception:
- Four humans wearing stylized rat masks and red robes trimmed with rat fur leap to their feet and look at you.
- In the northeast corner of the room are stairs going down.
Investigation Required:
- Creatures: The four men are actually wererats (AC 7; HD 3*; hp 13 each; MV 40′; #AT 1; D 1-4; Save F3; ML 8; AL C).
- These lycanthropes are disguised as Cynidiceans to safely rob citizens.
- If threatened, they will change into giant rat form and fight or run.
- Like other lycanthropes, wererats in animal form can only be hit by silvered or magical weapons.
- Treasure: They have a small chest containing 2000 sp and 4 gems worth a total of 700 gp.
- Stairs: The stairs end in a bricked-up wall, unless the expanded adventure is being played (see Part 5: Expanding the Adventure).
49. Consultation Room
Immediate Perception:
- The room is paneled with wood, and a dusty carpet covers the floor.
- A large, heavy desk sits in the center of the room.
- Several wooden chairs are grouped north of the desk.
- Behind the desk is a large plush chair, and behind the chair on the south wall is a mounted lion’s head.
- Four large painted urns stand in the corners of the room.
- On both sides of the north doorway are stone pedestals with stone statues of winged beasts with claws, fangs, and horns.
Investigation Required:
- Creatures: The two statues are gargoyles (AC 5; HD 4*; hp 18 each; MV 30′, fly 50′; #AT 4; D 1-3/1-3/1-6/1-4; Save F8; ML 11; AL C).
- If the party expects gargoyles, roll initiative normally. Otherwise, the party will be surprised.
- They will attack as soon as the party enters the room.
- They can only be hit with magical weapons and are not affected by sleep or charm spells.
- Desk Contents: The desk has three drawers and a locked cabinet. Inside the cabinet are 2000 ep, a mace +1, and a poison potion.
- Chair Treasure: Hidden in the cushion of the plush chair are 18 gems each worth 100 gp.
- Other Items: The urns and lion head contain nothing of value.
49a. Pit Trap
Immediate Perception:
- (No immediate perception, this is a hidden trap within a floor section).
Investigation Required:
- Mechanism: This floor section conceals a hidden 10-foot deep pit filled with spikes.
- Trigger: The DM rolls for each character entering this area; the trap is triggered on a roll of 1 or 2 on 1d6.
- Damage: Characters falling into the pit will take 2-12 (2d6) points of damage.
- Note: Demetrius (if possessing a PC) does not know about this pit.
50. Main Entry Chamber
Immediate Perception:
- The high, arched ceiling is supported by a double row of pillars. Each pillar is carved into a statue of a king or queen of Cynidicea.
- A series of mosaic pictures decorate the walls of the room, starting in the northeast corner and continuing clockwise.
- In the center of the north wall is a pair of huge stone doors.
- The floor at the base of the double doors is partially covered with sand.
Investigation Required:
- Mosaics: The mosaics depict scenes from the history of Cynidicea, in order from the northwest corner:
- A tribe of squat, heavy-browed humanoids wielding crude stone weapons worship a lizard-headed god.
- A large band of tall, black-haired people battle the humanoids and take over their hunting grounds.
- A village rises over the battle scene, with grain fields and cattle/sheep herds in the arid surroundings.
- A great leader gathers villagers into an army, destroying an enemy army of snake-headed humanoids.
- The victorious leader is crowned king, founding the line of Cynidicean rulers.
- The stone city of Cynidicea is built on the village site.
- Scenes of the kingdom’s splendor at its height.
- The births of King Alexander and Queen Zenobia.
- The great pyramid is built.
- Slaves digging under the pyramid uncover the foundations of a pre-historic temple.
- The death of King Alexander and Queen Zenobia and their burial in the pyramid.
- Worship of the old gods (Gorm, Usamigaras, Madarua) is replaced by worship of a large humanoid with many tentacles.
- Life becomes a year-round carnival for Cynidiceans; all Cynidiceans now wear masks.
- Cynidiceans meet a barbaric, golden-haired people (ancestors of the Heldann tribes from module X1).
- The final picture is a crudely painted sketch showing the tribesmen looting Cynidicea.
- Blank Space: There is room on the wall for more pictures, but the space is blank.
- Main Doors: The huge doors, which open outward, are blocked by sand and cannot be opened.
- Treasure: There is no treasure here.
50a. Secret Entrance to the Underground City
Investigation Required:
- This is a secret trap door leading to a passageway to the underground city (see the Underground City Map, area S).
- The party can find this door only if the DM is continuing the adventure beyond the upper pyramid (see Part 5: Expanding the Adventure).
51. Chapel
Immediate Perception:
- This large room is clearly a place of worship.
- Rows of high-backed wooden benches flank a broad center aisle.
- Narrow aisles along the walls pass ornate mosaics to two small fountains set into the walls.
- Just past the fountains, a large dais fills the southern end of the room.
- On the dais, near a stone altar, lie three large statues resembling those on top of the pyramid, which have been toppled from their bases.
- A man and a woman stand near the toppled statues, talking softly. They wear brightly colored clothing and small bronze fox masks. They both have red hair and appear to resemble each other.
Investigation Required:
- Creatures: The man and woman are actually werefoxes (AC 9, 6 as fox; HD 3+2*; hp 16 each; MV 40′, 60′ as fox; #AT 1; D by weapon or 1-6; Save F3; ML 8; AL N). They are disguised as Cynidiceans to hunt for treasure and supplies.
- Each werefox can try to charm a person of the opposite sex once per round, similar to a charm person spell, but lasting only one day. They can charm up to three times per day.
- They may bargain or try to charm the party, attempting to trick them out of treasure and magic.
- They avoid risks and will not fight stronger opponents unless forced. They rely on their wits.
- If attacked, they will turn into foxes to fight or escape. If hard-pressed, they may return to human form and surrender.
- They will lie, cheat, and bribe if necessary for survival.
- Treasure: They carry three pieces of jewelry worth a total of 3000 gp, a sword +1 that casts light on command (30′ radius), a helm of alignment change, and a potion of levitation (they are unaware of its effect).
- If forced to fight as humans, the female will use the magical sword.
- Room Function: This was once Cynidicea’s main chapel but is seldom used now.
- Fountains: The fountains are fed by an underground lake and provide all the water the party needs for drinking or refilling waterskins.
52. Trap Room
Immediate Perception:
- The entire room is a large sunken pool filled with a bubbling liquid.
- In the center of the room is a box made of stone slabs. The lid of the box is about a foot above the liquid surface and is locked with a large iron padlock.
Investigation Required:
- Liquid: The bubbling liquid is acid.
- It destroys any material except stone.
- It deals 2-8 points of damage each round to creatures that fall into it. The acid is 6 feet deep.
- Stone Box Mechanism: The stone box rests on a special pedestal.
- The pedestal will sink at a rate of 1/2 foot per melee round if any weight is placed on the box.
- If the weight is removed, the pedestal will rise at the same rate (though never higher than 1 foot above the acid surface).
- Treasure: Inside the box are 20,000 sp and a clerical scroll (purify food and water, remove curse).
53. Abandoned Clerical Quarters
Immediate Perception:
- This room seems oddly damp, and a strange moist odor fills the air.
- It contains a low bed, some wooden shelves, and a small chest.
- The contents of the room appear to shimmer, as if seen through clear water or a thick pane of glass.
Investigation Required:
- Creature: Just inside the doorway is a gelatinous cube (AC 8; HD 4*; hp 18; MV 20′; #AT 1; D 2-8 + paralyzation; Save F2; ML 12; AL N).
- The party is viewing the room through the gelatinous cube.
- The monster will move and attack immediately.
- Victims hit must save vs. Paralysis or be paralyzed for 2-8 turns (unless cure light wounds is used).
- The cube can be harmed by fire or weapons, but not by cold or lightning.
- Contents: There is nothing of value in the room. Its rotted contents will crumble if touched.
54. Storage Room
Immediate Perception:
- This room is lined with racks of wine bottles.
- Large casks and barrels are along the west wall. Several casks have been smashed open and their contents drained.
- Suddenly, from behind a stack of barrels, a huge bear-like creature with the head of a giant owl appears and staggers toward you.
Investigation Required:
- Creature: The creature is an owlbear (AC 5; HD 5; hp 30; MV 40′; #AT 3; D 1-8 each; Save F3; ML 9; AL N).
- It is completely drunk and ravenously hungry. If not fed immediately, it will attack.
- It attacks at -2 to hit, but its morale is 10.
- If both paws hit the same opponent in one round, the owlbear will “hug” for an additional 2-8 points of damage.
- Contents: The room contains 400 bottles of wine worth a total of 100 gp.
55. Party Room
Immediate Perception:
- Nine men and women in bright costumes and fancy masks are drinking, talking, and dancing. It appears to be a masked ball.
- Most of the people are dancing as if they had invisible partners.
- You hear snatches of conversation, most of which makes no sense. The people seem to be talking to themselves.
Investigation Required:
- Occupants: These nine people are Cynidiceans (AC 9; NM; hp 4 each; MV 40′; #AT 1; D 1-6; ML special; AL C).
- They are in their own dream world and will assume the characters are merely part of the dream.
- Treasure: There is no treasure here.
56. Crashing Walls
Immediate Perception:
- As the party passes, the walls just ahead crash together and fly apart. (This trap automatically triggers the first time the party passes.)
Investigation Required:
- Mechanism: A hidden pressure plate in the center of the hall triggers this trap.
- Purpose 1: It alerts Darius in room 58 that someone is coming.
- Purpose 2 (Return Trip): It will be a dangerous hazard to a party leaving room 56a if forgotten. In this case, it triggers on a 1 or 2 on 1d6, dealing 3-18 points of damage to characters behind the triggering character.
- Avoidance: The pressure plate will be easily seen and avoided if characters are looking for it on the way out.
56a. Lobby
Immediate Perception:
- Ten Cynidiceans wearing dark robes and masks of fearsome, imaginary monsters sit in a circle.
- They are staring straight ahead but don’t seem to be looking at anything particular.
Investigation Required:
- Occupants: These Cynidiceans (AC 9; NM; hp 4 each; MV 40′; #AT 1; D 1-6; ML special; AL C) are also in their own dream worlds, specifically nightmare worlds.
- Behavior: They will react to party actions and may even attack, but they will never speak, even if wounded. They might scream randomly from unseen terror, but their screaming will not match reality (e.g., they won’t scream if touched or attacked).
57. Gambling Room
Immediate Perception:
- A dozen brightly robed men and women masked as various animals are playing games of chance.
- Card games are at one table, dice games at another.
- In the center of the room is a large wheel of fortune.
- Many silver and gold coins, gems, and pieces of jewelry are changing hands as people win and lose.
Investigation Required:
- Occupants: Because they are sharing a common dream, these Cynidiceans act more normally than those in rooms 54 and 55.
- They will continue gambling and talking about gambling unless physically attacked. They may even invite the party to join.
- If attacked, they will fight back, assuming a gang of robbers has broken in.
- If the party tries to take the money without winning it, the cleric and his hobgoblin guards from room 58 will enter through the secret door in the south wall and attack.
- Gambling Rules (DM’s Discretion):
- The DM can use any simple system for gambling results (e.g., DM and player each roll 1d20, high roll wins, player loses ties).
- Suggested wagers: Minimum 50 gp, maximum 1000 gp.
- Characters cannot win more money than currently present in the room.
- If characters start winning large sums, the cleric from room 58 is likely to attack, as he considers all money in this room his “taxes” as a priest of Zargon.
- Demetrius’s Awareness: A character possessed by Demetrius (from room 45) will immediately go to the proper wall section and start looking for the secret door, knowing his enemy is very close.
- Treasure: The gambling room contains 3000 sp, 5000 gp, 26 gems worth a total of 3100 gp, and six pieces of jewelry worth 6000 gp total.
58. Cleric’s Chamber
Immediate Perception:
- (No immediate perception described, as the inhabitants are likely to emerge or be ready for the party).
Investigation Required:
- Occupants: This room contains the evil cleric Darius and his hobgoblin guards.
- They will be ready for the party to enter, or more likely, will charge out if the party attempts to steal treasure from room 57.
- If the party tried to steal treasure, the Cynidiceans from room 57 will join Darius in the fight. Otherwise, the Cynidiceans will do nothing unless attacked.
- Forces of Darius:
- Darius: AC 5; C 6; hp 22; MV 20′; #AT 1 at +1, or spell; D 1-6+1; Save C6; ML 10; AL C; S 13, I 9, W 16, D 9, C 13, Ch 14.
- Darius’s Spells:
- 1st level: cure light wounds, light
- 2nd level: bless, silence 15′ radius
- *3rd level: striking (Expert Rules only)
- *4th level: cause serious wounds (Expert Rules only)
- Suggested Spell Use:
- Before melee: bless hobgoblins (or blight party).
- Round 1: silence a party magic-user.
- Round 2: striking on his own mace.
- Round 3: Other spells as appropriate.
- Darius will always use his spells as intelligently as possible, even if in a different order.
- Darius’s Spells:
- 6 Hobgoblins: AC 6; HD 1+1; hp 5 each; MV 30′; #AT 1; D 1-8; Save F1; ML 8; AL C. (The DM can change the number of hobgoblins.)
- 12 Cynidiceans: AC 9; NM; hp 4 each; MV 40′; #AT 1; D 1-6; ML 8; AL C.
- Darius: AC 5; C 6; hp 22; MV 20′; #AT 1 at +1, or spell; D 1-6+1; Save C6; ML 10; AL C; S 13, I 9, W 16, D 9, C 13, Ch 14.
- Contents: Except for Darius and the hobgoblins, there is nothing of interest in this room.
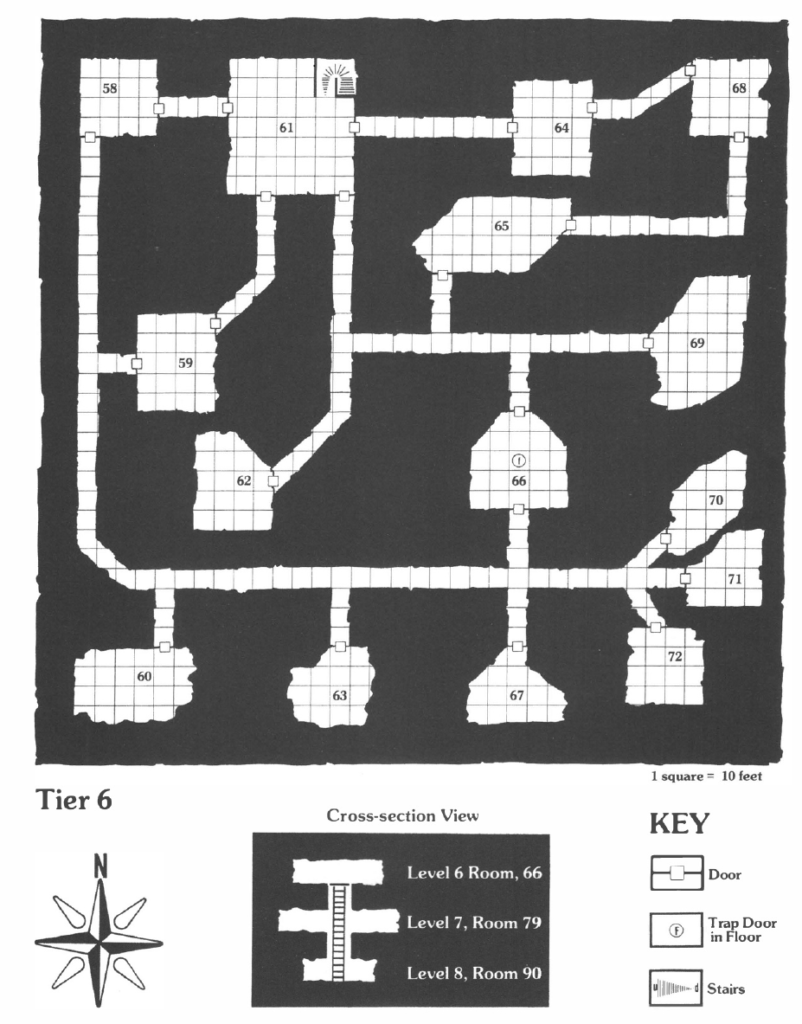
59. Abandoned Guards’ Quarters
Immediate Perception:
- This room appears to be a former barracks, with rotting wooden cots pushed against the walls and a few broken weapons scattered across the dusty floor. A thick, unsettling black ooze covers a section of the far wall.
Investigation Required:
- Monster: 1 black pudding (AC 6; HD 10*; hp 45; MV 20′; #AT 1; D 3-24; Save F5; ML 12; AL N).
- It dissolves wood and metal in one turn.
- It can only be killed by fire.
- Weapons and other spells break it into smaller puddings (AC 6; HD 2*; hp 9; #AT 1; D 1-8; Save F1).
- Treasure: None.
60. Abandoned Overseer’s Room
Immediate Perception:
- This small, dusty room contains a heavy, overturned wooden desk and a shattered chair. Faint scratch marks score the stone floor, suggesting something was dragged across it. The air is still, but a strange tension lingers.
Investigation Required:
- Monster: 3 blink dogs (AC 5; HD 4*; hp 18 each; MV 40′; #AT 1; D 1-6; Save F4; ML 6; AL L).
- They possess limited teleportation ability.
- Any round they have initiative, blink dogs can attack and blink away before being hit.
- Treasure: 2000 sp and a gem worth 500 gp.
61. Abandoned Slave Quarters
Immediate Perception:
- This cramped room is filled with piles of straw bedding that have long since turned to dust, suggesting it once housed many occupants. The air is stale and heavy.
- Stairs lead up from here, disappearing into the darkness above.
Investigation Required:
- The stairs lead up to room 48 on Tier 5.
- Monster: 1 giant scorpion (AC 2; HD 4*; hp 18; MV 50′; #AT 3; D 1-10/1-10/1-4 + poison; Save F2; ML 11; AL C).
- Its sting attack (1-4 damage) is poisonous.
- If either claw attack (1-10 damage) hits, the sting attack gains a +2 bonus to hit.
- Treasure: None.
62. Abandoned Guard Captain’s Room
Immediate Perception:
- This room is empty, its stone walls bare and cold. The only sign of its former purpose might be faint, faded marks where furniture once stood.
Investigation Required:
- (No additional details provided, implying it’s purely an empty room for ambiance).
63. Abandoned Guard Captain’s Room
Immediate Perception:
- This room, once an officer’s quarters, is now a scene of desolate decay. A shattered wooden bed frame lies in one corner, and the remains of a rotted chest are against the far wall. The air feels unnaturally cold and still, carrying a faint scent of grave dust.
Investigation Required:
- Monster: 2 wraiths (AC 3; HD 4**; hp 18 each; MV 40′, fly 80′; #AT 1; D 1-6 + energy drain; Save F4; ML 12; AL C).
- These undead drain one energy level when they hit.
- They can only be hit by silver, magic, or magical weapons.
- They are immune to charm, sleep, and hold spells.
- A 3rd-level cleric can turn wraiths on a roll of 11+ on 2d6.
- Trap: A treasure chest is protected by a poison dart trap.
- The dart fires as a 6 HD monster, dealing 1d4 + poison damage.
- Treasure: 3000 ep, 5000 gp, and 8 pieces of jewelry worth a total of 9600 gp.
64. Abandoned Kitchen
Immediate Perception:
- This room is clearly an abandoned kitchen. Rusting iron pots and pans hang crookedly from hooks, and a stone oven stands cold in one wall. Remnants of a long-collapsed wooden dining table are scattered across the floor, covered in a thick layer of dust. The air smells faintly of old grease and decay.
Investigation Required:
- Monster: 2 weretigers (AC 3; HD 5*; hp 23 each; MV 50′; #AT 3; D 1-6/1-6/2-12; Save F5; ML 9; AL N).
- These lycanthropes can only be hit with silver, magic, or magical weapons.
- Treasure: 2000 ep and 3 gems worth a total of 1510 gp.
65. Old Food Storeroom
Immediate Perception:
- This room is empty, save for the lingering scent of long-rotted provisions. Empty, splintered shelves line the walls.
Investigation Required:
- (No additional details provided, implying it’s purely an empty room).
66. Old Tool Storeroom
Immediate Perception:
- This room is lined with empty, dusty wooden shelves that once held tools. A faint metallic scent hangs in the air.
- A section of the floor looks suspiciously like a trap door.
Investigation Required:
- Trap Door: A trap door conceals a ladder leading down to room 79 on Tier 7.
- Monster: 2 wood golems (AC 7; HD 2+2*; hp 11 each; MV 40′; #AT 1; D 1-8; Save F1; ML 12; AL N).
- These crude, 3-foot tall manlike figures move stiffly and have a -1 penalty on initiative rolls.
- They can only be hit by magical weapons.
- Wood golems are immune to sleep, charm, and hold spells, as well as all gases.
- They burn easily, making saving throws against fire-based attacks at -2 and taking one extra point of damage for each die of fire damage.
- Treasure: None.
67. Abandoned Guards’ Quarters
Immediate Perception:
- This room is empty, with only the ghost of former occupants suggested by the indentations on the floor where cots once rested. The air is still and heavy.
Investigation Required:
- (No additional details provided, implying it’s purely an empty room).
68. Abandoned Messroom
Immediate Perception:
- This room is empty, a large, open space that once served as a dining area. The stone floor is worn smooth in places, hinting at countless footsteps, but now only silence remains.
Investigation Required:
- (No additional details provided, implying it’s purely an empty room).
69. Abandoned Slave Barracks
Immediate Perception:
- This large, communal room is filled with broken, splintered wooden bunk beds and scattered remnants of filthy, ancient straw. The air is thick with dust and the lingering scent of old sweat and despair.
Investigation Required:
- Monster: 2 medusae (AC 8; HD 4**; hp 18 each; MV 30′; #AT 1 + stone gaze; D 1-6 + poison; Save F4; ML 8; AL C).
- A character meeting a medusa’s gaze will turn to stone if a save vs. Turn to Stone is failed.
- A medusa’s hair is made of poisonous snakes (her normal attack).
- Treasure: 11 gems worth a total of 1100 gp, a rope of climbing, a potion of heroism, a potion of animal control, a magic-user/elf scroll (phantasmal force), and a ring of weakness.
70. Abandoned Cleric’s Quarters (Gorm)
Immediate Perception:
- This room is empty, a simple chamber that once belonged to a priest of Gorm. A faint, lingering scent of ozone might suggest its former dedication.
Investigation Required:
- (No additional details provided, implying it’s purely an empty room).
71. Abandoned Cleric’s Quarters (Usamigaras)
Immediate Perception:
- This small, desolate room shows signs of a past occupant, perhaps a cleric of Usamigaras. A stone altar stands in one corner, covered in dust, and a few broken clay tablets lie near its base. A strange, earthy smell permeates the air, and a section of the wall appears to have recently collapsed inward.
Investigation Required:
- Monster: 1 caecilia worm (AC 6; HD 6*; hp 27; MV 20′; #AT 1; D 1-8; Save F3; ML 9; AL N).
- An unadjusted “to hit” roll of 19 or 20 means the caecilia has swallowed its prey whole.
- The victim takes 1-8 points of damage a round until it or the caecilia is dead.
- The caecilia burrowed into this room, but the tunnel has collapsed behind it.
72. Abandoned Cleric’s Quarters (Usamigaras)
Immediate Perception:
- This room is larger than typical quarters, suggesting it belonged to a more significant cleric of Usamigaras. Faded celestial charts are painted on the ceiling, though time and dust have obscured much of their detail. The room is otherwise bare, hinting at a hasty abandonment.
Investigation Required:
- Monster: 2 minotaurs (AC 6; HD 6; hp 27 each; MV 40′; #AT 2; D 1-6/1-6; Save F6; ML 12; AL C).
- Once in combat, these bull-headed men will pursue as long as their prey is in sight.
- Treasure: 4 gems worth a total of 1700 gp.
TIERS 7 AND 8 (Dungeon Level 5)
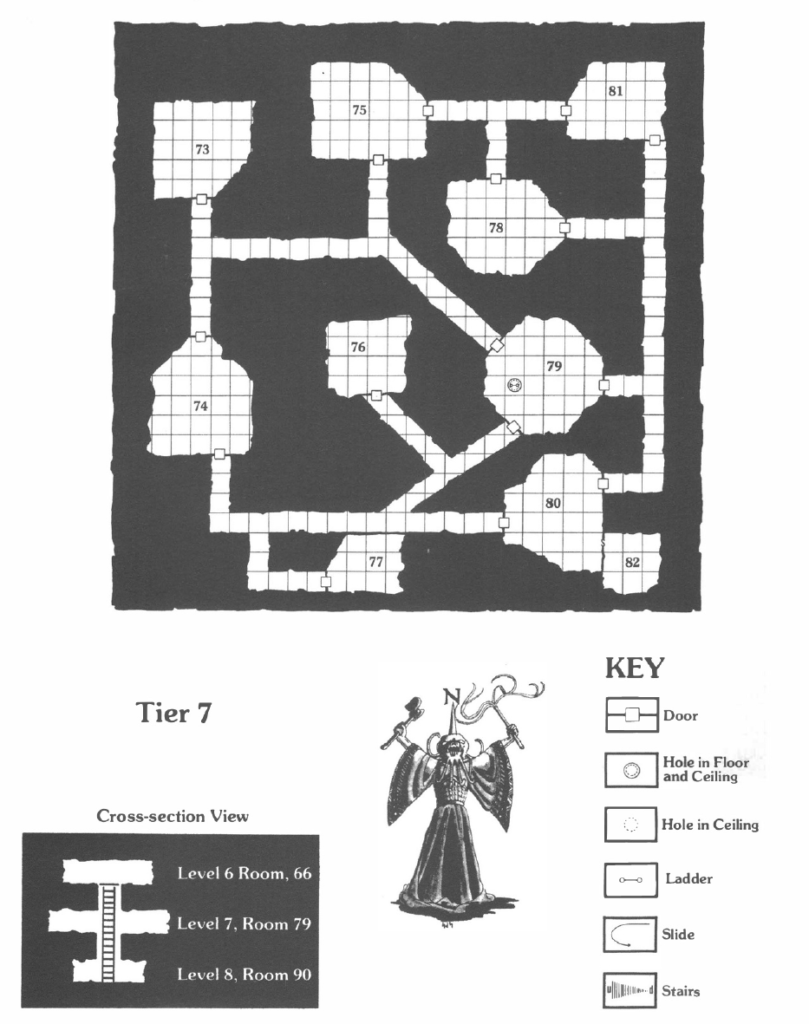
KEY TO TIER 7
73. The painting shows the various stages in preparing a body for burial.
Immediate Perception:
- The painting on the wall depicts various stages in preparing a body for burial, from ritual cleaning to the final wrapping in linens. The artistry is faded but still conveys the solemnity of the process.
Investigation Required:
- Contents: None.
74. The painting shows Cynidiceans in mourning.
Immediate Perception:
- The painting on the wall depicts Cynidiceans in mourning, their faces obscured by traditional veils, their postures conveying deep sorrow. The air in the room feels heavy, as if the echoes of ancient grief still linger.
Investigation Required:
- Monster: 2 mummies (AC 3; HD 5+1*; hp 23 each; MV 20′; #AT 1; D 1-12 + disease; Save F5; ML 12; AL C).
- Characters seeing these undead must save vs. Paralysis or be paralyzed with fear until the mummies attack.
- Mummies are immune to all attacks except spells, magical weapons, or fire attacks, all of which do half damage.
- They are also immune to sleep, charm, and hold spells.
- The disease caused by a mummy lasts until magically cured. It prevents magical healing of wounds and makes wounds take 10 times the normal time to heal.
- A 4th-level cleric can turn mummies on a roll of 11+ on 2d6.
- Treasure: 5000 gp and 4 pieces of jewelry worth a total of 3200 gp.
75. The painting shows a funeral.
Immediate Perception:
- The painting on the wall depicts a funeral, with robed figures gathered around a sarcophagus, offering final respects. The scene is somber, captured in muted tones.
Investigation Required:
- Monster: 3 giant weasels (AC 7; HD 4+4*; hp 22 each; MV 50′; #AT 1 + drain blood; D 2-8; Save F3; ML 8; AL N).
- Once they bite successfully, weasels hold on and suck blood, dealing 2-8 points of damage each round until their prey is dead or they are killed.
- Treasure: The body of a previous victim with 77 gp and a magic-user/elf scroll (dispel magic, web).
76. The painting shows a funeral procession.
Immediate Perception:
- The painting on the wall depicts a solemn funeral procession, with draped figures carrying a bier through a stylized landscape. The movement in the artwork creates a sense of slow, inevitable progress.
Investigation Required:
- Contents: None.
77. The painting shows various types of coffins, caskets, and sarcophagi.
Immediate Perception:
- The painting on the wall displays various types of funerary receptacles, from simple wooden coffins to elaborate, jeweled sarcophagi, each meticulously rendered. It’s like a morbid catalog of final resting places.
Investigation Required:
- Monster: 2 displacer beasts (AC 4; HD 6*; hp 27 each; MV 50′; #AT 2; D 2-8/2-8; Save F6; ML 8; AL N).
- Because of its displacement ability, anyone attacking a displacer beast must subtract 2 from their “to hit” roll.
- The displacer beast also receives a +2 bonus on all saving throws.
- Treasure: 4 gems worth a total of 700 gp.
78. The painting shows the building of a gravesite.
Immediate Perception:
- The painting on the wall depicts the laborious building of a gravesite, showing workers hauling stone and carving intricate designs. The detail suggests a reverence for death and the afterlife.
Investigation Required:
- Monster: 2 trolls (AC 4; HD 6+3*; hp 30 each; MV 40′; #AT 3; D 1-6/1-6/1-10; Save F6; ML 10; AL C).
- The third round after being damaged, trolls regenerate 3 hp each round.
- Trolls can only be completely destroyed by acid or fire.
- Treasure: 6000 gp in rotting leather sacks.
79. The painting shows various scenes of natural death.
Immediate Perception:
- The painting on the wall depicts various scenes of natural death, from elderly Cynidiceans passing peacefully to animals succumbing to the elements. The imagery is stark yet part of the natural cycle.
- The room contains a huge open pit in the center, dropping into darkness, with a sturdy ladder extending down into it.
- A pile of dull copper coins rests near the edge of the pit.
- You see two large, reddish dogs (hellhounds) near the pit; they grin with a disturbing intelligence but remain watchful, their eyes fixed on you.
Investigation Required:
- Monster: 2 hellhounds (AC 4; HD 5*; hp 23 each; MV 40′; #AT 1; D 1-6 or breath; Save F5; ML 9; AL C).
- In melee, a hellhound will attack one person each round, either breathing fire (1-2 on 1d6) or biting (3-6 on 1d6).
- Its breath does 5-30 points of damage, halved if the victim makes a save vs. Dragon Breath.
- Hellhounds can detect invisible within 60 feet (75% chance).
- Encounter Behavior: The hellhounds are accustomed to people throwing copper coins onto the pile before descending. They will wait for this. If the party doesn’t pick up on the hint (DM should provide suggestive growls and whines), the dogs will become nervous, then suspicious, and finally begin stalking the party (softly growling, hackles raised). If the hint remains unheeded and the party lingers or attempts to descend without paying, the hellhounds will attack, their fiery breath revealing their true nature.
- Treasure: 9000 cp, a sword +1, +3 vs Dragons, and a wand of trap detection with 12 charges (buried in the copper pile, visible with detect magic).
- Ladder: The ladder goes up to room 66 on Tier 6 and down to room 90 on Tier 8.
80. The walls, floor, and ceiling are all painted black.
Immediate Perception:
- The walls, floor, and ceiling of this room are all painted a deep, absorbing black, creating a disorienting sense of limitless space. The darkness seems to press in, almost unnervingly silent.
Investigation Required:
- Monster: 2 werebears (AC 2; HD 6*; hp 27 each; MV 40′; #AT 3; D 2-8/2-8/2-16; Save F6; ML 10; AL L).
- These lycanthropes can only be hit by silver or magic.
- If both paws hit, werebears automatically “hug” for an additional 2-16 (2d8) points of damage.
- They may be friendly if approached in a friendly manner.
- Treasure: 4000 ep.
81. The painting shows an individual choosing a gravesite.
Immediate Perception:
- The painting on the wall depicts an individual choosing a gravesite, a solitary figure contemplating a serene, open landscape. The scene suggests a personal and peaceful end.
Investigation Required:
- Contents: None.
82. All the walls in the room are painted black except for the east wall, which shows a rising sun.
Immediate Perception:
- All walls in the room are painted deep black, creating a stark contrast with the east wall, which displays a vibrant, golden rising sun, its rays stretching across a painted horizon. The artistic choice is striking and symbolic.
Investigation Required:
- Contents: None.
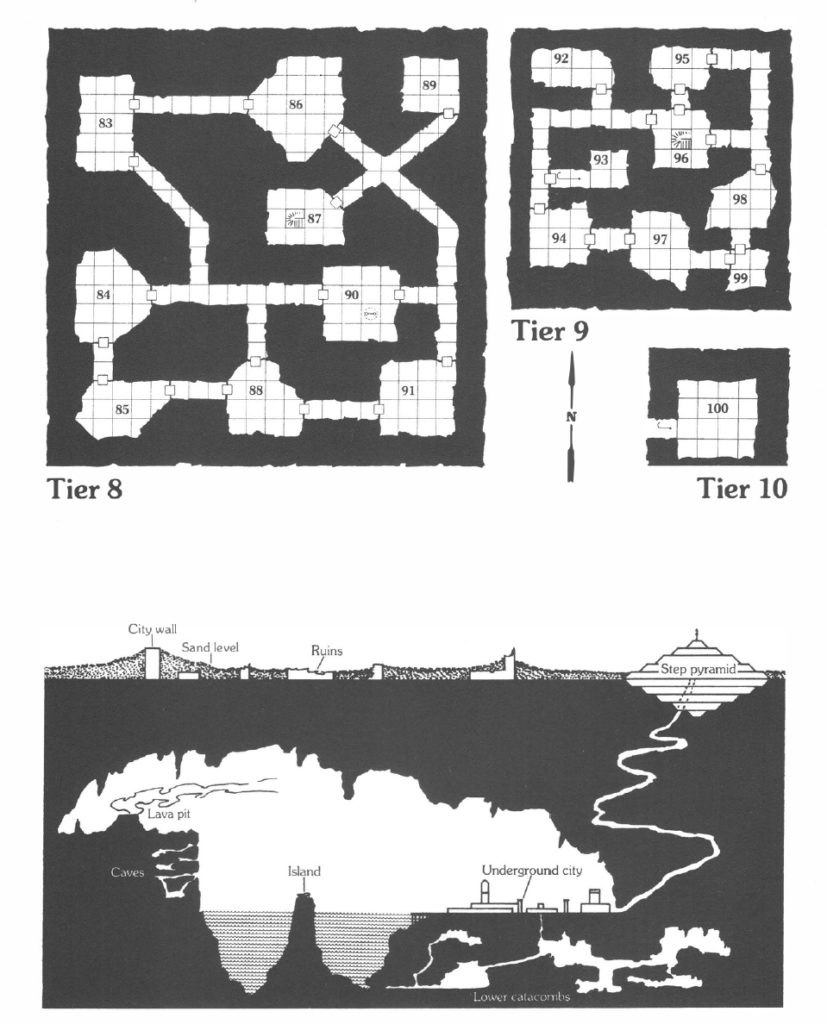
KEY TO TIER 8
83. The painting shows a narrow bridge over an abyss.
Immediate Perception:
- The painting on the wall depicts a precarious, narrow bridge arching over a seemingly bottomless abyss. The detail conveys a sense of dizzying height and danger.
Investigation Required:
- Contents: None.
84. The painting shows a group of spirits crossing an underground river in a ferry-boat.
Immediate Perception:
- The painting on the wall depicts a group of ethereal, glowing spirits crossing a dark, underground river in a simple ferry-boat, guided by an unseen hand. The scene is both haunting and serene.
Investigation Required:
- Monster: 1 basilisk (AC 4; HD 6+1**; hp 28; MV 20′; #AT 1; D 1-10 + stone gaze, stone touch; Save F6; ML 9; AL N).
- If this lizard hits in melee, or if its gaze is met, the victim must save vs. Turn to Stone or be turned to stone.
- Treasure: 4000 gp and 2000 pp in a loose pile.
85. The painting shows a ferry-boat and its ferryman, who wears a black hooded cloak.
Immediate Perception:
- The painting on the wall depicts a solitary ferry-boat gliding on a dark river, its oars dipping silently. Standing at the helm is a mysterious ferryman, clad entirely in a black hooded cloak, his face obscured.
Investigation Required:
- Contents: None.
86. The painting shows a party of spirits walking across a narrow bridge over an abyss.
Immediate Perception:
- The painting on the wall depicts a procession of glowing spirits, single-file, carefully walking across a narrow bridge suspended over a gaping abyss. The faint light from their forms illuminates the unsettling void beneath.
Investigation Required:
- Monster: 1 eight-headed hydra (AC 5; HD 8*; hp 64; #AT 8; D 1-10 each; Save F8; ML 9; AL N).
- For every 8 points of damage a hydra takes, one head will no longer be able to attack.
- Treasure: 4000 cp, 3000 gp, and 4 pieces of jewelry worth a total of 3800 gp.
87. The painting shows a woman in white robes kneeling next to a pool of fire.
Immediate Perception:
- The painting on the wall depicts a serene woman dressed in white robes, kneeling next to a shimmering pool of fire. Her expression is one of devotion, and the flames seem to dance without consuming.
- A spiral staircase descends into the floor in one corner of the room.
Investigation Required:
- Monster: 1 Djinni (lesser) (AC 5; HD 7+1*; hp 33; MV 30′, fly 80′; #AT 1 + special; D 2-16 (fists) or 2-12 (whirlwind); Save F14; ML 12; AL N).
- A djinni can perform any of the following three times per day:
- Create food and drink (for 12 men and their mounts).
- Create metallic objects of temporary duration (varies with hardness—gold, 1 day; iron, one round) up to a maximum of 1000 cn weight.
- Create soft goods and wooden objects (permanent) up to a maximum of 1000 cn weight.
- Become invisible.
- Assume gaseous form.
- Form itself into a whirlwind.
- In addition, a djinni can create illusions at will that affect both sight and hearing. These last until touched.
- The djinni will let the party pass for a suitable bribe or service.
- A djinni can perform any of the following three times per day:
- Stairs: The spiral staircase leads down to room 96 on Tier 9.
88. The painting is of a gloomy underground river.
Immediate Perception:
- The painting on the wall depicts a vast, gloomy underground river, its waters dark and still, reflecting the cavern ceiling above. The scene evokes a sense of vastness and silent, eternal flow.
Investigation Required:
- Monster: 2 hill giants (AC 4; HD 8; hp 36 each; MV 40′; #AT 1; D 2-16; Save F8; ML 8; AL C).
- Treasure: 12,000 sp, 5000 gp, 1 piece of jewelry worth 1100 gp, a potion of healing, a sword +2, a helm of reading languages and magic, and a cursed scroll.
- The cursed scroll will turn the reader into a 1-inch tall miniature unless a save vs. Spells is made (MV 1′; #AT 0).
89. A painting shows an underground pool of fire.
Immediate Perception:
- A painting on the wall depicts a vivid underground pool of churning fire, its orange and red hues illuminating a dark cavern. The depiction is strangely mesmerizing, capturing the intense heat and light.
Investigation Required:
- Monster: 1 manticore (AC 4; HD 6+1*; hp 28; MV 40′ fly 60′; #AT 3; D 1-4/1-4/2-8; Save F6; ML 9; AL C).
- This winged lion with the head of a man has a spiked tail.
- It can shoot 6 spikes from its tail each round. The spikes deal 1-6 points of damage each. A total of 24 spikes can be fired.
- Treasure: 4000 gp and 6 pieces of jewelry worth a total of 6000 gp.
90. The walls, floor, and ceiling in this room have all been painted the color of sunlight.
Immediate Perception:
- The walls, floor, and ceiling in this room have all been painted a brilliant, warm yellow, the color of sunlight. The effect is surprisingly cheerful and starkly contrasts with the deeper levels of the pyramid.
Investigation Required:
- Contents: None.
91. The painting shows a ferry-boat approaching a group of Cynidicean spirits waiting on the bank of an underground river.
Immediate Perception:
- The painting on the wall depicts a small ferry-boat approaching a group of glowing Cynidicean spirits who wait patiently on the dark bank of an underground river, their forms luminescent.
Investigation Required:
- Monster: 1 spectre (AC 2; HD 6**; hp 27; MV 50′, fly 100′; #AT 1; D 1-8 + drain 2 energy levels; Save F6; ML 11; AL C).
- This undead creature has no solid body and can only be hit by magic or magical weapons.
- Its touch drains two energy levels.
- It is immune to charm, sleep, and hold spells.
- A 5th-level cleric can turn spectres on a roll of 11+ on 2d6.
- Trap: A gas trap on a treasure chest.
- Effect: Save vs. Spells or lose half Strength and Dexterity (-20% on all thieving ability rolls) for 24 turns. The gas fills the entire room for one hour.
- Treasure: 7000 gp.
TIERS 9 AND 10 (Dungeon Level 6)
KEY TO TIER 9
92. The painting shows evil spirits being judged (the evil spirits turn black upon judgement).
Immediate Perception:
- The painting on the wall depicts a solemn scene of judgment, where grotesque, shadowy figures stand before robed arbiters. As they are judged, the evil spirits within the painting visibly turn a deeper, inky black.
Investigation Required:
- Monster: 1 devil swine (AC 3; HD 9*; hp 40; MV 60′, 40′ in human form; #AT 1; D 2-12; Save F9; ML 10; AL C).
- This lycanthrope can only be harmed by silver, magic, or magical weapons.
- It can cast a powerful charm person spell up to 3 times per day (save vs. Spell at -2). However, charmed creatures cannot use spells or magical devices.
- Treasure: A locked chest containing 4000 sp.
93. Trap Entrance to Zargon’s Lair.
Immediate Perception:
- The hallway ahead seems normal, but there’s a subtle, unsettling shimmer to the air.
- A painting on the wall depicts glowing spirits boarding a magnificent winged boat made of pure golden light, soaring towards an unseen horizon.
Investigation Required:
- Trap: The hallway to room 93 turns into a slide when entered, abruptly dropping and tumbling the party into Tier 10, the lair of Zargon.
- Contents: None.
94. A painting shows a winged boat of golden light approaching a group of glowing spirits.
Immediate Perception:
- A painting on the wall depicts a radiant winged boat of golden light gracefully approaching a group of ethereal, glowing spirits waiting expectantly on a bank, their forms bathed in its warm glow.
Investigation Required:
- Monster: 1 vampire (AC 2; HD 9**; hp 40; MV 40′, fly 60′; #AT 1; D 1-10 + drain 2 energy levels; Save F9; ML 11; AL C).
- This undead can only be hit with magic or magical weapons and is immune to sleep, charm, and hold spells.
- It regenerates 3 hp per melee round, starting the round after it is hit.
- It can charm those looking into its eyes (save vs. Spells at -2).
- It can become gaseous at will and will use this form to escape if reduced to 0 hp.
- A 6th-level cleric can turn vampires on a roll of 11+ on 2d6.
- Treasure: 6000 gp and 10 pieces of jewelry worth a total of 7000 gp.
95. The painting shows Madarua dressed in the robes of a judge.
Immediate Perception:
- The painting on the wall depicts Madarua, the Warrior Maiden goddess, dressed in the austere robes of a judge, her expression stern yet resolute as if weighing the fates of unseen souls.
Investigation Required:
- Monster: 1 chimera (AC 4; HD 9**; hp 40; MV 40′, fly 60′; #AT 5 + breath; D 1-3/1-3/2-8/2-8/3-12 + breath; Save F9; ML 9; AL C).
- A chimera is part goat, part lion, and part dragon.
- In addition to its claws, the goat head gores for 2-8 damage, the lion head bites for 2-8 damage.
- The dragon head either bites for 3-12 damage (50% chance) or breathes a 10’x 50′ cone of fire for 3-18 points (50% chance, save vs. Dragon Breath for half damage).
- The dragon head can only breathe three times a day.
- Treasure: 12 pieces of jewelry worth 13,000 gp.
96. The painting shows a woman dressed in white washing the spirits of the dead in a pool of fire.
Immediate Perception:
- The painting on the wall depicts a serene woman dressed in flowing white robes, gently washing the ethereal forms of the dead in a shimmering pool of fire. The flames appear purifying rather than destructive in the artwork.
Investigation Required:
- Monster: 1 bone golem (AC 2; HD 8**; hp 36; MV 40′; #AT 4; D 1-8 each; Save F4; ML 12; AL N).
- This four-armed skeleton wields four swords simultaneously.
- It will attack up to two enemies each round.
- Bone golems are immune to sleep, charm, and hold spells, plus fire, cold, and electrical attacks.
- They can only be hit by magic or magical weapons.
97. The painting shows good spirits being judged. After a good spirit has been judged, it glows with a golden light.
Immediate Perception:
- The painting on the wall depicts a celestial scene of judgment, where noble spirits stand before radiant arbiters. As each good spirit is judged, it glows with an increasingly brilliant golden light, radiating warmth and peace within the painted scene.
Investigation Required:
- Monster: 1 blue dragon (AC 0; HD 9**; hp 40; MV 30′; fly 80′; #AT 3 or breath; Damage 2-7/2-7/3-30; Save F9; ML 9; AL C).
- The dragon breathes lightning in a line up to 5′ x 100′.
- The breath deals damage equal to the dragon’s current hit points (save vs. Dragon Breath for half).
- It has a 20% chance of being asleep when the party enters the room.
- This dragon does not talk or use spells.
- Treasure: A mound consisting of 6000 sp, 15,000 gp, and 18 pieces of jewelry worth 20,000 gp total.
98. The painting shows Gorm dressed in the robes of a judge.
Immediate Perception:
- The painting on the wall depicts Gorm, the lord of storms and lightning, dressed in the authoritative robes of a judge, his bearded face stern and unyielding as he presides over a celestial court.
Investigation Required:
- Contents: None.
99. The painting shows Usamigaras dressed in the robes of a judge.
Immediate Perception:
- The painting on the wall depicts Usamigaras, the winged child deity, dressed in the flowing robes of a judge, his youthful face holding a surprisingly grave expression as he considers the fate of spirits.
Investigation Required:
- Contents: None.
KEY TO TIER 10
100. LAIR OF ZARGON
Immediate Perception:
- You slide into a large, cavernous chamber, slick with a thick, viscous slime that covers the floor and drips from the ceiling. The air is heavy and foul, carrying the stench of decay and something ancient. The floor is disgustingly littered with countless bones, ranging from small fragments to large, picked-clean skeletons.
- Suddenly, you hear a chilling rustling noise from the north wall. There, a huge humanoid figure rises from the slime, towering 15 feet tall. Its head is that of a giant, grotesque lizard, and a menacing black, 2-foot long horn curves sharply upward above its single, malevolent red eye. Sharp, jagged teeth fill its wide mouth. Instead of arms, the creature possesses six thrashing tentacles, three on each side of its body, each ending in razor-sharp talons. In place of legs, the creature slithers toward you on six more powerful, writhing tentacles, dragging its massive, slimy bulk.
Investigation Required:
- Creature: This creature is Zargon (AC 0; HD 12*; hp 80; MV 30′; #AT 7; D 6 x 1-8/3d8; Save F12; ML 12; AL C).
- It will try to attack and slay any party members it can catch, striking with its claws and biting.
- The party can climb back up the slide with difficulty (if Zargon permits).
- Background: Although ancient, Zargon is not a god. It is a cunning creature that discovered its “godhood” made it easier to acquire victims. Worshipped by primitive peoples, Zargon retreated underground when they were wiped out by the Cynidiceans’ ancestors. Zargon remained in a strange hibernation until its original shrine’s foundations were uncovered during the pyramid’s construction, awakening it.
- Regeneration: Zargon can regenerate its body as long as its great horn is not destroyed.
- Regeneration from the bare horn may take years, but otherwise Zargon is likely to be at full strength whenever encountered.
- Zargon will not regenerate during an encounter (it regrows too slowly for that).
- Zargon’s horn can only be destroyed by being cast into a volcanic fire (like the Eye of Zargon in the underground city, area Q).
- Treasure: In the slime of Zargon’s lair is its accumulated treasure: 58,000 sp, 9000 pp, chain mail +2, a shield +2, a spear +2, a cursed scroll (turns the reader into a miniature of Zargon, 3′ tall, without regeneration: AC 9; hp as character; #AT 7; D 6 x 1-2/1-6), a wand of illusion with 7 charges, and elven cloak and boots.
THE UNDERGROUND CITY
If your players enjoyed the pyramid adventure, you might want to create further adventures near the Lost City. These adventures could take place within the vast underground city itself or out in the surrounding desert wilderness. A map of the underground city is provided for your use, and its most important features are briefly described below. Suggestions for additional adventures are also included at the end of this section.
The underground city was constructed in the catacombs beneath the old, ruined city after its destruction. Approximately 1000 adult Cynidiceans currently reside here.
KEY TO THE UNDERGROUND CITY
A: Underground Lake
Immediate Perception: You see a vast, dark body of water stretching into the gloom, its surface still and reflective. It smells fresh and clean, hinting at its purity.
Investigation Required:
- This deep, fresh-water lake serves as the primary water supply for Cynidicea.
- It’s fed by channels cut laboriously through solid rock, leading to hidden springs.
- Numerous fish inhabit the lake, providing the Cynidiceans with a consistent source of fresh meat.
B: The Island of Death
Immediate Perception: In the middle of the underground lake, you see a desolate island, its rocky surface riddled with dark caves. At its center stands a Stonehenge-like arrangement of massive, rough-hewn stone arches, silent and ancient.
Investigation Required:
- This island, and its stone arches, existed before the first Cynidiceans arrived. Its builders and original purpose remain a mystery.
- Rumors suggest it’s a place of great power.
- When the underground city was built, the Cynidiceans exhumed all bodies from the upper catacombs, burned them in a mass pyre, and re-buried the ashes on this island.
- Over time, the island became home to undead creatures and is now actively avoided by the Cynidiceans.
C: City Docks
Immediate Perception: Wooden docks extend out into the underground lake, forming a small harbor. Several simple, flat-bottomed boats are tied to the posts, bobbing gently on the dark water. The scent of fish and damp wood hangs in the air.
Investigation Required:
- These docks serve as the central point for the Cynidicean fishing fleet.
D: Water-Filled Chasm
Immediate Perception: The underground lake’s waters flow into a nearby, darker chasm, creating subtle currents. The surface looks deceptively calm, but there’s a hint of unseen danger beneath.
Investigation Required:
- Cynidicean fishermen actively avoid this chasm due to dangerous undertows and sharp rock ledges hidden just beneath the water’s surface.
E: Rock Bridges
Immediate Perception: Two natural rock arches span the water-filled chasm, forming sturdy-looking bridges. They appear solid and well-worn.
Investigation Required:
- These natural formations provide safe crossings over the treacherous chasm. They are indeed sturdy and show signs of regular use.
F: Mushroom Fields
Immediate Perception: You enter an area filled with an eerie, phosphorescent glow emanating from colossal fungi. Giant mushrooms, some taller than trees, grow in dense clusters, forming what resembles a strange, subterranean forest. The air is humid and smells of rich earth and damp fungi.
Investigation Required:
- The Cynidiceans farm mushrooms, edible fungi, and lichens here.
- These fields are poorly tended, overgrown and wild, more akin to natural forests than cultivated land.
G: Stock Pens
Immediate Perception: This area is a maze of crude, stockade-like pens constructed from thick, giant mushroom stalks. A faint, musky animal scent hangs in the air, mixed with the damp earth of the mushroom fields. Some pens appear empty or contain disturbing piles of bones, while others show signs of recent struggle, with broken walls and trampled earth leading into the fungal forest.
Investigation Required:
- The Cynidiceans herd giant underground animals for meat (aside from fish). Their primary livestock includes non-poisonous giant snakes, a type of cave locust, and giant rats.
- Like the mushroom fields, the animals are poorly tended.
- Some pens contain only dead animals, having been forgotten and unfed.
- In other pens, the animals have broken down the walls and now roam freely among the mushroom forests, posing a potential danger to unobservant travelers.
H: Water Channels
Immediate Perception: You see large channels, roughly 10 feet high and 10 feet wide, cut meticulously through the solid rock walls. A shallow stream, typically only 2-3 feet deep, flows through them. The sound of trickling water echoes softly.
Investigation Required:
- These channels were laboriously cut by the Cynidiceans to feed the underground lake.
- They lead under the desert surface to hidden springs.
- While usually shallow, these channels are prone to sudden, unpredictable floods.
I: Orpheus Park
Immediate Perception: A sandy path leads from a small beach into what appears to be a tranquil, if alien, park. A tiny stream trickles gently through the area from the underground lake. The landscape is a curious mix of giant mushrooms, some glowing softly, and strange, naturally formed rock formations that resemble abstract sculptures. The air is cooler and smells cleaner here.
Investigation Required:
- This park was built in honor of Orpheus, a wealthy citizen, when the underground city was first established. It serves as a quiet, natural retreat within the subterranean environment.
J: Main Streets
Immediate Perception: Two wide, well-maintained streets, paved with smooth stone, intersect near the middle of the city. They are lined with elegant marble columns, some of which bear faded carvings.
Investigation Required:
- These are the city’s main thoroughfares: Alexander Way and Zenobia Street, named after the ancient King Alexander and Queen Zenobia.
K: The Temple of Zargon
Immediate Perception: This is the largest and most imposing building in Cynidicea, a dark and ominous structure of crude, cyclopean stone. Its entrance is wide and foreboding. A low, guttural chanting can sometimes be faintly heard emanating from within. The air around it feels heavy and oppressive.
Investigation Required:
- This building houses the main temple dedicated to Zargon.
- It contains barred cells where prisoners are kept, presumably until they are fed to Zargon.
- Temple services are poorly attended, yet the Priests of Zargon remain the strongest power in the underground city, ruling through fear and fanaticism.
L: Stronghold of Gorm
Immediate Perception: A section of the city has been heavily fortified, with houses converted into a formidable stronghold surrounded by sturdy stone walls. Within the walled area, a large building rises, flanked by two imposing stone towers, bearing the stern, lightning-bolt symbol of Gorm.
Investigation Required:
- This is the fortified base of operations for the Brotherhood of Gorm.
M: Stronghold of Usamigaras
Immediate Perception: This area of the city has been transformed into a walled stronghold. A large central building dominates the compound, and smaller guard posts stand vigil at each corner of the encompassing wall, bearing the subtle star motif of Usamigaras.
Investigation Required:
- This is the fortified base of operations for the Magi of Usamigaras.
N: Stronghold of Madarua
Immediate Perception: The houses in this section of the city have been integrated into a formidable stronghold, marked by a single, large tower rising above its encompassing stone walls. The bronze emblem of the Warrior Maidens, a stern female face, adorns the tower’s entrance.
Investigation Required:
- This is the fortified base of operations for the Warrior Maidens of Madarua.
O: Goblin Cliff-Dwellings
Immediate Perception: On the far shore of the underground lake, sheer, imposing cliffs rise dramatically to a flat plateau above. Numerous dark caves are visible within the cliff faces, some with rough wooden ladders leading down, others showing faint handholds cut into the rock. The air carries a faint, unpleasant smell of unwashed bodies and crude fires.
Investigation Required:
- These caves are home to goblins and hobgoblins.
- Access is primarily by ladders, though some caves can be reached via handholds.
- Many of the caves are interconnected by tunnels within the cliffs.
- These cliff-dwellings also house more dangerous creatures: thouls, bugbears, ogres, and trolls.
P: The Wasteland
Immediate Perception: The top of the plateau is a stark, alien wilderness. Towering giant stalagmites rise from the ground like stone trees, while massive stalactites hang precariously from the unseen ceiling high above. Strange, twisted rock formations cast unsettling shadows. The air is warm and humid, carrying the distinct smell of sulfur, as geysers hiss steam and pools of thick, bubbling mud churn with ominous gurgles.
Investigation Required:
- This area is a dangerous, untamed expanse within the underground environment.
Q: The Eye of Zargon
Immediate Perception: In the midst of the wasteland’s strange formations, you see a large lava pit, its molten contents glowing with an intense, pulsating red light. The heat is palpable, and the air shimmers above the fiery abyss. It throbs with a baleful intensity, truly resembling a giant, malevolent eye.
Investigation Required:
- This lava pit is known as the “Eye of Zargon” due to its glowing red color, which resembles Zargon’s single eye.
- The approach to the crater is guarded by dangerous creatures, typically flame salamanders led by a lesser efreeti, or other creatures chosen by the DM. This is a highly hazardous area, crucial for Zargon’s ultimate defeat.
R: Entrance to the Lower Catacombs
Immediate Perception: A sturdy, ancient-looking building stands isolated, containing a massive stone slab that seems to seal an entrance. A complex system of heavy chains, pulleys, and a large winch is mounted nearby.
Investigation Required:
- This building houses the sealed entrance to the lower catacombs, which are said to hold terrible monsters.
- The huge stone slab can only be lifted by a special winch, using the pulleys and heavy chains.
- The underground city was built only in the upper catacombs because of the dangers below. You may use the lower catacombs for special, extended adventures.
S: Entrance to the Pyramid
Immediate Perception: You find a discreet passage leading into the rock, clearly a secret entrance. The air here is dustier, carrying a faint scent of old stone.
Investigation Required:
- Adventurers entering the underground city from the pyramid will emerge onto the map at point S.
- This passage also leads directly back to room 50 on Tier 5 of the pyramid.
- All of the factions within the underground city (Brotherhood of Gorm, Magi of Usamigaras, Warrior Maidens of Madarua) possess their own, separate secret entrances to the pyramid (these are not shown on the map).
FURTHER ADVENTURES
Once the pyramid has been thoroughly explored, you and your players might enjoy a special series of adventures set within the sprawling underground city. These suggestions share a common overarching goal: the rebuilding of the Cynidicean civilization by the player characters. Each adventure is designed to encourage different styles of play, allowing you and your players to try various approaches to the game. For simple dungeon delving, you can always open new tunnels to other catacomb areas.
Here are some adventure ideas:
1. Uniting the Cynidiceans
The players must find a way to bring order to the Underground City. While the safest approach involves uniting the factions of Gorm, Usamigaras, and Madarua, be open to other player actions. Typical player strategies could include:
- Forming an alliance against the evil Priests of Zargon: This involves convincing the three main factions to put aside their differences and launch a combined assault on the Temple of Zargon. Players might need to complete quests for each faction to gain their trust.
- Defeating all factions except the one they support: Players might choose to align strongly with one faction and systematically dismantle the others, consolidating power under their chosen banner. This could involve political maneuvering, espionage, or outright combat.
- Destroying all factions and taking over the underground city themselves: This is a more ambitious and potentially ruthless path, where the players seek to establish themselves as the new rulers of Cynidicea, likely through a combination of force and charisma.
2. Destroying Zargon’s Horn
This adventure assumes the player characters discover the truth about Zargon’s regeneration. If they are ever to be truly free of Zargon’s menace, its horn must be destroyed by casting it into the lava pit at the Eye of Zargon (Area Q). The party will need to:
- Organize a major expedition: This involves gathering resources, potentially recruiting allies from the factions, and meticulously planning their route through the dangerous Wasteland.
- Journey to the lava pit: Navigating the treacherous terrain of the Wasteland (Area P), with its giant stalagmites, stalactites, strange rock formations, geysers, and bubbling mud pools.
- Deal with the creatures guarding it: Overcoming the formidable flame salamanders and their lesser efreeti leader, or other guardians you choose to place there. Success hinges on strategic combat and perhaps even a daring stealth approach.
3. The Ambush
The Priests of Zargon attempt to ambush the party, possibly with the aid of the goblins and hobgoblins from the Cliff-Dwellings (Area O).
- Set the stage like any other adventure: Lull the players into a false sense of security.
- Spring the ambush at a critical moment: This should be a meticulously planned attack, combining missile fire from hidden positions, potent magic from the priests, and a coordinated melee assault by the hobgoblins and perhaps even larger brutes like ogres or trolls.
- Ensure a reasonable chance of survival: While challenging, the ambush shouldn’t be insurmountable. You should be able to gauge what your party can handle.
- Offer options for survival: If the ambush proves too strong, give the characters a chance to surrender or escape, perhaps by finding a hidden passage or exploiting a weakness in the attackers’ plan. This emphasizes wits over brute force in desperate situations.
4. Raid on the Temple of Zargon
Even without Zargon itself, the Priests of Zargon remain a formidable force in Cynidicea (Area K). This adventure can be triggered by several motivations:
- Revenge for Zargon’s defeat: If the player characters destroyed Zargon, its priests will undoubtedly seek retribution.
- Faction alliance: A faction the party has joined might attempt to raid the temple to weaken a common enemy or reclaim lost artifacts.
- Rescue mission: A kidnapped NPC, perhaps an important faction leader or an innocent Cynidicean, might be held prisoner within the temple’s barred cells.
- Emphasis on planning: Give the party a general map of the temple (Area K), but not the details of guardians, traps, or specific layouts. The focus should be on how they plan the raid—scouting, infiltration, diversion, and escape. This tests their strategic thinking and problem-solving skills.
5. The Prophecy
A relic of great power, belonging to one of the three major factions, lies hidden on the Island of Death (Area B). Its return to the stronghold of the rightful faction (Gorm, Usamigaras, or Madarua) will fulfill a part of a prophecy detailing Cynidicea’s recovery.
- Create the prophecy: Devise a short, cryptic verse that hints at the relic’s location and significance.
- Deliver the clue: Give the party a scrap of parchment with the prophecy on it. The words should serve as clues to the proper path that leads to the relic, perhaps referencing landmarks on the island or specific features of its history.
- The relic’s purpose: The relic itself should be powerful but “pass from play” once its specific purpose in fulfilling the prophecy is accomplished (e.g., providing a temporary boon, unlocking a new alliance, or revealing crucial information).
6. The Antidote
A cure for the dream-like state of the Cynidiceans is discovered. The main ingredient is a small white flower found only in certain areas of the lower catacombs.
- Access the lower catacombs: The players must figure out how to raise the massive stone slab at the Entrance to the Lower Catacombs (Area R) and venture into the unknown depths.
- Journey and encounters: After navigating a few perilous encounters in the dangerous lower catacombs (Dungeon Levels 4-6, as per your expanded monster tables), the party finally arrives in the proper area.
- Mysterious Guardian: They discover a mysterious guardian whom they must talk or trick into giving them the flowers. The idea here is to create a situation where traditional combat or brute force is insufficient.
- Test of Worthiness: The guardian could test the party’s wisdom, compassion, or resolve before providing the antidote. This might involve riddles, moral dilemmas, or a non-lethal challenge.
- Divine Intervention (Optional): The mysterious guardian might even be Gorm, Usamigaras, or Madarua in disguise, subtly guiding the party toward a greater destiny.
7. The True King
After the deaths of King Alexander and Queen Zenobia, the royal family did not die out entirely. A descendant of the royal line still lives, hidden within the underground city, but would be killed if discovered by the Priests of Zargon or rival factions.
- Protect and advise the heir: The party must protect and advise this non-player character, teaching them how to be a king or queen in a fragmented society.
- Long-term theme: This can run as a long-term theme throughout any of the other adventures, as the party subtly guides and prepares the royal heir until it is safe for them to reclaim the throne. This focuses on social interaction, intrigue, and long-term planning.
8. Leaving the Desert
The player characters began the adventure lost in a sandstorm. You can create a special wilderness adventure for them to find their way out of the desert.
- Wilderness exploration: This adventure would utilize wilderness travel rules (such as those found in the D&D Expert booklet) as the party navigates the vast, unforgiving desert.
- New challenges: Encounters could include desert monsters, nomadic tribes, hidden oases, ancient ruins (potentially leading to entirely new dungeons), or even the remnants of other lost civilizations. The goal is to escape the desert, but the journey itself is the adventure.
These ideas offer a framework for continued adventures in the Lost City, encouraging diverse playstyles and challenging your players in new ways. Which of these might pique your interest for your next session?
PART 6: NEW MONSTERS
Banshee
- Armor Class: 3
- Hit Dice: 5*
- Move: 150′ (50′)
- Attacks: Special wail
- Damage: 1-4/round
- No. Appearing: 1 (1)
- Save As: Fighter: 5
- Morale: 12
- Treasure Type: C
- Alignment: Neutral
Description: Banshees are pale, ghostly figures. Their shape is roughly humanoid, though longer and thinner than most humans, with glowing red eyes and a large, dark mouth. They are supernatural creatures that haunt certain families, warning them of an approaching death, or mourning a person after their death. Thus, they might be found guarding graves, catacombs, or tombs.
Combat: Banshees can only be harmed by magic or magical weapons. They are immune to sleep, charm, and hold spells. They are not undead and cannot be turned by clerics. Disturbed banshees attack with a special wail. All those within 30 feet of the wailing banshee take 1-4 points of damage each round automatically. Doors or walls will block the sound. A banshee will attack any living creature it sees and will continue to wail until it is destroyed or until intruders have fled.
Cynidiceans
- Armor Class: 9
- Hit Dice: 1
- Move: 120′ (40′)
- Attacks: 1
- Damage: 1-6
- No. Appearing: 1-6
- Save As: Fighter: 1
- Morale: Special
- Treasure Type: A
- Alignment: Chaotic
Description: Cynidiceans are a special type of normal human residing in the Lost City. They are characterized by pale skin, white hair, large eyes, and infravision. They wear colorful masks and bright clothing and carry short swords. Having lived underground for so long, they suffer a -1 penalty to hit when attacking in full sunlight (similar to goblins). They spend most of their time immersed in strange dream worlds. Special Cynidicean characters can be set up just like normal NPCs. More details on the Cynidiceans can be found in the DM’s Background in Part 1 of this module. A dozen example encounters are provided below; feel free to use these or create your own.
Cynidicean Encounters
- “Werewolf” Cynidicean:
- Immediate Perception: You encounter a single Cynidicean wearing a wolf mask. Upon seeing you, they drop to all fours, howl, sniff the air, and circle, behaving exactly like a wolf.
- Investigation Required: This Cynidicean (AC 9; NM; hp 3; MV 40′; #AT none; ML 7; AL C) believes they are a werewolf. They may attempt to bite if approached too closely. They genuinely think they cannot be harmed and will only show fear towards magic or silver weapons.
- “Demon-Slaying Clerics”:
- Immediate Perception: Three Cynidiceans approach, dressed in dark robes and unsettling devil masks. They carry incense burners from which foul-smelling smoke billows. They are yelling loudly and seem agitated.
- Investigation Required: These Cynidiceans think they are powerful clerics (AC 5; C3, C2, C1; hp 13, 9, 4; MV 30′, #AT 1; D 1-6; ML 8; AL C). They perceive the party as demons and will attempt to drive them off with loud cries and their noxious smoke. Their leader is Brother Theodeus.
- Silent Gifter:
- Immediate Perception: A single Cynidicean, dressed in bright green robes and a vibrant bird mask, walks slowly towards one party member. They offer a small pouch with a smile, then continue walking as if oblivious to any attempts at conversation.
- Investigation Required: This Cynidicean (AC 9; NM; hp 3; MV 40′; #AT 1; D 1-6; ML 11; AL C) is entirely unresponsive to interaction. The pouch contains a strange powder that smells distinctly of cloves, but it has no special properties.
- Panic-Stricken Refugees:
- Immediate Perception: A group of five Cynidiceans, wearing brightly colored robes and masks with human faces, spot the party. A look of terror crosses their masked visages, and they immediately turn and flee in a panicked scramble as you approach.
- Investigation Required: This group believes the party to be the same band of barbarian raiders who looted their city centuries ago. Their flight is driven by ingrained, fearful delusion.
- Invisible Snake Warning:
- Immediate Perception: Six Cynidiceans, clad in striped robes and camel masks, are slowly zigzagging down the hall in single file. They walk with extreme caution, occasionally pointing to empty spots on the floor and whispering.
- Investigation Required: They are attempting to avoid what they perceive as invisible snakes on the floor. They will try to show the party these non-existent snakes and warn them to walk around them. There are, of course, no actual snakes.
- “Bee” Healers:
- Immediate Perception: A party of four Cynidiceans wearing insect masks approaches, humming softly like bees. They carry large clay jars. They stop and invite the party to drink from their jars.
- Investigation Required: If anyone drinks, they find their wounds cured by 1-4 points of damage. These jars contain honey from the lair of killer bees, a true healing substance. However, if the Cynidiceans are attacked, or if someone tries to drink from a jar twice, they will smash the jars and attack berserkly (AC 9; NM; hp 3 each; MV 40′; #AT 1 at +2; D 1-6; ML 12; AL C).
- “Sick Friend” Guradians:
- Immediate Perception: A party of four Cynidiceans approaches, wearing animal masks: Hawk, Fish, Cat, and Fox (they also refer to themselves by these names). They are rushing, carrying a stretcher upon which rests a gourd.
- Investigation Required: They are transporting their “sick friend” (the gourd, which they call “Dog”) to a cleric. If the party has a cleric, the Cynidiceans will insist that the cleric cure their friend, believing the gourd to be genuinely ill.
- The “Royal” Attendants:
- Immediate Perception: A group of six Cynidiceans, in bright yellow robes and masks of human faces, stop and stare intently at the party. Their eyes widen in what seems to be awe or recognition.
- Investigation Required: They will “recognize” a party member as the long-lost King or Queen of Cynidicea. They will then follow that character, singing songs of praise and waiting on them hand and foot, smothering them with attention. However, they will not fight for their “monarch.” Instead, if danger arises, they are more likely to grab the character and try to rush them to perceived safety. They are AC 9; NM; hp 4 each; MV 40′; #AT 1; D 1-6; ML 7; AL C. Their spokesman is Policrates the Herald.
- Feathered Fliers:
- Immediate Perception: A group of four Cynidiceans in feathered robes and bird masks approaches. Upon seeing the party, they immediately begin to “fly” (run) forward, flapping their arms wildly and squawking like large birds.
- Investigation Required: They will invite the party to “fly” along and will lead them on a merry chase through the pyramid. If the party refuses, the Cynidiceans will insult them as “land-bound slugs” incapable of flight, circle three times, and then “fly” away. If attacked, these Cynidiceans (AC 9; NM; hp 4; MV 40′; Save: F1) will prioritize escape by “flying” away.
- Undertakers of the Dream:
- Immediate Perception: A group of six Cynidiceans, their bodies painted black and wearing vulture masks, walk quietly and purposefully toward the party. They carry long wooden boards, but their demeanor seems friendly and normal.
- Investigation Required: They will follow the party, patiently waiting for something to be killed. When a body falls, they will rush over and immediately begin constructing a custom-sized coffin for it. Once finished, they will demand a 10 gp payment for their services. They will attack (AC 9; NM; hp 4 each; MV 40′; #AT 1; D 1-6; ML 8; AL C) if they are not paid.
- Mistaken Identity (NPC Party):
- Immediate Perception: You encounter a well-equipped party of five Cynidiceans, looking alert and ready for trouble. Their expressions indicate they see you as a threat.
- Investigation Required: This is an NPC adventuring party, and they believe the player characters are some kind of monster. Roll on the Wandering Monster: Level 2 table in the D&D Basic rules (p. B55) to determine what monster type they perceive the player characters to be. The Cynidicean party consists of:
- F3: (AC 5; hp 14; MV 20′; #AT +1 at 1; D 1-8; Save F3; ML 8; AL C)
- F2: (AC 5; hp 10; MV 20′; #AT 1; D 1-8; Save F2; ML 8; AL C)
- F2: (AC 5; hp 8; MV 20′; #AT 1; D 1-8; Save F2; ML 8; AL C)
- M2: (AC 9; hp 6; MV 40′; #AT 1 or spells; D 1-4; Save M2; ML 8; AL C) Spells: hold portal, magic missile
- C2: (AC 5; hp 8; MV 20′; #AT 1: D 1-6; Save C2; ML 8; AL C) Spell: cure light wounds
- Zargon’s Zealots:
- Immediate Perception: A Priest of Zargon, clad in dark, tattered robes, approaches with a solemn, unwavering gaze. He is accompanied by twelve fanatic followers, their eyes glazed with devotion, carrying crude weapons.
- Investigation Required: The Priest of Zargon (AC 5; C3; hp 12; MV 20′; #AT 1; D 1-6; Save C3; ML 8; AL C; Spells: cure light wounds x2) and his twelve fanatic followers (AC 9; F1; hp 4 each; MV 40′; #AT 1; D 1-8; Save F1; ML 12; AL C) are on a “holy quest.” The priest will insist the party join them, subtly attempting to trick and take them prisoner for Zargon. Their fanatical devotion makes them highly dangerous.
Lycanthrope, Werefox
- Armor Class: 6 (9 in human form)
- Hit Dice: 3+2*
- Move: 180′ (60′ in fox form)
- Attacks: 1 + charm
- Damage: 1-6
- No. Appearing: 1-4 (1-6)
- Save As: Fighter: 3
- Morale: 8
- Treasure Type: C
- Alignment: Neutral
Description: Werefoxes are naturally cunning foxes capable of shifting into human form. In human guise, a werefox has distinctive fox-like red hair and an Armor Class of 9. They are clever and live primarily by their wits.
Combat & Abilities:
- Charm Person: In human form, a werefox can attempt to charm a person of the opposite sex. This ability functions like a charm person spell but lasts only one day.
- Charm Animals: In fox form, the werefox can charm animals, affecting any one normal or giant animal for one day.
- Charm Usage: The charm ability can be used only three times per day. For example, a werefox could attempt to charm two humans and one animal in the same day. Once a creature or person is charmed, they remain charmed for that day, even if the werefox changes form.
- Resilience: A creature or person who succeeds on a save vs. Spell will not be charmed.
- Tactics: Werefoxes prefer to trick or bribe their opponents rather than fighting to the death, especially if combat is going against them.
Polymar
- Armor Class: 9
- Hit Dice: 10*
- Move: 60′ (20′)
- Attacks: 3
- Damage: 1-6/1-6/1-6
- No. Appearing: 1-2 (1-3)
- Save As: Fighter: 5
- Morale: 10
- Treasure Type: B
- Alignment: Chaotic
Description: A polymar is a semi-intelligent creature with the remarkable ability to change its shape. It can perfectly mimic any creature with 10 Hit Dice or less, or any object no larger than 100 cubic feet (for example, a 10′ x 10′ x 1′ tapestry). The polymar gains no special abilities from its changed form; it only takes on the physical appearance.
Abilities & Detection:
- Physical Transformation: This shape-changing ability is purely physical, not magical. Therefore, a detect magic spell will not detect the polymar.
- Imperfect Mimicry: The change, however, is not absolutely perfect. Characters (including NPCs) have the same chance to detect a polymar as they do to find secret doors. Elves, for instance, are more likely to notice polymars than other character classes due to their keen senses.
- Surprise Attack: If the polymar is not detected before it initiates an attack, it will attack with surprise.
GLOSSARY
- Abyss: A deep crack or seemingly bottomless pit in the earth.
- Balance: An instrument used for weighing, featuring two small pans suspended from either end of a balancing crossbar. It levels when equal weights are placed in both pans.
- Brazier: A container designed to hold hot coals, often used for warmth, light, or burning incense.
- Catacomb: An underground tunnel network, frequently serving as a burial place.
- Carapace: A hard, shell-like covering that provides protection to the bodies of certain animals, such as beetles.
- Dais: A raised platform, typically reserved for a throne, seat of honor, or altar.
- Desecrate: To defile or destroy the ceremonial purity of a holy place, rendering it unfit for worship.
- Divan: A large, low couch, typically without armrests or a back, often used for reclining.
- Haunt: A spectral presence or a strange, unsettling image, often appearing as a ghost.
- Mosaic: A picture or design created by embedding small, colored pieces of stone or glass into a surface, typically mortar.
- Niche: A small, open hollow or recess in a wall, commonly used to display a statue or vase.
- Pallet: A simple, often makeshift, bed or mattress, frequently made of straw.
- Pedestal: A short column or base, usually supporting a vase, statue, or similar object.
- Pyre: A pile of combustible material, typically wood, arranged for burning a body as part of a funeral rite.
- Sarcophagus: A stone coffin, particularly one found in grand tombs. It often encases a smaller, usually wooden, coffin.
- Stalactite: An icicle-shaped mineral formation that hangs from the ceiling of a cave, formed by mineral-rich dripping water.
- Stalagmite: An upward-growing mineral formation on the floor of a cave, resembling an inverted icicle, created by dripping water from above.
- Step-pyramid: A type of pyramid constructed with several distinct, receding levels or tiers, each smaller than the one below it.
- Tier: In this module’s context, it refers to one of the distinct “steps” or levels of the pyramid structure.
- Urn: A vase, often decorative, frequently used to hold the ashes of the deceased.